Delightful No-Bake Cherry Angel Cloud Cake: Heavenly Treat
Delightful No-Bake Cherry Angel Cloud Cake: Heavenly Treat
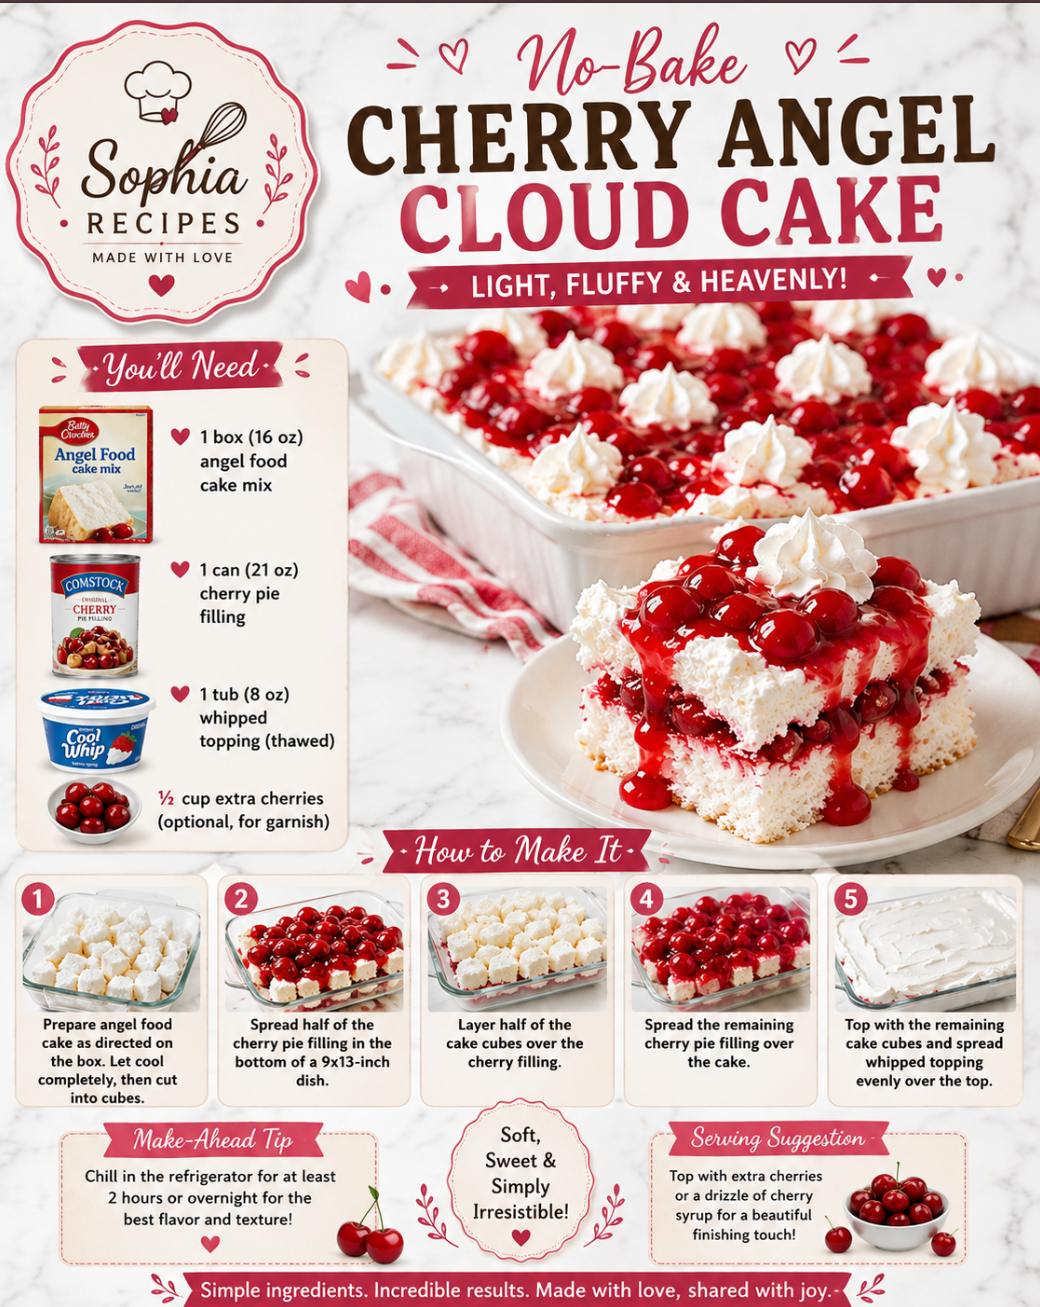
The No-Bake Cherry Angel Cloud Cake That Saved My Sanity
It was one of those long, stressful days where nothing seemed to go right. I was exhausted, cranky, and just wanted to curl up on the couch with a big slice of cake and forget the world for a while. That’s when I remembered this magical no-bake cherry angel cloud cake — my go-to comfort food that never fails to lift my spirits.
Follow me on HaileeRecipes on Pinterest for more easy, delicious recipes like this one. I’m Hailee Nova, a cozy down-to-earth food blogger who’s all about creating simple, wholesome dishes that bring people together. This no-bake cherry cake is the perfect example — it’s light, airy, and bursting with sweet cherry flavor, yet it comes together in just 30 minutes with no oven required. It’s the ultimate comfort food for those days when you need a little pick-me-up.
Why You’ll Love This Recipe
This no-bake cherry angel cloud cake is:
- Quick and easy to make — just 30 minutes of prep time, no baking required!
- Incredibly light and fluffy, with a melt-in-your-mouth texture.
- Bursting with fresh cherry flavor, perfect for summer or anytime you’re craving something sweet and fruity.
- A crowd-pleasing dessert that’s great for parties, potlucks, or cozy nights in.
- Customizable with fun add-ins and variations to suit your tastes.
Ingredients
**For the Cherry Filling:**
* 2 cups fresh or frozen pitted cherries
* 1/4 cup granulated sugar
* 2 tablespoons water
* 1 tablespoon cornstarch
**For the Whipped Cream Topping:**
* 1 cup heavy whipping cream, chilled
* 1/4 cup powdered sugar
* 1 teaspoon vanilla extract
**For the Cake Base:**
* 1 (3-ounce) package cherry-flavored gelatin
* 1 cup boiling water
* 1 (8-ounce) package cream cheese, softened
* 1 cup granulated sugar
Hailee’s Tip
For the best texture, make sure to use full-fat cream cheese and heavy whipping cream. Low-fat or non-fat versions won’t give you the same rich, creamy results.
Optional Add-Ins and Variations
This no-bake cherry cake is super versatile! Here are some fun ways to customize it:
- Chocolate Swirl: Melt 1/2 cup chocolate chips and drizzle it over the whipped cream topping.
- Almond Extract: Add 1/2 teaspoon of almond extract to the whipped cream for a lovely nutty flavor.
- Lemon Zest: Grate some lemon zest into the cherry filling or whipped cream for a bright, citrusy twist.
- Crushed Cookies: Sprinkle some crushed graham crackers, Oreos, or vanilla wafers on top for a fun crunchy texture.
- Fresh Berries: Top the cake with fresh raspberries, blueberries, or sliced strawberries for extra color and flavor.
Step-by-Step Method
1. Make the cherry filling: In a small saucepan, combine the cherries, sugar, water, and cornstarch. Bring to a simmer over medium heat, stirring frequently, until thickened, about 5 minutes. Remove from heat and let cool completely.
2. Make the gelatin layer: In a medium bowl, dissolve the cherry gelatin in the boiling water, stirring until fully dissolved. Let cool for 10 minutes.
3. Make the cream cheese layer: In a large bowl, beat the cream cheese and sugar with an electric mixer until smooth and creamy, about 2 minutes.
4. Assemble the cake: Spread the cream cheese mixture evenly into the bottom of an 8-inch square baking dish. Carefully pour the slightly cooled gelatin mixture over the top, making sure to spread it to the edges. Refrigerate for at least 2 hours, until set.
5. Make the whipped cream topping: In a large bowl, beat the heavy cream, powdered sugar, and vanilla with an electric mixer until stiff peaks form, about 3-5 minutes.
6. Spread the whipped cream evenly over the set gelatin layer. Refrigerate for at least 1 hour before serving.
What I Messed Up
The first time I made this, I accidentally let the gelatin mixture cool a bit too much before pouring it over the cream cheese layer. It ended up creating a thicker, more defined layer instead of blending seamlessly. Not a disaster by any means, but the texture wasn’t quite as light and airy as it should have been. Now I make sure to pour the gelatin over the cream cheese while it’s still slightly warm and fluid.
Common Mistakes to Avoid
– Not letting the gelatin layer set completely before adding the whipped cream. This can cause the layers to slide around and get messy.
– Overbeating the whipped cream, which can make it grainy and curdled. Be sure to stop mixing as soon as stiff peaks form.
– Using low-fat or non-fat dairy products, which won’t give you the same rich, creamy texture.
– Skimping on the cherry filling — you want enough to really shine through in every bite.
My Tested Substitutions
– For the cherry filling, you can use frozen cherries instead of fresh. Just thaw them first before cooking.
– If you can’t find cherry gelatin, you can use any other fruit-flavored gelatin, like raspberry or strawberry.
– Swap in Greek yogurt for some of the cream cheese for a tangier, lighter version.
– Try using a combination of heavy cream and mascarpone cheese for an extra-lush whipped topping.
How to Customize
The beauty of this no-bake cherry angel cake is how easy it is to customize to your tastes. Here are some ideas:
– Make it chocolate: Stir in 1/2 cup cocoa powder to the cream cheese layer.
– Go tropical: Use pineapple or mango in place of the cherries.
– Make it boozy: Add a splash of kirsch or cherry liqueur to the cherry filling.
– Make it gluten-free: Use gluten-free graham crackers or cookies for the crust.
– Make it dairy-free: Use coconut cream or cashew cream in place of the dairy products.
Serving Ideas
This no-bake cherry angel cake is the perfect light and refreshing dessert for summer gatherings, potlucks, or just a cozy night in. It’s delicious on its own, but also pairs beautifully with:
– Fresh berries or sliced stone fruit
– A drizzle of chocolate sauce or caramel
– A scoop of vanilla ice cream or whipped cream
– A sprinkle of chopped nuts or toasted coconut
Meal Prep & Storage
This no-bake cherry cake is great for making ahead of time. You can prepare the entire cake, cover it, and refrigerate it for up to 3 days before serving. The whipped cream topping may need a quick re-whip before serving if it’s been chilled for a while.
Leftovers will keep in the fridge for up to 5 days. You can also freeze individual slices for up to 2 months. Just thaw in the fridge overnight before serving.
Nutritional Breakdown
Per serving (based on 9 servings):
* Calories: 290
* Protein: 5g
* Carbs: 41g
* Fat: 14g
* Fiber: 1g
This no-bake cherry angel cake is a fairly indulgent dessert, but it’s still lighter and more refreshing than a traditional baked cake. The whipped cream and fresh cherries provide antioxidants, vitamins, and a boost of natural sweetness.
Final Thoughts
When I’m in need of a little comfort and joy, this no-bake cherry angel cloud cake is my go-to treat. It’s the perfect balance of sweet, tart, and creamy — a heavenly dessert that comes together in a flash with no oven required. Whether you’re serving it at a party or indulging in a slice on the couch, I hope this recipe brings you as much happiness as it does for me. Enjoy!
Ingredients
Method
- Make the cherry filling: In a small saucepan, combine the cherries, sugar, water, and cornstarch. Bring to a simmer over medium heat, stirring frequently, until thickened, about 5 minutes. Remove from heat and let cool completely.
- Make the gelatin layer: In a medium bowl, dissolve the cherry gelatin in the boiling water, stirring until fully dissolved. Let cool for 10 minutes.
- Make the cream cheese layer: In a large bowl, beat the cream cheese and sugar with an electric mixer until smooth and creamy, about 2 minutes.
- Assemble the cake: Spread the cream cheese mixture evenly into the bottom of an 8-inch square baking dish. Carefully pour the slightly cooled gelatin mixture over the top, making sure to spread it to the edges. Refrigerate for at least 2 hours, until set.
- Make the whipped cream topping: In a large bowl, beat the heavy cream, powdered sugar, and vanilla with an electric mixer until stiff peaks form, about 3-5 minutes.
- Spread the whipped cream evenly over the set gelatin layer. Refrigerate for at least 1 hour before serving.