Red White and Blue Ice Cream Float Recipe
Red White and Blue Ice Cream Float Recipe
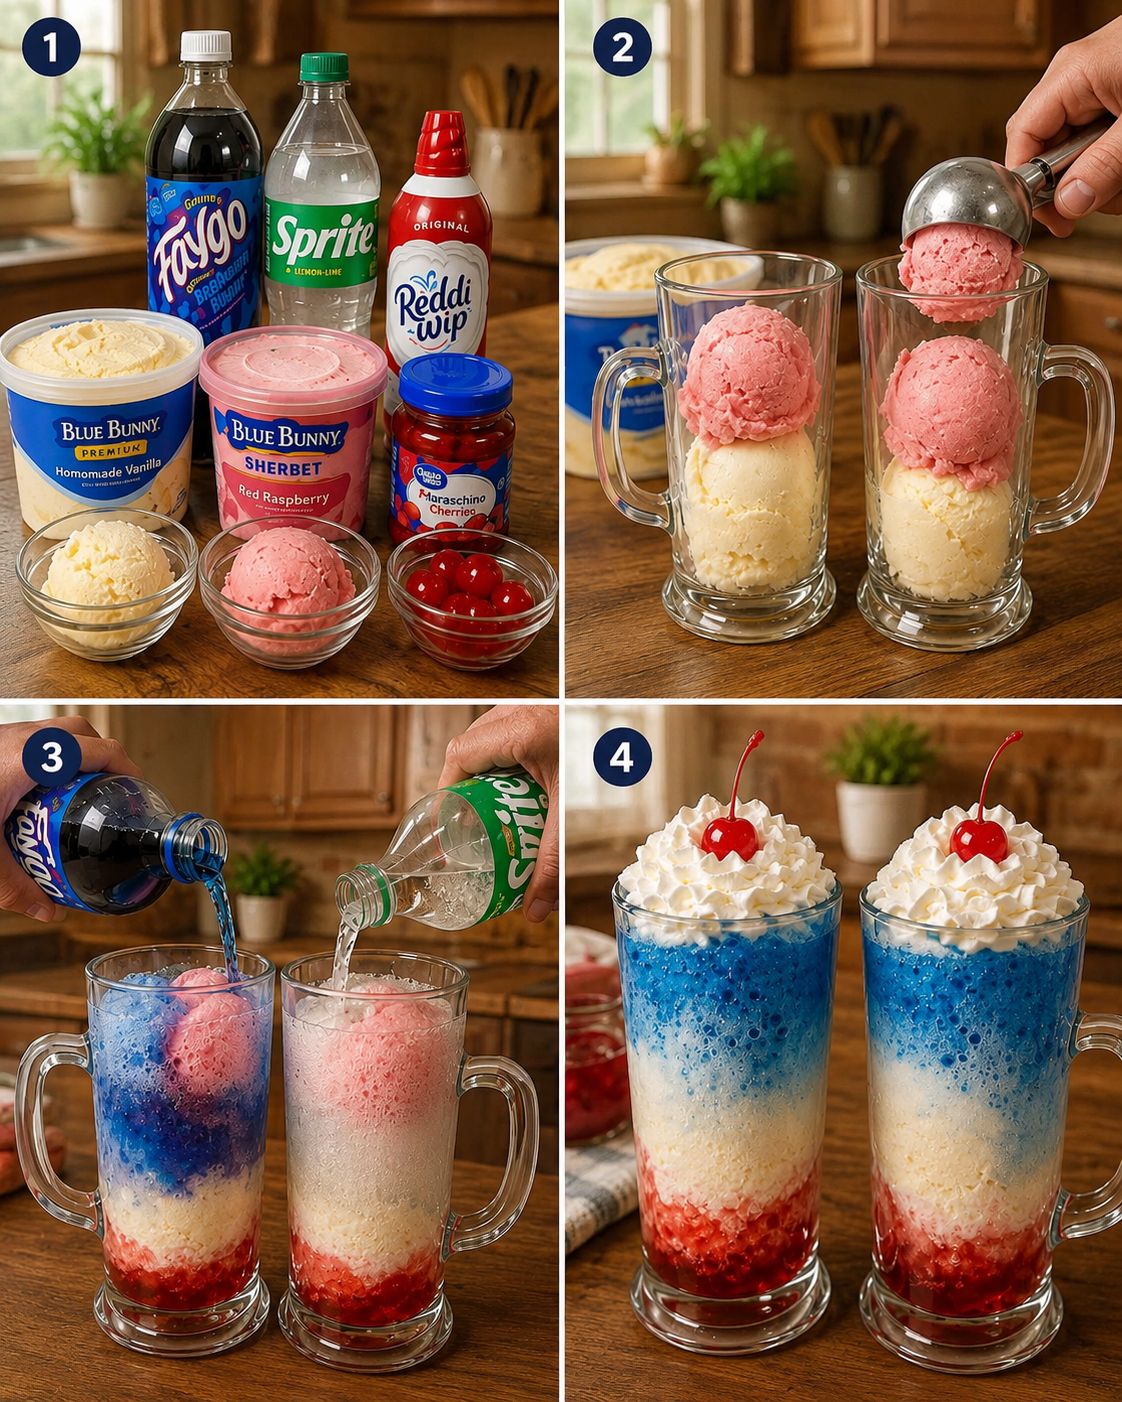
Red White and Blue Ice Cream Float: A Patriotic Treat That Tastes Like Summer
I have this memory from when I was about eight years old. My grandpa took me to this old-fashioned ice cream parlor on the Fourth of July, and I ordered something called a “Patriotic Float.” It was basically vanilla ice cream floating in cream soda with whipped cream on top, but to my eight-year-old brain, it felt like I was drinking liquid freedom. The fizz, the sweetness, the way the ice cream melted into the soda—it was pure magic.
Fast forward to last summer, and I was craving that exact feeling again. So I decided to recreate it, but with a grown-up twist. I layered fresh strawberries, blueberries, and a touch of white chocolate into the mix, and suddenly I had a Red White and Blue Ice Cream Float that felt both nostalgic and sophisticated. My friends went absolutely wild for it. One of them literally said, “This is what summer tastes like,” and I knew I had to share it with you all.
A Red White and Blue Ice Cream Float is exactly what it sounds like: a patriotic dessert drink that combines vanilla ice cream, your choice of soda or sparkling beverage, and fresh berries arranged in red, white, and blue colors. It’s perfect for Fourth of July parties, summer gatherings, or literally any day when you want something that feels celebratory without requiring you to actually cook anything complicated. This recipe works for kids, adults, people with dietary restrictions (I’ll show you how), and honestly, anyone who loves ice cream and nostalgia.
If you’re looking for more summer recipes like this, follow me on HaileeRecipes on Pinterest—I’m always pinning cozy, easy recipes that feel special without the stress.
Why You’ll Love This Recipe
Let me be real with you: this isn’t a recipe that requires skill or timing or three trips to specialty stores. It’s a recipe that requires you to have good ice cream, fresh berries, and something fizzy on hand. That’s it.
What makes it genuinely worth making is how it hits on every level. It’s visually stunning—those red strawberries, white whipped cream, and blue blueberries actually look like a celebration. It tastes like childhood nostalgia mixed with grown-up flavors. It’s customizable to whatever you have in your kitchen. And it takes about five minutes to throw together, which means you can make it on a Tuesday night without guilt.
Plus, there’s something about serving a float that makes people smile. It feels special and indulgent, but it’s also just ice cream and soda. That’s the sweet spot I always aim for in my kitchen.
Ingredients
- 2 scoops vanilla ice cream (or your favorite flavor—I’ll explain alternatives later)
- 1 cup cream soda, ginger ale, or sparkling lemonade (whatever sounds good to you)
- ½ cup fresh strawberries, sliced or halved
- ½ cup fresh blueberries
- 2 tablespoons whipped cream (homemade or store-bought)
- 1 tablespoon white chocolate shavings (optional but adds that “white” element)
- A pinch of red food coloring (optional, for a more vivid strawberry layer)
- Fresh mint leaf (for garnish, optional)
Hailee’s Tip: Buy your ice cream a day or two before you plan to make this. Ice cream that’s been in your freezer for a bit is easier to scoop and won’t melt as fast when you add the cold soda.
Hailee’s Tip: If you can’t find fresh berries, frozen berries work too. Just thaw them slightly and drain any excess liquid so they don’t water down your float.
Hailee’s Tip: Cream soda is my go-to because it’s sweet and pairs beautifully with berries, but honestly, use whatever you have. I’ve made these with root beer, ginger ale, and even sparkling cider, and they’re all delicious.
Optional Add-Ins and Variations
Here’s where you get to make this recipe your own. I love the base version, but I also love playing around with what goes into the glass.
- Berry compote layer: Simmer your berries with a little sugar and lemon juice for 5 minutes, let it cool, and layer it at the bottom of the glass before adding the soda. It’s fancier and feels more intentional.
- Alcohol version: Add a splash of vodka or rum to the soda for an adult float. Honestly, this is how I make them when friends come over.
- Chocolate drizzle: Drizzle a little chocolate syrup on the inside of the glass before adding anything else. It creates a pretty swirl and adds richness.
- Coconut whipped cream: Swap regular whipped cream for coconut whipped cream if you want a tropical vibe.
- Edible glitter: I know, I know, but a tiny sprinkle of edible glitter actually looks amazing and makes it feel extra festive.
Step-by-Step Method
Step 1: Choose your glass. I use a tall, clear glass because you want to see all those pretty layers. A regular drinking glass works fine, but if you have a fun sundae glass or milkshake glass, use that. This is about feeling special.
Step 2: Layer your berries. Add your strawberry slices to the bottom of the glass first. I usually do about a quarter cup, arranged so they’re visible through the glass. This is your “red” layer. Don’t stress about making it perfect—imperfect looks more homemade and real.
Step 3: Add the ice cream. Scoop two generous scoops of vanilla ice cream and nestle them right on top of the strawberries. If your ice cream is too hard to scoop, run your scooper under warm water for a few seconds. Life’s too short to wrestle with frozen ice cream.
What I messed up: The first time I made this, I added the soda immediately after the ice cream, and it exploded all over my kitchen. The ice cream was too cold, the soda was too fizzy, and I wasn’t paying attention. Now I add the blueberries first, which gives the soda something to settle into.
Step 4: Add the blueberries. Scatter your blueberries around and on top of the ice cream. This is your “blue” layer. They’ll sink a bit as the ice cream melts, which is fine—that’s part of the charm.
Step 5: Pour the soda slowly. This is the key moment. Pour your cream soda (or whatever fizzy drink you’re using) slowly and deliberately down the side of the glass. Watch it fill in around the ice cream and berries. It should fizz a little, but not aggressively. If it starts bubbling over, just stop for a second and let it settle.
Step 6: Top with whipped cream. Add a generous dollop of whipped cream to the top. This is where you get to be generous and a little messy. Whipped cream is forgiving.
Step 7: Add your white elements. Sprinkle white chocolate shavings on top of the whipped cream, or add a few more strawberry slices for visual contrast. Garnish with a mint leaf if you’re feeling fancy.
Step 8: Drink it immediately. This is important. Ice cream floats are best enjoyed right away, while everything is cold and the soda is still fizzy. Grab a long spoon, a straw, or both, and dive in.
Common Mistakes to Avoid
Using melted or overly soft ice cream: If your ice cream is too soft, it’ll dissolve into the soda and you’ll lose that satisfying texture contrast. Keep it in the freezer until the last second.
Pouring the soda too fast: I know I mentioned this, but it bears repeating. Fast pour equals overflow. Slow and steady wins the race here.
Forgetting to taste as you go: If you’re making this for a crowd, make one for yourself first. Taste it. Make sure the ratio of ice cream to soda feels right to you. Everyone’s preference is different, and there’s no “wrong” way to do this.
Using berries that are past their prime: Sad, mushy berries make sad, mushy floats. Use fresh berries or thawed frozen berries that still have some structure.
My Tested Substitutions
Ice cream flavors: I love vanilla as the base, but I’ve also made these with strawberry ice cream, blueberry ice cream, and even butter pecan. Chocolate ice cream works too, though it changes the vibe from “patriotic” to “decadent chocolate berry float.”
Soda options: Cream soda is my favorite, but ginger ale adds spice, root beer adds earthiness, and sparkling lemonade adds brightness. Even sparkling water works if you want something less sweet.
Whipped cream: Homemade whipped cream is best, but store-bought is totally fine. I’ve also used Greek yogurt whipped with a little honey for a tangier version.
Berries: If fresh berries aren’t available or are expensive, frozen berries work. You can also use raspberry jam swirled into the glass, or even fresh cherries if you want to get creative.
For dairy-free: Use dairy-free ice cream and coconut whipped cream. The float will taste just as good, I promise.
How to Customize
The beauty of a float is that it’s inherently customizable. Make it yours by thinking about what flavors you love.
If you like things more decadent: Add chocolate syrup, use chocolate ice cream, or drizzle the glass with caramel before you start assembling.
If you like things more fruity: Make a berry compote (simmer berries with sugar and lemon for 5 minutes) and layer it in the glass before adding the soda.
If you like things more tropical: Use coconut ice cream, pineapple soda, and fresh mango instead of berries.
If you like things more boozy: Add a shot of vodka, rum, or bourbon to the soda. Bourbon and vanilla ice cream with blueberries is genuinely incredible.
Serving Ideas
I serve these at almost every summer gathering I host. Here’s what works best:
- Fourth of July parties: Make a whole batch and set up a float bar where people can customize their own. It’s interactive and fun.
- Casual dinner nights: Serve one at the end of dinner as a light dessert. It feels special without being heavy.
- Afternoon snack: Make one on a hot day when you want something cold and sweet but not too serious.
- Date night: Make two and enjoy them together. There’s something romantic about sharing a nostalgic treat.
- Kids’ parties: Set out the ice cream, soda, and berries and let kids build their own. They’ll be entertained and fed.
Meal Prep and Storage
Here’s the thing about floats: you can’t really make them ahead. They’re best enjoyed fresh and cold, right after you assemble them. But you can prep the components ahead of time.
The day before: Wash and slice your strawberries. Store them in an airtight container in the fridge. Wash your blueberries and store them separately. Make sure your ice cream is in the freezer.
A few hours before: Chill your glasses in the freezer. Seriously, this makes a difference. A cold glass keeps everything cold longer.
Right before serving: Assemble the floats one at a time. This takes about two minutes per float and ensures everything stays cold and fizzy.
If you have leftover berries, eat them as a snack or throw them into smoothies. If you have leftover whipped cream, use it on pie or coffee. Nothing goes to waste.
Nutritional Breakdown
Let’s be honest: this isn’t a health food. It’s a treat. But here’s what’s actually in one float, roughly speaking.
A typical Red White and Blue Ice Cream Float contains about 280–320 calories, depending on your exact ice cream and soda choices. Most of those calories come from the ice cream and sugar in the soda. The berries add fiber and vitamins, so at least there’s that. The whipped cream adds a little fat, which makes it taste better and keeps you satisfied.
If you want to lighten it up: use low-fat ice cream, use diet soda, skip the whipped cream, or add more berries. But honestly, if you’re making this, you’re probably not worried about the calorie count. You’re worried about enjoying yourself. And that matters too.
Final Thoughts
I think the reason I love this recipe so much is because it doesn’t try to be something it’s not. It’s not a complicated dessert that requires culinary school. It’s not a health food masquerading as indulgence. It’s just a genuinely delicious, visually beautiful, nostalgic treat that takes five minutes to make and tastes like summer.
Every time I make a Red White and Blue Ice Cream Float, I think about my grandpa taking me to that ice cream parlor. I think about how simple happiness can be. And I think about how good it feels to make something that makes people smile.
So go ahead. Make one. Make a few. Invite someone over and make them together. Customize it until it feels like yours. That’s what cooking is really about—not following rules perfectly, but making something that brings you joy and tastes good.
I’d love to hear how you make yours. Come find me on Pinterest or just make this for someone you love and know that you’re creating a memory they’ll think about for years to come.
Happy float-making, friends.
—
Recipe Card
Red White and Blue Ice Cream Float Recipe
Ingredients
Method
- Add sliced strawberries to the bottom of a tall, clear glass.
- Scoop two generous scoops of vanilla ice cream on top of the strawberries.
- Scatter blueberries around and on top of the ice cream.
- Slowly pour the soda down the side of the glass, watching it fill in around the ice cream and berries.
- Top with a generous dollop of whipped cream.
- Sprinkle white chocolate shavings on top and garnish with a mint leaf if desired.
- Serve immediately with a long spoon and straw.