No Bake Summer Pies | Cool & Creamy Recipes
No Bake Summer Pies | Cool & Creamy Recipes
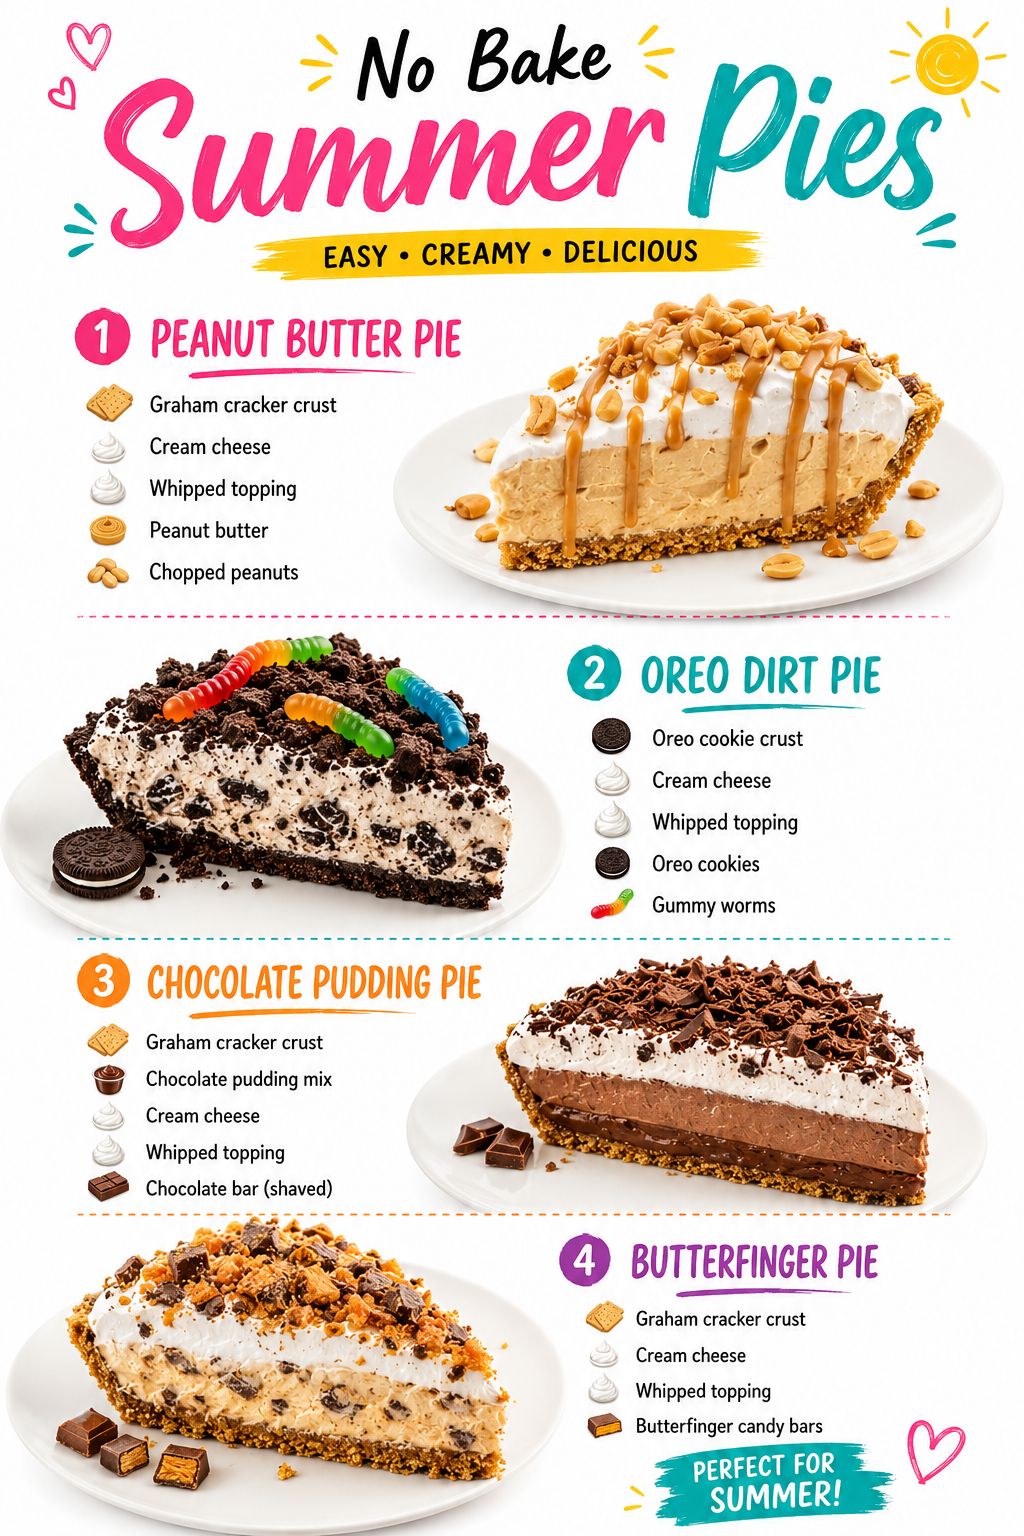
Summer is the perfect time to skip the oven and let your no bake summer pies do all the work. I’m talking about desserts that come together in minutes, chill while you’re out enjoying the sunshine, and taste absolutely incredible when you bring them to the table. Whether you’re hosting a backyard gathering or just craving something cool and indulgent, these recipes are total game-changers.
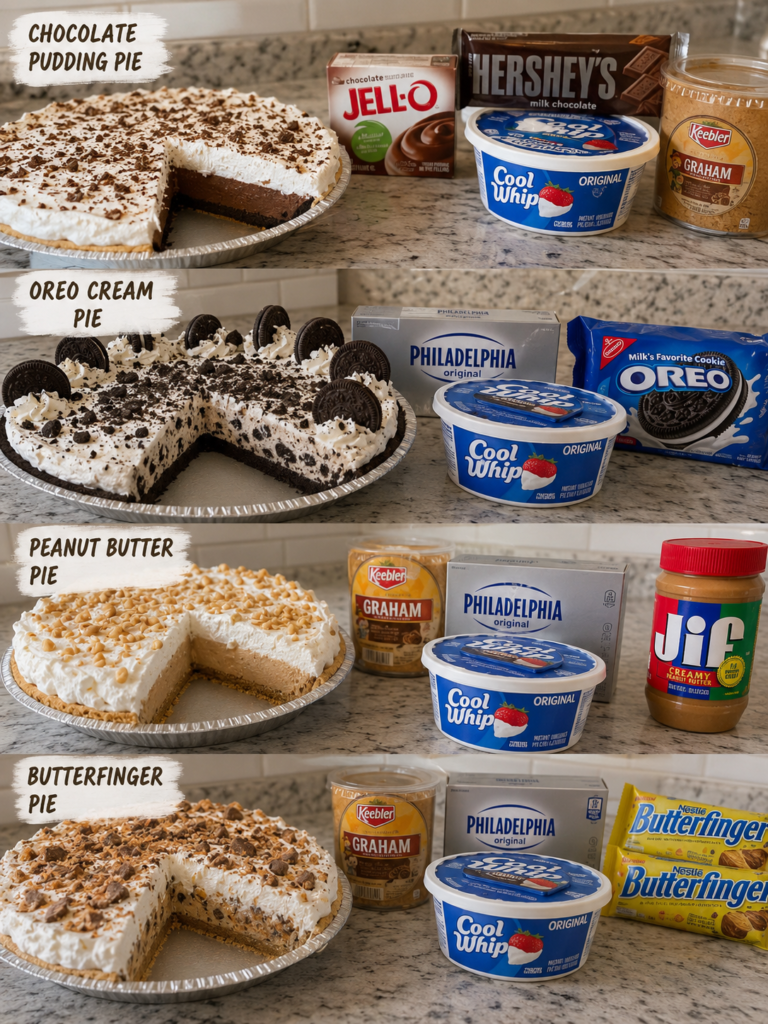
I’ve rounded up four of my absolute favorite no bake pies that my family requests year after year: a creamy Peanut Butter Pie, an indulgent Oreo Dirt Pie, a silky smooth Chocolate Pudding Pie, and a crunchy Butterfinger Pie. Each one is different enough to keep things interesting, but they all share that same easy, stress-free vibe that makes summer cooking actually enjoyable. These are the kinds of recipes worth saving and making again and again.
If you love easy desserts as much as I do, I’d love for you to Follow me on HaileeRecipes on Pinterest where I’m constantly sharing recipes that make life simpler and more delicious. Now let’s dive into these no bake beauties and find your new favorite summer pie.
1. Peanut Butter Pie
This creamy peanut butter pie is the ultimate no-bake dessert for warm weather entertaining. Rich peanut butter filling sits atop a buttery graham cracker crust and is topped with a cloud of whipped cream and chocolate drizzle. The combination of sweet, salty, and smooth textures creates an indulgent treat that tastes like peanut butter cup pie. It’s perfect for summer potlucks, barbecues, or whenever you want an impressive dessert without turning on the oven. This pie comes together in minutes and requires only basic ingredients you likely have on hand.
Why You’ll Love It
- Completely no-bake, requiring zero oven time and minimal effort.
- Ready to serve in just 4 hours of chilling, making it perfect for last-minute gatherings.
- Uses simple pantry staples that most home cooks already have available.
Ingredients
- 1 1/2 cups graham cracker crumbs
- 6 tablespoons melted butter
- 3 tablespoons sugar
- 1 cup creamy peanut butter
- 8 ounces cream cheese, softened
- 1 cup powdered sugar
- 1 1/2 cups heavy whipping cream
- 2 tablespoons cocoa powder
- 2 ounces chocolate, melted
How To Make It
- Combine graham cracker crumbs, melted butter, and sugar in a bowl and mix until the texture resembles wet sand. Press firmly into a 9-inch pie dish, covering the bottom and sides. Refrigerate while preparing the filling.
- In a large mixing bowl, beat softened cream cheese and peanut butter together until smooth and well combined, about 2 minutes.
- Add powdered sugar to the peanut butter mixture and beat until light and fluffy, approximately 3 minutes.
- In a separate bowl, whip the heavy cream to stiff peaks using an electric mixer.
- Gently fold the whipped cream into the peanut butter mixture in two additions, being careful not to deflate the cream.
- Pour the filling into the prepared crust and smooth the top with a spatula.
- Refrigerate for at least 4 hours or until firm enough to slice cleanly.
- Drizzle melted chocolate over the top just before serving for an elegant presentation.
Variations And Substitutions
For a chocolate peanut butter version, add 1/4 cup cocoa powder to the filling and reduce powdered sugar to 3/4 cup. Replace the graham cracker crust with a chocolate cookie crust using crushed Oreos for deeper flavor. Swap creamy peanut butter for crunchy peanut butter if you prefer texture. For a lighter version, use whipped cream cheese or substitute half the heavy cream with Greek yogurt. Add 1 teaspoon vanilla extract to the filling for extra depth.
Make-Ahead, Storage, And Serving Tips
This pie can be made up to 2 days in advance, making it ideal for meal planning. Store it covered in the refrigerator to prevent it from absorbing odors. For best results, slice with a hot, wet knife wiped clean between cuts for neat portions. The pie can be frozen for up to 1 month; thaw in the refrigerator overnight before serving. If the filling seems too soft after chilling, place it in the freezer for 30 minutes before serving. Serve directly from the refrigerator for the creamiest texture.
2. Oreo Dirt Pie
This decadent no-bake dessert combines crushed Oreos with creamy chocolate and vanilla layers for an indulgent treat that tastes like chocolate cake meets cookies and cream. The “dirt” topping of crumbled Oreos adds delightful texture and visual appeal, while the rich filling stays perfectly creamy without any baking required. It’s ideal for hot summer days when turning on the oven is the last thing you want to do, and it impresses guests with minimal effort. The combination of textures and flavors makes this pie a nostalgic favorite that works for casual family dinners or special occasions.
Why You’ll Love It
- No oven needed, just refrigerator time for a restaurant-quality dessert
- Requires only basic ingredients you likely have on hand
- Crowd-pleasing chocolate and cookie flavor appeals to all ages
Ingredients
- 24 Oreo cookies, divided
- 4 tablespoons unsalted butter, melted
- 8 ounces cream cheese, softened
- 1 cup heavy whipping cream
- 1/2 cup powdered sugar
- 1/2 cup chocolate pudding mix (instant)
- 1 1/2 cups cold milk
- 1 teaspoon vanilla extract
How To Make It
- Crush 16 Oreos into fine crumbs and combine with melted butter, then press firmly into a 9-inch pie dish to form the crust. Refrigerate for 15 minutes.
- Beat softened cream cheese with powdered sugar and vanilla extract until smooth and fluffy, about 2 minutes.
- Whip heavy cream to stiff peaks in a separate bowl, then gently fold into the cream cheese mixture until no streaks remain.
- Whisk together chocolate pudding mix and cold milk until thickened, about 1 minute.
- Spread the cream cheese mixture evenly over the chilled crust, then carefully spread the chocolate pudding layer on top.
- Crush the remaining 8 Oreos into chunky pieces and sprinkle generously over the pudding layer to create the “dirt” topping.
- Refrigerate for at least 4 hours or overnight until the pie is set and chilled throughout.
Variations And Substitutions
Swap the chocolate pudding for vanilla pudding and add a layer of chocolate ganache for a different flavor profile. Use crushed chocolate wafer cookies instead of Oreos for a slightly less sweet option. For a peanut butter twist, mix peanut butter into the cream cheese layer. You can also replace some of the heavy cream with Greek yogurt for a tangier taste and lighter texture.
Make-Ahead, Storage, And Serving Tips
This pie is best made 1 to 2 days ahead, allowing flavors to meld and textures to set completely. Store covered in the refrigerator for up to 3 days. Do not freeze, as the texture becomes icy. Serve slices directly from the refrigerator with a warm knife dipped in hot water between cuts for clean slices. If the crust becomes too soft, briefly chill the pie before serving.
3. Chocolate Pudding Pie
This classic Chocolate Pudding Pie delivers rich, silky chocolate flavor in a no-bake format that’s perfect for summer entertaining. The combination of a buttery cookie crust, creamy pudding filling, and whipped cream topping creates irresistible layers of texture and taste. It’s an ideal dessert when you want something elegant but don’t want to turn on the oven, and it comes together in just 15 minutes of hands-on time. Serve it chilled for the best flavor and texture, making it a crowd-pleasing option for picnics, potlucks, and warm-weather gatherings.
Why You’ll Love It
- No baking required, so you can make it during the hottest part of the day without heating up your kitchen.
- Ready to serve in under 30 minutes, making it perfect for last-minute dessert needs.
- Naturally gluten-free when using gluten-free cookies, and easily customizable for dietary preferences.
Ingredients
- 2 cups chocolate cookie crumbs, such as Oreos
- 6 tablespoons melted butter
- 3 cups whole milk
- 6 tablespoons unsweetened cocoa powder
- 1/2 cup granulated sugar
- 3 tablespoons cornstarch
- 1/4 teaspoon salt
- 1 teaspoon vanilla extract
- 2 cups heavy whipping cream
- 2 tablespoons powdered sugar
How To Make It
- Mix chocolate cookie crumbs with melted butter until the texture resembles wet sand, then press firmly into a 9-inch pie dish to form an even crust. Refrigerate while preparing the filling.
- In a medium saucepan, whisk together cocoa powder, granulated sugar, cornstarch, and salt to combine evenly and break up any lumps.
- Gradually pour in milk while whisking constantly to create a smooth mixture without lumps, then place the pan over medium heat.
- Cook while stirring frequently for 8 to 10 minutes until the mixture thickens and comes to a gentle boil, then remove from heat and stir in vanilla extract.
- Pour the warm chocolate pudding into the prepared crust and smooth the top with a spatula, then refrigerate for at least 15 minutes until cooled.
- In a separate bowl, whip heavy cream with powdered sugar until stiff peaks form using an electric mixer.
- Spread or pipe the whipped cream over the cooled chocolate filling, creating decorative peaks if desired.
- Refrigerate the finished pie for at least 2 hours before serving to allow flavors to meld and the texture to set properly.
Variations And Substitutions
For a mocha twist, replace 1/2 cup of milk with strong brewed coffee. Use graham crackers or digestive biscuits instead of chocolate cookies for a different flavor profile. Add 2 tablespoons of espresso powder to intensify the chocolate flavor, or stir in 1/2 teaspoon of peppermint extract for a chocolate-mint version. You can also layer the filling with a thin layer of peanut butter mousse for added richness, or top with chocolate shavings and crushed cookies instead of whipped cream.
Make-Ahead, Storage, And Serving Tips
Prepare the crust up to one day in advance and store it covered in the refrigerator. The pudding filling can be made several hours ahead and refrigerated separately, then assembled just before serving for the best texture. The finished pie keeps well covered in the refrigerator for up to three days. For cleaner slices, dip your knife in hot water and wipe it clean between cuts. If the whipped cream topping weeps or separates, you can make a stabilized whipped cream by adding 1 tablespoon of cream cheese or 1/2 teaspoon of gelatin dissolved in 1 tablespoon of water.
4. Butterfinger Pie
This indulgent no-bake Butterfinger Pie combines a buttery graham cracker crust with a creamy peanut butter filling studded with crushed Butterfinger candy bars. The result is a dessert that’s crispy, creamy, and utterly addictive—perfect for summer potlucks, barbecues, or whenever you need an impressive dessert without turning on the oven. The contrast between the smooth filling and crunchy candy pieces makes every bite satisfying, while the no-bake method means you can prepare it ahead and enjoy it straight from the refrigerator on hot days.
Why You’ll Love It
- No oven required, making it ideal for keeping your kitchen cool during summer months.
- Combines two beloved flavors—peanut butter and Butterfinger candy—for an irresistible taste.
- Can be prepared up to two days in advance, perfect for entertaining without last-minute stress.
Ingredients
- 2 cups graham cracker crumbs
- 6 tablespoons melted butter
- 3 tablespoons sugar
- 8 ounces cream cheese, softened
- 1 cup creamy peanut butter
- 1 cup powdered sugar
- 2 cups whipped topping, such as Cool Whip
- 6 Butterfinger candy bars, crushed and divided
- 1 teaspoon vanilla extract
How To Make It
- Combine graham cracker crumbs, melted butter, and sugar in a bowl, mixing until the texture resembles wet sand. Press firmly into a 9-inch pie dish, covering the bottom and sides evenly. Refrigerate while preparing the filling.
- In a large bowl, beat softened cream cheese and peanut butter together until smooth and well combined, about 2 minutes.
- Add powdered sugar and vanilla extract to the peanut butter mixture, beating until light and fluffy, approximately 1 minute.
- Gently fold in the whipped topping using a spatula until no white streaks remain, being careful not to deflate the mixture.
- Reserve about one-third of the crushed Butterfinger pieces for topping. Fold the remaining crushed candy into the filling until evenly distributed.
- Spoon the filling into the prepared crust, smoothing the top with a spatula. Sprinkle the reserved Butterfinger pieces over the surface.
- Refrigerate for at least 4 hours, or until the filling is set and firm to the touch.
Variations And Substitutions
For a chocolate twist, add 2 tablespoons of cocoa powder to the filling or drizzle melted chocolate over the top before serving. Substitute the graham cracker crust with a chocolate cookie crust for deeper flavor. If you prefer less sweetness, reduce the powdered sugar to three-quarters cup. You can also swap Butterfinger bars for crushed Snickers, Reese’s Pieces, or Heath bars depending on your candy preference. For a dairy-free version, use coconut cream instead of whipped topping and dairy-free cream cheese.
Make-Ahead, Storage, And Serving Tips
This pie can be prepared up to two days in advance and stored covered in the refrigerator. For best texture, keep it chilled until serving, as the filling softens quickly at room temperature. Slice with a sharp knife dipped in hot water and wiped clean between cuts for neat portions. Leftover pie keeps refrigerated for up to three days. If the pie becomes too soft before serving, place it in the freezer for 30 minutes to firm up. For a frozen dessert option, wrap the entire pie and freeze for up to one month; thaw in the refrigerator for 4 hours before serving.
Final Thoughts
No bake summer pies are the perfect answer to those hot days when turning on the oven feels like a crime. Whether you’re drawn to the bright freshness of berry fillings, the tropical vibes of coconut cream, or the rich indulgence of chocolate, there’s a recipe here waiting to become your new favorite. These pies require minimal effort but deliver maximum flavor and impressive presentation that will have everyone asking for your secret.
Pick one recipe that speaks to you and give it a try this week. Start with whatever filling sounds most appealing or whatever ingredients you already have on hand. Once you experience how simple and rewarding these pies can be, you’ll find yourself making them again and again throughout the season. Your future self will thank you for discovering such an easy way to bring homemade dessert to the table.
Peanut Butter Pie
Ingredients
Method
- Mix graham cracker crumbs, sugar, and melted butter in a bowl until combined.
- Press the mixture firmly into a 9-inch pie dish to form the crust.
- Bake at 350°F for 10 minutes until lightly golden, then cool completely.
- Beat peanut butter, cream cheese, powdered sugar, and vanilla extract together until smooth and fluffy.
- In a separate bowl, whip heavy whipping cream to stiff peaks.
- Gently fold the whipped cream into the peanut butter mixture until fully combined.
- Spoon the filling into the cooled crust and smooth the top.
- Refrigerate for at least 3 hours until set, then drizzle with chocolate syrup before serving.