Crispy Baked Zucchini Chips
Crispy Baked Zucchini Chips
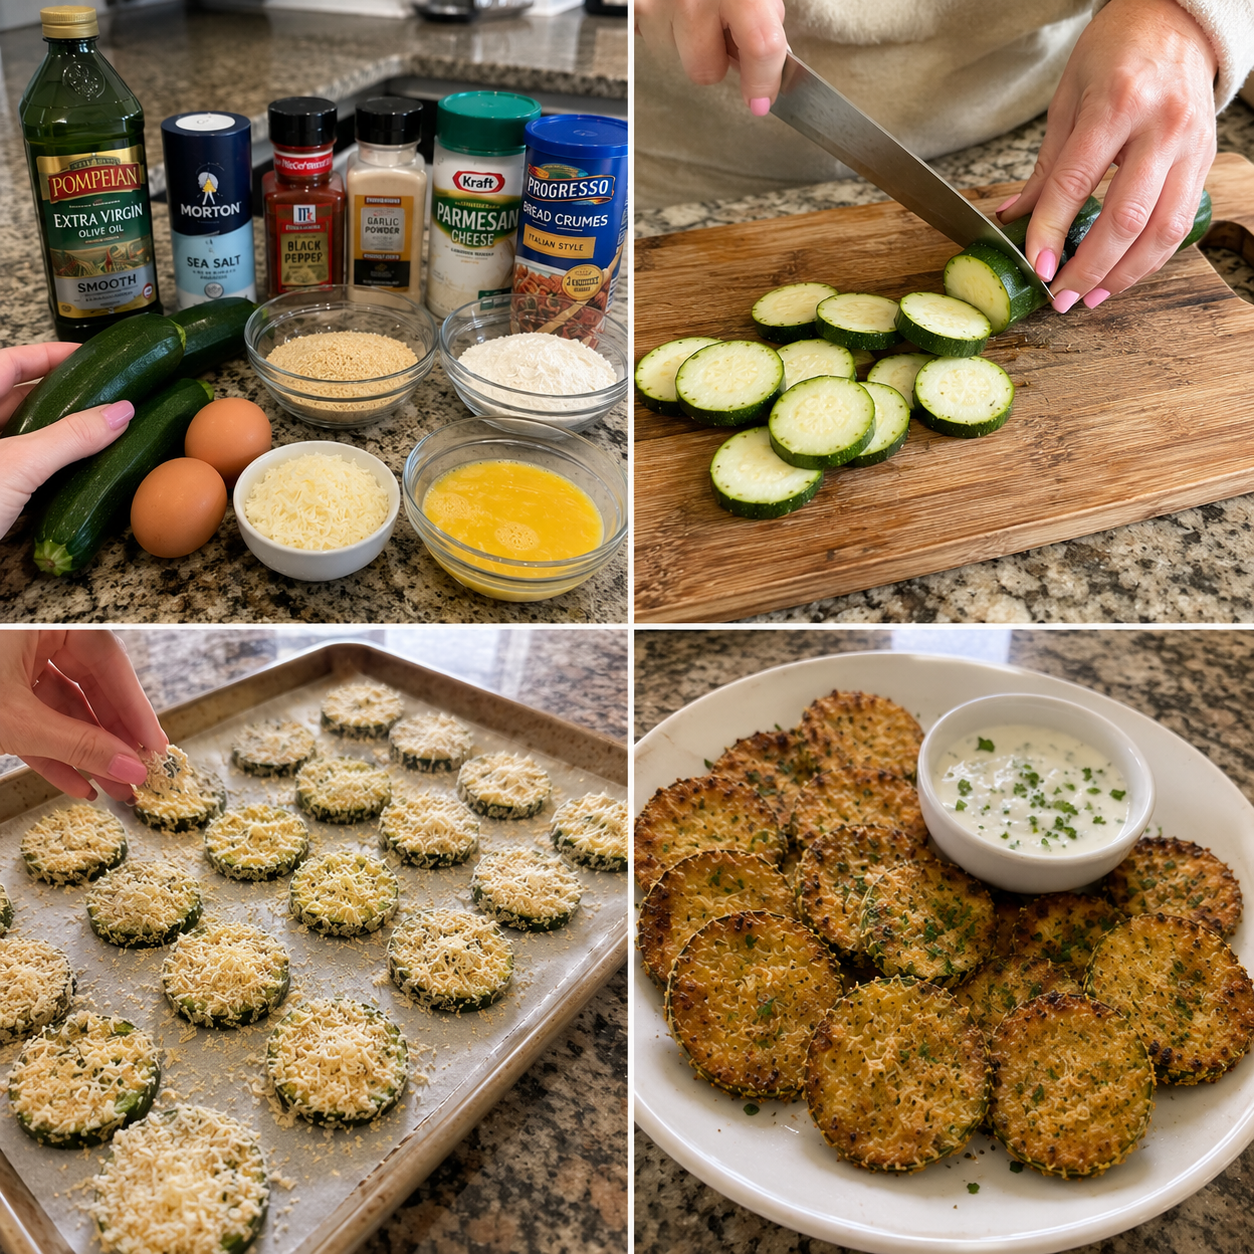
Crispy Baked Zucchini Chips: A Game-Changing Snack That Actually Works
I remember the exact moment I became obsessed with crispy baked zucchini chips. It was a random Tuesday night, my fridge was looking pretty sad, and I had exactly two medium zucchinis staring back at me. I’d tried making them before—you know, the soggy, disappointing kind that taste like regret and broken dreams. But that night, I decided I wasn’t going to let another batch fail me. I pulled out my notebook, got a little experimental, and honestly? I cracked the code.
Here’s the thing: crispy baked zucchini chips shouldn’t be this hard, but they are. Most recipes online either leave you with limp, watery disappointments or they’re so complicated you need a culinary degree just to read the instructions. I get it. Zucchini is like 95% water, so the struggle is real. But I’ve figured out the exact combination of prep work, seasoning, and oven magic that transforms thin slices of summer squash into something genuinely addictive—crispy on the outside, tender on the inside, and absolutely zero guilt.
This recipe is for anyone who’s tired of boring snacks, wants to use up zucchini from their garden (or farmer’s market haul), or is just looking for something healthier than chips that doesn’t taste like you’re punishing yourself. It’s also perfect for meal prep, impressing people at parties, or just having something crunchy and satisfying on hand when 3 p.m. hunger hits. If you love this kind of honest, approachable cooking, I’d love to have you follow me on HaileeRecipes on Pinterest where I share all my favorite tested-and-true recipes.
Why You’ll Love This Recipe
Let me be real with you: this recipe works because I’ve failed enough times to know exactly what doesn’t. I’ve tested different temperatures, different breading methods, different seasoning combos, and I’m giving you the absolute best version.
- Actually crispy, not soggy. The key is proper moisture removal and a hot enough oven. I’m talking about that satisfying crunch that makes you want another handful.
- Naturally gluten-free. If you use the right breading, this is naturally GF and still tastes incredible. No weird substitutes needed.
- Ridiculously customizable. You can season these a hundred different ways. Spicy, herb-forward, cheesy, ranch-inspired—whatever you’re craving.
- Genuinely healthy. Low calorie, high in fiber, packed with nutrients. You’re not sacrificing anything here.
- Takes about 30 minutes total. Mostly hands-off oven time, so you can actually relax while they cook.
- Stores beautifully. Make a batch and snack on them for days. They reheat perfectly in a 350-degree oven for 5 minutes.
Ingredients
- 3 medium zucchini (about 1 pound total)
- 1 teaspoon kosher salt (for drawing out moisture)
- 1/2 cup all-purpose flour (or cornstarch for GF)
- 2 large eggs
- 1 cup panko breadcrumbs (or regular breadcrumbs—panko is crispier)
- 1/2 cup grated Parmesan cheese
- 1 teaspoon garlic powder
- 1 teaspoon onion powder
- 1/2 teaspoon smoked paprika
- 1/4 teaspoon cayenne pepper (optional, but I use it)
- 1/2 teaspoon black pepper
- 1/2 teaspoon dried Italian seasoning
- Cooking spray or 2 tablespoons olive oil
Hailee’s Tip: Don’t skip the step where you salt the zucchini slices and let them sit. I know it seems fussy, but this is literally the difference between crispy and disappointing. Trust me on this one.
Hailee’s Tip: Use panko breadcrumbs if you can find them. They’re coarser and create a noticeably crispier coating. Regular breadcrumbs work fine, but panko is the move.
Optional Add-Ins and Variations
This is where you get to make these your own. Here are my favorite tweaks:
- Ranch lover? Skip the Italian seasoning and add 1 tablespoon of dry ranch seasoning mix to your breadcrumb mixture.
- Spicy kick? Increase the cayenne to 1/2 teaspoon and add a pinch of red pepper flakes.
- Everything bagel vibes? Mix in 1 tablespoon of everything bagel seasoning instead of the garlic and onion powder.
- Lemon herb? Add 1 teaspoon of lemon zest and 1/2 teaspoon of dried dill to the breadcrumb mixture.
- Cheesier? Increase the Parmesan to 3/4 cup, or add 1/4 cup of sharp cheddar.
- Gluten-free? Use cornstarch or a GF flour blend instead of regular flour, and make sure your panko is certified GF.
Step-by-Step Method
Step 1: Prep Your Zucchini
Wash your zucchini and pat them completely dry. This is important—any water on the outside will interfere with the coating. Trim the ends off and slice the zucchini lengthwise into 1/4-inch-thick planks. I use a mandoline for consistency, but a sharp knife works just fine if you’re careful. You should get about 5-6 planks per zucchini.
What I Messed Up: The first time I made these, I didn’t dry the zucchini thoroughly. They came out looking sad and steamed instead of crispy. Now I pat them with paper towels like my life depends on it.
Step 2: Draw Out the Moisture
Arrange your zucchini slices on paper towels in a single layer. Sprinkle both sides generously with kosher salt. Let them sit for 10-15 minutes. You’ll see moisture beading up on the surface—that’s exactly what we want. After the time is up, pat them dry with fresh paper towels. This step removes water that would otherwise steam your chips instead of crisping them.
Step 3: Set Up Your Breading Station
Get three shallow bowls ready. In the first bowl, combine your flour with a pinch of salt and pepper. In the second bowl, whisk your eggs together until smooth. In the third bowl, combine your panko breadcrumbs, Parmesan, garlic powder, onion powder, smoked paprika, cayenne, black pepper, and Italian seasoning. Mix that third bowl really well so the seasonings are distributed evenly.
Step 4: Coat Each Slice
Working one slice at a time, dip each zucchini slice into the flour, coating both sides and shaking off any excess. Then dip into the egg, letting the excess drip back into the bowl. Finally, press firmly into the breadcrumb mixture, making sure both sides are well coated. This triple-coating is what gives you that satisfying crunch.
What I Messed Up: I used to skip the flour step and go straight from egg to breadcrumbs. The coating didn’t stick as well, and some of it fell off in the oven. The flour acts as an adhesive. Don’t skip it.
Step 5: Arrange on Your Baking Sheet
Line a baking sheet with parchment paper or aluminum foil. Lightly spray it with cooking spray or brush it with olive oil. Arrange your coated zucchini slices in a single layer, making sure they’re not touching. If they overlap, they’ll steam instead of crisp. You might need two baking sheets.
Step 6: Spray the Tops
This is the secret that changed everything for me. Lightly spray the top of each zucchini slice with cooking spray. This helps them crisp up beautifully and turn golden. If you prefer, you can brush them lightly with olive oil instead, but spray is honestly more even and uses less oil.
Step 7: Bake
Pop them into a preheated 400-degree oven for 20-25 minutes, depending on your oven. You’re looking for the edges to turn golden brown and the tops to look crispy. About halfway through, you can give the pan a shake or flip them if you want extra crispiness on both sides, but honestly, I usually just let them sit.
Step 8: Cool and Enjoy
Let them cool on the baking sheet for 5 minutes—they’ll continue to crisp up as they cool. Then transfer to a serving plate or storage container. They’re best eaten warm or at room temperature.
Common Mistakes to Avoid
I’ve made all of these so you don’t have to:
- Not removing enough moisture. Seriously, don’t rush the salting step. Wet zucchini equals soggy chips. There’s no getting around physics here.
- Crowding the baking sheet. If your slices are touching, they’ll steam. Give them space to breathe and crisp up.
- Oven temperature too low. You need that 400-degree heat to get proper browning and crispiness. 350 degrees won’t cut it.
- Skipping the flour step. The breading won’t stick as well without it. I learned this the hard way.
- Using too much egg. You just need a thin coating. Too much egg and they’ll get soggy. Dip and shake off the excess.
- Not seasoning the flour mixture. This is your chance to build flavor from the inside out. Don’t skip it.
My Tested Substitutions
Life happens, and sometimes you don’t have exactly what the recipe calls for. Here’s what I’ve tested and what actually works:
- Breadcrumbs: You can use regular breadcrumbs, crushed crackers, or even crushed pork rinds if you’re doing low-carb. Panko is crispiest, but others work.
- Cheese: Any hard cheese works. Try sharp cheddar, Pecorino Romano, or even nutritional yeast for a vegan version.
- Flour: Cornstarch, rice flour, or any GF flour blend works. Even a little bit of arrowroot powder helps with crispiness.
- Eggs: If you’re vegan, use aquafaba (the liquid from canned chickpeas) or a commercial egg replacer. It’s not quite the same, but it works.
- Oil: Any neutral oil works for the spray. I’ve used avocado oil, vegetable oil, and even butter spray.
How to Customize
The beauty of this recipe is how flexible it is. Want them to taste like your favorite restaurant appetizer? Here’s how:
For Pizza Vibes: Add 1/2 teaspoon of dried oregano, 1/2 teaspoon of dried basil, and a pinch of red pepper flakes to your breadcrumb mixture. Serve with marinara for dipping.
For Buffalo Chicken Lovers: Mix 1/2 teaspoon of cayenne, 1/4 teaspoon of smoked paprika, and a tiny pinch of garlic powder. Serve with blue cheese dip.
For Dill Pickle Fans: Add 1/2 teaspoon of dried dill, 1/2 teaspoon of garlic powder, and a pinch of black pepper. Serve with a cool dill ranch.
For Cajun Heat: Mix in 1/2 teaspoon of cayenne, 1/4 teaspoon of smoked paprika, 1/4 teaspoon of garlic powder, and a pinch of black pepper.
Serving Ideas
These are incredibly versatile. Here’s how I serve them:
- As a snack straight from the oven with a cold drink
- With marinara sauce for dipping
- With ranch dip or a cool yogurt-based dip
- Alongside grilled chicken or fish as a crispy side dish
- In a salad for extra crunch and substance
- As an appetizer at parties (they always disappear first)
- With hummus or tzatziki for a Mediterranean vibe
- Sprinkled over pasta or grain bowls for texture
Meal Prep and Storage
One of my favorite things about this recipe is how well it stores. Make a big batch on Sunday and snack on them all week.
Storing: Keep them in an airtight container at room temperature for up to 4 days. They’ll stay crispy if you store them properly. If they do get a little soft, just reheat them in a 350-degree oven for 5 minutes to recrisp them.
Freezing: You can freeze the breaded raw zucchini slices on a baking sheet before cooking, then transfer them to a freezer bag. They’ll keep for up to 3 months. Bake them straight from frozen, adding about 5 extra minutes to the cooking time.
Make-Ahead: You can prep and bread the zucchini slices a few hours ahead of time, keep them on the baking sheet covered with plastic wrap in the fridge, and bake them when you’re ready.
Nutritional Breakdown
Per serving (assuming 24 chips from the full recipe):
- Calories: 45
- Protein: 2g
- Carbs: 5g
- Fat: 2g
- Fiber: 1g
These are genuinely light and satisfying. You can eat a whole bunch without feeling guilty, and you’re actually getting vegetables and protein. Win-win.
Final Thoughts
I’m really proud of this recipe because it actually delivers on the promise. Crispy baked zucchini chips that taste amazing, store well, and don’t require any weird ingredients or complicated techniques. They’re the kind of snack that makes you feel good about what you’re eating, which honestly matters more than people think.
The best part? Once you nail this recipe, you’ll make it constantly. It’s one of those dishes that becomes part of your regular rotation because it’s easy, reliable, and genuinely delicious. Your family will ask for it. Your friends will want the recipe. You’ll find yourself making extra batches just to have on hand.
I’d love to know how yours turn out. If you make these, I really hope they’re crispy and perfect and that you love them as much as I do. Thanks for cooking along with me today.
—
Recipe Card
Crispy Baked Zucchini Chips
Ingredients
Method
- Wash and pat zucchini dry. Trim ends and slice lengthwise into 1/4-inch-thick planks.
- Arrange zucchini slices on paper towels, sprinkle both sides with kosher salt, and let