Loaded Nachos with Cheese, Beans, and Toppings
Loaded Nachos with Cheese, Beans, and Toppings
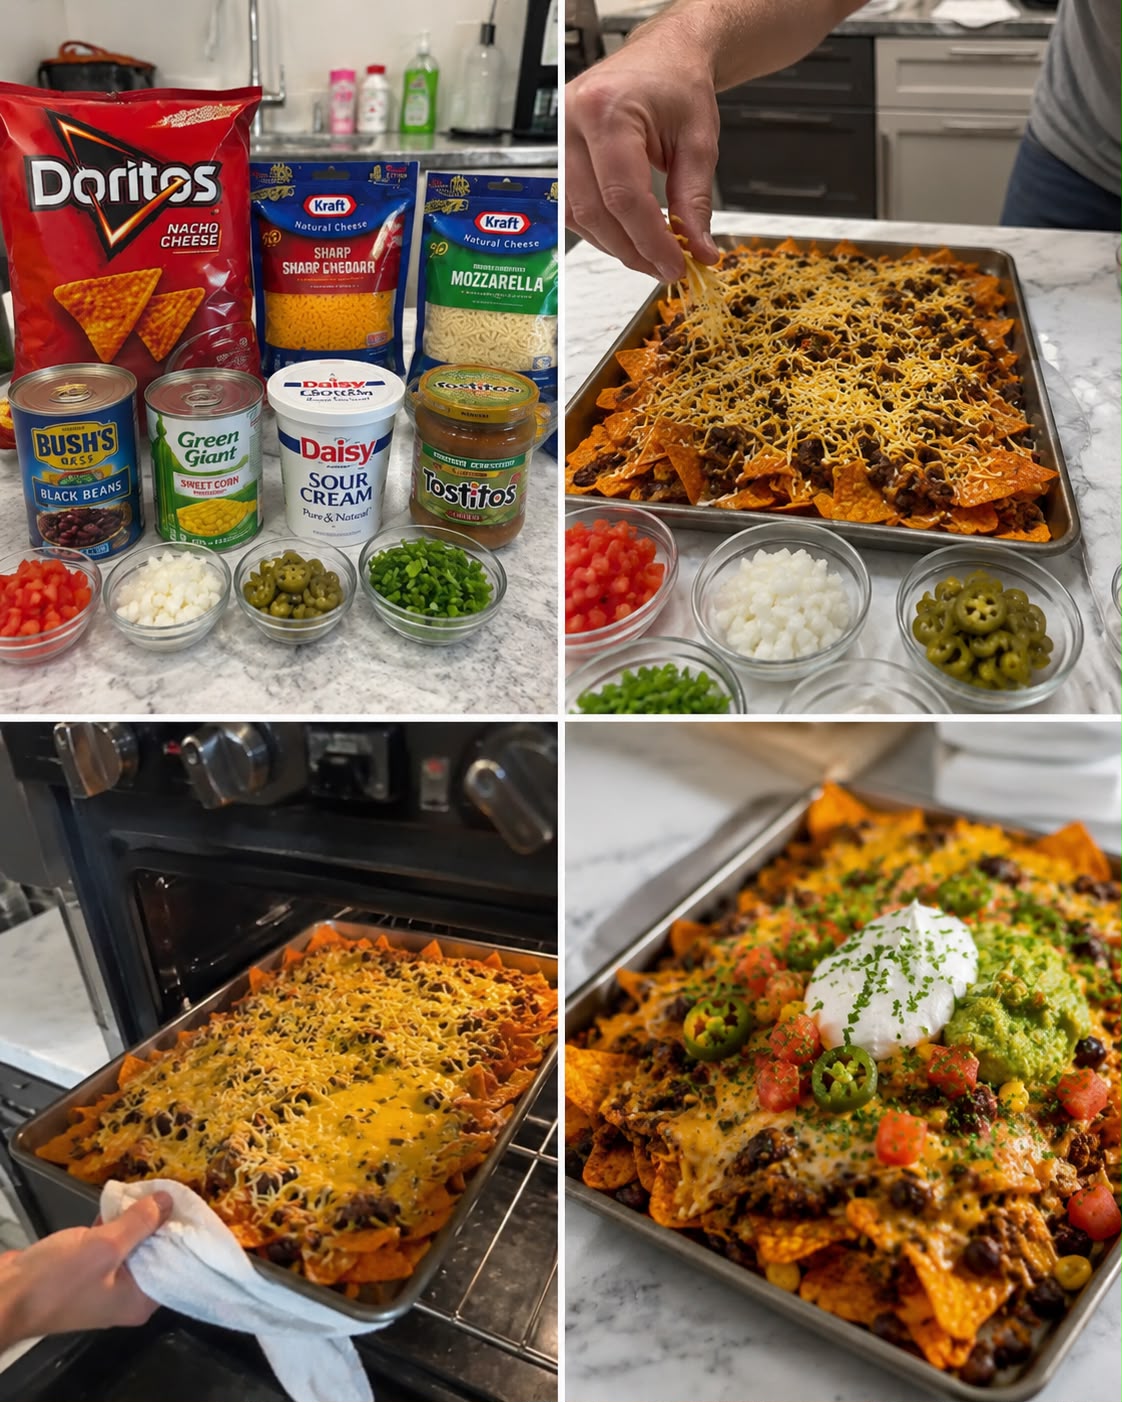
Loaded Nachos with Cheese, Beans, and Toppings: The Ultimate Game-Day (or Any-Day) Comfort Bite
I’m going to be honest with you—nachos saved my life during a particularly rough Tuesday night last month. I’d had one of those days where everything felt like too much, my brain was fried, and the last thing I wanted to do was think about dinner. But I had friends coming over in an hour, and I needed something that felt special without requiring me to channel my inner Gordon Ramsay.
So I did what I always do when life gets messy: I made nachos.
There’s something almost magical about loaded nachos with cheese, beans, and toppings. They’re the kind of food that brings people together, requires minimal actual cooking skills, and somehow feels indulgent while being genuinely doable on a weeknight. That night, my friends and I sat around my coffee table with a massive plate of crispy chips piled high with melted cheese, seasoned beans, jalapeños, sour cream, and guacamole. Nobody checked their phone. Nobody rushed. We just ate, talked, and laughed.
I realized then that nachos aren’t just a snack—they’re an experience. And if you’re going to make them, you might as well make them really well.
This recipe is for anyone who wants to master the art of loaded nachos without overthinking it. Whether you’re hosting a game day, throwing together a quick lunch, feeding picky eaters (because let’s be real, everyone likes nachos), or just craving something warm and cheesy, I’ve got you covered. I’ve tested this a hundred different ways, learned what works and what absolutely doesn’t, and I’m sharing all of it with you here.
Follow me on HaileeRecipes on Pinterest for more comfort food ideas and easy entertaining recipes.
Why You’ll Love This Recipe
Let me break down why loaded nachos with cheese, beans, and toppings have become a staple in my kitchen:
- Zero cooking experience required. Seriously. If you can turn on an oven and layer things, you’re good. This isn’t about technique—it’s about assembly and flavor.
- Customizable to your taste. Vegetarian? Skip the meat. Hate cilantro? Don’t use it. Allergic to dairy? Swap in a good melting vegan cheese. This recipe bends to your preferences.
- Feeds a crowd or just you. Make a small plate for one or a massive sheet pan for eight. The method stays exactly the same.
- Budget-friendly. A bag of tortilla chips, some canned beans, and cheese go a long way. You don’t need expensive ingredients to make this taste amazing.
- Actually satisfying. There’s protein from the beans, fat from the cheese and avocado, and carbs from the chips. Your body feels nourished, not just full.
- Fast. From “I’m hungry” to “I’m eating” is about 15 minutes if you’re using a broiler, or 20 if you’re using the oven.
Ingredients
For the base:
- 6 cups tortilla chips (about one regular bag, or roughly 5 ounces)
- 2 cans (15 ounces each) black beans or pinto beans, drained and rinsed
- 3 cups shredded cheese (I use a mix of sharp cheddar and Monterey Jack)
- 1 teaspoon cumin
- 1/2 teaspoon garlic powder
- 1/4 teaspoon cayenne pepper (optional, but I use it)
- Salt and black pepper to taste
For the toppings:
- 1 cup diced tomatoes (fresh or from a can, drained)
- 1/2 cup diced red onion
- 1 cup sour cream or Mexican crema
- 1 cup guacamole or 2 ripe avocados, sliced
- 1/4 cup fresh cilantro, chopped (optional)
- 2-3 jalapeños, sliced
- 1/4 cup sliced black olives (optional)
- Lime wedges for serving
Hailee’s Tip: Don’t skip the step of rinsing your canned beans. It removes excess sodium and that weird starchy liquid, which means your nachos won’t get soggy and your beans will taste fresher.
Hailee’s Tip: Buy pre-shredded cheese if you’re short on time, but if you can grab a block and shred it yourself, it melts so much better. I’m not a snob about this—I do both depending on my mood—but there’s a noticeable difference in how smoothly it melts.
Hailee’s Tip: Toast your tortilla chips in a 350°F oven for about 5 minutes before assembling if they’ve been open for a few days. This brings back their crunch and prevents a sad, soggy nacho situation.
Optional Add-Ins and Variations
This is where nachos get fun. Here’s what I like to add depending on my mood or what I have on hand:
- Protein: Seasoned ground beef, shredded chicken, crumbled chorizo, or crispy bacon bits. Brown the meat first, season it with cumin and chili powder, and scatter it over the chips before the cheese.
- Vegetables: Corn kernels, diced bell peppers, sliced mushrooms, or caramelized onions. These add texture and nutrition without weighing the nachos down.
- Extras: Crispy fried onions, toasted pumpkin seeds, crumbled queso fresco, hot sauce drizzle, or a sprinkle of cotija cheese.
- Fresh finish: Pico de gallo instead of plain diced tomatoes, or a squeeze of fresh lime juice over everything right before serving.
Step-by-Step Method
Step 1: Prep your workspace and preheat. Preheat your oven to 400°F (or set your broiler to high if you’re in a hurry). Line a large baking sheet with foil for easy cleanup—trust me on this one. Have all your toppings prepped and in bowls before you start. This sounds fussy, but it makes the whole process feel smooth and less chaotic.
Step 2: Warm and season your beans. In a small saucepan over medium heat, combine your drained beans with cumin, garlic powder, cayenne, salt, and pepper. Stir occasionally for about 3-4 minutes until the beans are warm and smell absolutely incredible. This is where the magic starts. Don’t skip this step—cold beans on nachos are sad beans.
Hailee’s Tip: If your beans seem too thick, add a splash of water or chicken broth to loosen them up. You want them spreadable but not soupy.
Step 3: Layer your chips. Spread about half your tortilla chips on the prepared baking sheet in a single layer. Yes, I said half. This is the secret to nachos that don’t have a soggy bottom layer. You’re going to do two layers.
Step 4: Add the first layer of toppings. Spoon half your warm beans over the chips. Scatter half your shredded cheese on top. Try to distribute it evenly so every chip gets some cheese love. This is not the time to be shy.
Step 5: Repeat the layers. Add the remaining chips, then the remaining beans, then the remaining cheese. This is your insurance policy against dry nachos or unevenly melted cheese.
Step 6: Bake or broil. If using the oven, bake at 400°F for 8-10 minutes until the cheese is melted and bubbly. If using the broiler, watch them like a hawk and broil for 3-5 minutes until the cheese is melted and starting to brown slightly. Broilers are unpredictable, so don’t walk away. I learned this the hard way when I made a batch that was basically nacho charcoal.
What I Messed Up: Early on, I’d pile all the toppings on before baking, and the fresh tomatoes and sour cream would get warm and weird. Now I only bake the chips, beans, and cheese. Everything else goes on after they come out of the oven, which keeps things fresh and prevents a hot mess (literally).
Step 7: Cool for one minute. I know you’re hungry. But let them sit for just 60 seconds. The cheese will set slightly, and you won’t burn the roof of your mouth. Your future self will thank you.
Step 8: Add fresh toppings. Remove from the oven and immediately top with sour cream or crema (drizzle it or dollop it, your choice), guacamole or avocado slices, diced tomatoes, red onion, cilantro, jalapeños, and olives if using. Serve with lime wedges.
Common Mistakes to Avoid
Piling everything on before baking. This is the biggest one. Fresh toppings get warm, wet, and sad. Bake your cheese layer, then add the fresh stuff. Trust me.
Using too many chips. I know it’s tempting to make a massive pile, but if the chips are more than two layers deep, the bottom ones get soggy and don’t cook evenly. Stick with two layers maximum.
Not seasoning your beans. Plain beans are boring. The seasoning is what makes them taste like they belong in a restaurant-quality nacho plate.
Forgetting to drain your canned tomatoes. If you’re using canned, drain them really well. Otherwise, you’ll end up with a puddle of tomato juice on your nachos.
Using low-quality cheese. This sounds snobby, but it matters. Cheap pre-shredded cheese has additives that prevent it from melting smoothly. Spend a couple extra dollars on decent cheese—it’s worth it.
Skipping the cooling time. One minute. That’s all I’m asking. Your mouth will thank you.
My Tested Substitutions
For the cheese: Use a combination of cheddar and Oaxaca cheese for extra creaminess. Or try a mix of cheddar and pepper jack if you like heat. Avoid mozzarella—it gets stringy and doesn’t have enough flavor.
For the beans: Black beans, pinto beans, refried beans, or even a mix work beautifully. If you’re using refried beans, thin them out with a little broth first so they’re spreadable.
For the sour cream: Greek yogurt works in a pinch, though it’s tangier. Mexican crema is creamier and more authentic. You can also use a cashew-based sour cream if you’re avoiding dairy.
For the chips: Honestly, any tortilla chip works. Thick, thin, white corn, yellow corn, blue corn—I’ve used them all. Just make sure they’re fresh because stale chips ruin everything.
For the guacamole: If avocados are expensive or you’re out, use a dollop of guacamole from the store (no judgment here), or skip it and add extra sour cream. You won’t miss it.
How to Customize
This is the beautiful part about nachos—they’re endlessly customizable. Here are my favorite combinations:
The Breakfast Nacho: Use chorizo instead of beans, add scrambled eggs, crispy hash browns, and a fried egg on top. Serve with hot sauce and cilantro.
The Vegetarian Route: Skip the meat, load up on black beans, corn, bell peppers, and mushrooms. Add a sprinkle of cotija cheese for saltiness.
The Spicy Version: Add jalapeños to the baking layer, use pepper jack cheese, top with hot sauce, and add a squeeze of lime.
The Pulled Pork Special: Use shredded pulled pork instead of ground beef, add a drizzle of barbecue sauce, and top with crispy fried onions and cilantro.
The Seafood Situation: Top with seasoned shrimp or crab, add diced avocado, fresh cilantro, and a lime crema (sour cream mixed with lime juice and garlic).
Serving Ideas
Nachos are versatile little things. Here’s how I serve them depending on the occasion:
- Game day: Make a huge sheet pan and let people graze. Set out extra toppings on the side so people can customize as they eat.
- Casual dinner: Make individual plates with a smaller portion of chips and toppings. It feels fancier and portions are easier to control.
- Appetizer at a party: Cut the chips into smaller pieces and make mini nachos. They’re easier to eat standing up.
- Lunch for one: Make a small plate, maybe 2 cups of chips, and load it up. Pair with a cold drink and you’re set.
- Late-night snack: Make a quick batch with just cheese and beans. No judgment here.
Meal Prep and Storage
Can you make nachos ahead? Sort of, but not really. Nachos are best eaten immediately after assembly. However, you can prep everything in advance and assemble right before serving.
What I do: I prep and season my beans the morning of, store them in the fridge, and reheat them gently before assembling. I chop my vegetables and store them in separate containers. When guests arrive, I just layer, bake, and top. It takes 15 minutes total.
Leftover nachos: If you somehow have leftover nachos (this has never happened in my house, but theoretically), store them in an airtight container in the fridge for up to 2 days. Reheat in a 350°F oven for about 5 minutes. They won’t be quite as crispy, but they’re still delicious.
Storing components: Cooked beans last 4-5 days in the fridge. Guacamole lasts about 2 days (press plastic wrap directly onto the surface to prevent browning). Diced tomatoes and onions last 3-4 days. Sour cream lasts until the expiration date on the container.
Nutritional Breakdown
Here’s what you’re looking at per serving (based on 4 servings):
- Calories: approximately 520
- Protein: 18g
- Carbohydrates: 42g
- Fat: 30g
- Fiber: 8g
Keep in mind: This varies depending on your exact portions and toppings. If you add meat, calories go up. If you skip the guacamole, they go down. These numbers are estimates based on the core recipe.
Final Thoughts
Loaded nachos with cheese, beans, and toppings aren’t fancy, but they’re comforting in a way that feels like a warm hug. They’re the kind of food that brings people together without any pretense or stress. And honestly, that’s what I love most about cooking—creating moments where people slow down and enjoy each other’s company over good food.
I hope this recipe becomes a staple in your kitchen like it has in mine. Whether you’re making it for a crowd, a quiet night in, or just because you’re craving something delicious, I promise you won’t regret it. And if you try any of my variations or come up with your own, I’d love to hear about it.
Now go make some nachos. Your future self is already grateful.
With warmth and cheese-covered hands,
Hailee
—
Recipe Card
**Loaded Nachos with Cheese, Beans, and Toppings**
**Ingredients**
* 6 cups tortilla chips
* 2 cans (15 ounces each) black beans or pinto beans, drained and rinsed
* 3 cups shredded cheese (cheddar and Monterey Jack mix)
* 1 teaspoon cumin
* 1/2 teaspoon garlic powder
* 1/4 teaspoon cayenne pepper
* Salt and black