Delicious No-Bake Dessert Recipes
Delicious No-Bake Dessert Recipes
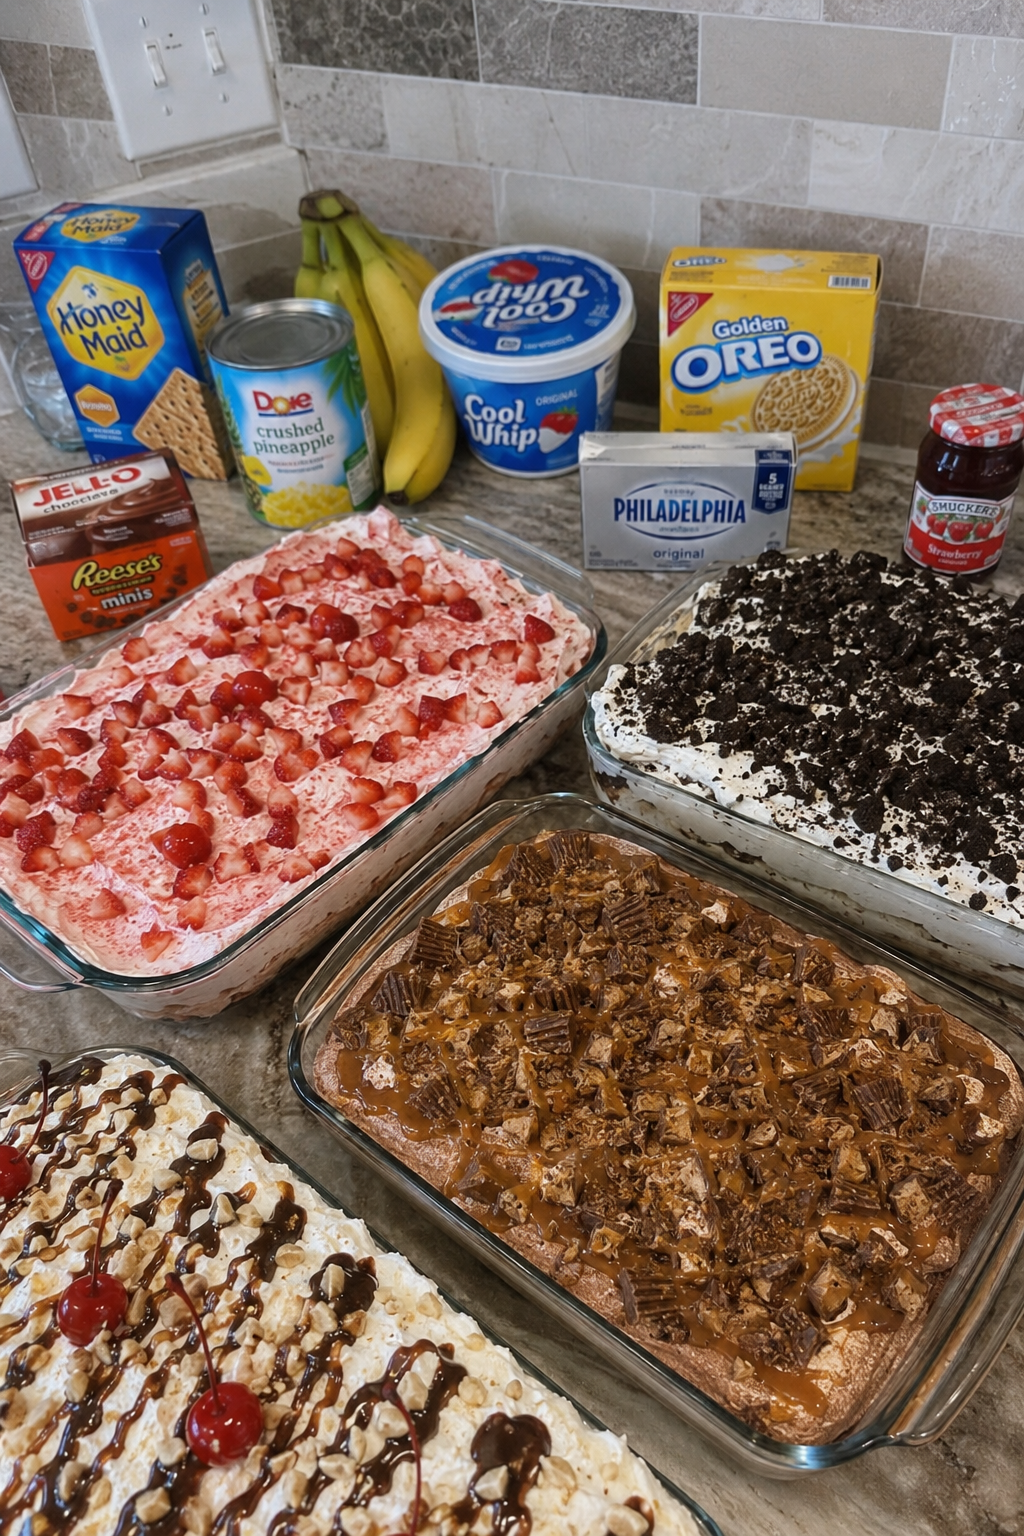
I’m sharing four of my favorite delicious no-bake dessert recipes that have become absolute lifesavers in my kitchen. Whether it’s the middle of summer and you don’t want to heat up your oven, or you’re just craving something sweet without the fuss, these recipes deliver every single time. They’re the kind of desserts that look impressive but require minimal effort, which honestly means I make them way more often than I probably should.
What I love most about these no-bake options is that they come together quickly, often in under thirty minutes, and they taste like you spent hours in the kitchen. From a strawberry dessert that’s bright and refreshing to an indulgent Oreo creation, there’s truly something for everyone here. I’ve also included a peanut butter dessert and a banana dessert because sometimes you need options depending on what you’re craving or what ingredients you have on hand.
These are the recipes I find myself making again and again, and I’m confident you’ll want to save them too. If you love easy dessert ideas like these, Follow me on HaileeRecipes on Pinterest where I’m constantly sharing new favorites and kitchen inspiration. Let’s dive into these recipes and get you set up with some go-to desserts for any occasion.
1. Strawberry Dessert
This luscious strawberry dessert combines creamy layers with fresh fruit flavor, creating a show-stopping treat that requires zero oven time. The combination of smooth cheesecake-like filling and juicy strawberries delivers a perfect balance of richness and brightness. With its elegant presentation and refreshing taste, this dessert is ideal for summer gatherings, dinner parties, or whenever you want something impressive without the baking stress. The no-bake format makes it perfect for hot weather entertaining.
Why You’ll Love It
- Completely no-bake means no heating up your kitchen on warm days.
- Comes together in under 30 minutes with minimal active preparation time.
- Looks restaurant-quality and impressive enough for special occasions or guests.
Ingredients
- 2 cups graham cracker crumbs
- 6 tablespoons melted butter
- 16 ounces cream cheese, softened
- 1/2 cup powdered sugar
- 1 cup heavy whipping cream
- 1 teaspoon vanilla extract
- 2 pounds fresh strawberries, hulled and sliced
- 3 tablespoons granulated sugar
How To Make It
- Mix graham cracker crumbs with melted butter, then press firmly into the bottom of a 9-inch springform pan to create an even crust layer.
- Beat softened cream cheese with powdered sugar until smooth and fluffy, about 2 minutes, scraping down the bowl as needed.
- In a separate bowl, whip heavy cream with vanilla extract until stiff peaks form, then gently fold into the cream cheese mixture until no streaks remain.
- Spread the cream cheese mixture evenly over the graham cracker crust, smoothing the top with a spatula.
- Toss sliced strawberries with granulated sugar and let sit for 10 minutes to release their juices.
- Arrange the sugared strawberries and their juices over the cream cheese layer, covering the top completely.
- Refrigerate for at least 2 hours until the crust is set and flavors meld together.
Variations And Substitutions
Replace graham crackers with crushed vanilla wafers or digestive biscuits for different flavor profiles. Substitute strawberries with raspberries, blackberries, or a mixed berry combination for variety. For a lighter version, use Greek yogurt mixed with whipped cream instead of all cream cheese. Add a tablespoon of strawberry liqueur or balsamic vinegar to the fruit topping for sophisticated depth.
Make-Ahead, Storage, And Serving Tips
Prepare this dessert up to 24 hours ahead, keeping it covered in the refrigerator until serving. The crust can be made a day in advance and stored in an airtight container. Store leftovers covered in the refrigerator for up to 3 days. For best texture, add fresh strawberries just before serving if making it more than a few hours ahead. To serve, run a warm knife around the edges before removing the springform pan sides for clean slices.
2. Oreo Dessert
This indulgent Oreo Dessert combines the beloved cookie with creamy layers for a show-stopping treat that requires zero baking. The result is a decadent, cookies-and-cream dream with a crunchy Oreo crust, smooth filling, and whipped topping that melts on your tongue. Perfect for potlucks, dinner parties, or whenever you crave something sweet without turning on the oven, this dessert delivers maximum flavor with minimal effort. The no-bake format makes it ideal for hot summer days or when your oven is already occupied.
Why You’ll Love It
- Completely no-bake, ready in under 30 minutes of hands-on time.
- Uses simple pantry staples and requires no special equipment or baking skills.
- Can be made a day ahead, making it perfect for entertaining and stress-free meal planning.
Ingredients
- 20 Oreo cookies, crushed into crumbs
- 4 tablespoons melted butter
- 8 ounces cream cheese, softened
- 1 cup powdered sugar
- 2 cups heavy whipping cream
- 1 teaspoon vanilla extract
- 10 Oreo cookies, chopped into chunks
- Whipped cream for topping
How To Make It
- Mix crushed Oreo crumbs with melted butter until the texture resembles wet sand, then press firmly into the bottom of a 9-by-13-inch dish to form an even crust.
- Beat softened cream cheese and powdered sugar together until smooth and fluffy, about 2 minutes, scraping down the bowl as needed.
- In a separate bowl, whip heavy cream and vanilla extract until stiff peaks form using an electric mixer.
- Gently fold the whipped cream into the cream cheese mixture in two additions until no streaks remain.
- Fold the chopped Oreo chunks into the filling, reserving some pieces for garnish if desired.
- Spread the filling evenly over the crust and smooth the top with a spatula.
- Refrigerate for at least 4 hours or overnight until firm and set.
- Top with additional whipped cream and crushed Oreos before serving.
Variations And Substitutions
For a chocolate twist, add 2 tablespoons of cocoa powder to the filling. Replace some whipped cream with mascarpone cheese for extra richness. Swap the crust by using chocolate graham crackers or chocolate wafer cookies instead of Oreos. For a lighter version, use whipped cream cheese or Greek yogurt in place of some heavy cream. Try mixing in crushed candy canes for a festive holiday version, or add a layer of chocolate ganache between the crust and filling.
Make-Ahead, Storage, And Serving Tips
Prepare this dessert up to 24 hours in advance, covering it tightly with plastic wrap after the filling sets. Store in the refrigerator for up to 3 days. For longer storage, freeze for up to 1 month; thaw in the refrigerator before serving. Cut into squares with a sharp knife dipped in hot water and wiped clean between cuts for neat portions. Serve chilled directly from the refrigerator. If the dessert becomes too soft, refrigerate for 30 minutes before serving to restore firmness.
3. Peanut Butter Dessert
This creamy peanut butter dessert combines rich, nutty flavors with a silky-smooth texture that melts on your tongue. Layers of peanut butter filling and chocolate create an indulgent treat that’s perfect for peanut butter lovers. The no-bake preparation makes it ideal for warm weather entertaining or when you want dessert without heating up the kitchen. Serve it chilled for the best texture and flavor, and watch it become an instant favorite at potlucks and dinner parties.
Why You’ll Love It
- Requires no oven time, making it perfect for busy schedules or hot summer days.
- Rich peanut butter flavor satisfies cravings with minimal ingredients and effort.
- Can be made up to two days ahead, allowing you to plan entertaining stress-free.
Ingredients
- 1 cup creamy peanut butter
- 4 tablespoons unsalted butter, softened
- 1 cup powdered sugar
- 1 teaspoon vanilla extract
- 1 cup semi-sweet chocolate chips
- 2 tablespoons coconut oil
- 1/2 cup crushed graham crackers
- 2 tablespoons honey
How To Make It
- Line an 8-inch square baking dish with parchment paper, leaving overhang on two sides for easy removal.
- Mix peanut butter, softened butter, powdered sugar, and vanilla extract in a bowl until smooth and well combined.
- Press the peanut butter mixture evenly into the prepared baking dish, creating a firm base layer.
- Melt chocolate chips with coconut oil together in a microwave-safe bowl in 30-second intervals, stirring between each interval until smooth.
- Pour the melted chocolate over the peanut butter layer and spread evenly to cover completely.
- Combine crushed graham crackers with honey and sprinkle over the chocolate layer as a topping.
- Refrigerate for at least 4 hours until the chocolate is completely set and firm.
- Cut into squares using a sharp knife, wiping the blade between cuts for clean edges.
Variations And Substitutions
Swap creamy peanut butter for almond butter or sunflower seed butter for a different nutty flavor. Replace semi-sweet chocolate with dark chocolate for deeper richness, or use milk chocolate for a sweeter version. Substitute graham cracker topping with crushed pretzels for added saltiness, or omit it entirely for a smoother finish. Add a pinch of sea salt to the chocolate layer to enhance all the flavors, or drizzle with peanut butter on top before the chocolate sets.
Make-Ahead, Storage, And Serving Tips
Prepare this dessert up to two days in advance and store it covered in the refrigerator. Keep it in an airtight container to prevent it from absorbing odors. Cut into squares and serve directly from the refrigerator for the best texture. If the dessert becomes too soft at room temperature, simply chill it again before serving. For easier cutting, dip your knife in hot water and wipe it clean between each cut to achieve neat, professional-looking squares.
4. Banana Dessert
This creamy banana dessert combines the natural sweetness of ripe bananas with rich chocolate and smooth cream for an indulgent treat that requires zero oven time. The layered texture features a crumbly cookie base, velvety chocolate mousse middle, and whipped cream topping that melts on your tongue. Perfect for summer gatherings, dinner parties, or whenever you need a show-stopping dessert without the baking hassle. The no-bake approach means you can prepare it in under 30 minutes, making it ideal for last-minute entertaining or satisfying unexpected cravings.
Why You’ll Love It
- Ready to eat in just 30 minutes with minimal active preparation time.
- Requires only basic pantry ingredients and no special equipment or baking skills.
- Naturally sweetened by bananas, making it feel lighter than traditional chocolate desserts.
Ingredients
- 2 cups graham cracker crumbs
- 6 tablespoons melted butter
- 3 ripe bananas, sliced
- 8 ounces semi-sweet chocolate, chopped
- 1 cup heavy whipping cream
- 1/4 cup powdered sugar
- 2 tablespoons cocoa powder
- 1 teaspoon vanilla extract
How To Make It
- Mix graham cracker crumbs with melted butter until resembling wet sand, then press firmly into the bottom of a 9-inch dish to create an even base layer.
- Arrange sliced bananas in a single layer over the crust, covering it completely to prevent browning.
- Melt chocolate in a microwave-safe bowl in 30-second intervals, stirring between each, until completely smooth and glossy.
- Let melted chocolate cool for 5 minutes, then spread evenly over the banana layer using a spatula.
- Whip heavy cream with powdered sugar and vanilla extract until stiff peaks form, using an electric mixer or whisk.
- Spread or pipe the whipped cream generously over the chocolate layer.
- Dust the entire surface with cocoa powder using a fine sieve for a professional finish.
Variations And Substitutions
Swap graham crackers for crushed digestive biscuits, vanilla wafers, or even chocolate cookies for different flavor profiles. Use dark chocolate or white chocolate instead of semi-sweet for intensity preferences. Replace heavy cream with whipped coconut cream for a dairy-free version, or add a tablespoon of peanut butter to the chocolate layer for nutty complexity. For extra indulgence, drizzle caramel sauce between layers or sprinkle toasted nuts over the whipped cream topping.
Make-Ahead, Storage, And Serving Tips
Prepare the crust and chocolate layers up to 8 hours ahead, then refrigerate covered. Add the whipped cream topping no more than 2 hours before serving to maintain its fluffy texture. Store leftovers in an airtight container in the refrigerator for up to 2 days, though the crust will gradually soften. Serve chilled directly from the refrigerator for the best texture contrast. If the dessert sits too long and the bananas brown slightly, the flavor actually deepens and improves. For easier slicing, dip your knife in hot water and wipe between cuts.
Final Thoughts
No-bake desserts are a game-changer for anyone looking to satisfy their sweet tooth without heating up the kitchen. Whether you’re a busy parent, a college student in a dorm, or simply someone who wants to avoid turning on the oven during hot summer months, these recipes prove that incredible desserts don’t require an oven or complicated techniques. The beauty of no-bake treats is that they’re forgiving, fun to make, and often taste even better after a night in the refrigerator.
If you’re new to no-bake baking, we recommend starting with whichever recipe speaks to you most. Maybe it’s the creamy cheesecake, the indulgent chocolate mousse, or the refreshing fruit tart. Pick one, gather your ingredients, and give it a try this week. You’ll be amazed at how simple it is to create restaurant-quality desserts in your own kitchen, and we guarantee you’ll find yourself coming back to these recipes again and again.
Delicious No-Bake Dessert Recipes
Ingredients
Method
- Strawberry Dessert: Wash and slice fresh strawberries, then layer with whipped cream and graham cracker crumbs in a serving dish.
- Strawberry Dessert: Chill for at least 2 hours before serving for best flavor and texture.
- Oreo Dessert: Crush Oreo cookies and mix with softened cream cheese until combined, then fold in whipped topping gently.
- Oreo Dessert: Divide into serving cups and refrigerate for 1 hour until set.
- Peanut Butter Dessert: Mix peanut butter with powdered sugar and fold in chocolate chips for texture.
- Peanut Butter Dessert: Scoop into balls or press into a pan and refrigerate until firm.
- Banana Dessert: Slice bananas and layer with Greek yogurt mixed with honey in bowls.
- Banana Dessert: Serve immediately or chill for up to 4 hours before eating.
Notes
Oreo Dessert Tips: Can be prepared 2 days in advance. Keep refrigerated in an airtight container.
Peanut Butter Dessert Tips: Store in the refrigerator for up to 5 days. Serve at room temperature or chilled.
Banana Dessert Tips: Assemble just before serving to prevent bananas from browning. Use ripe but firm bananas for best results.