Giant M&M Cookie Cake
Giant M&M Cookie Cake
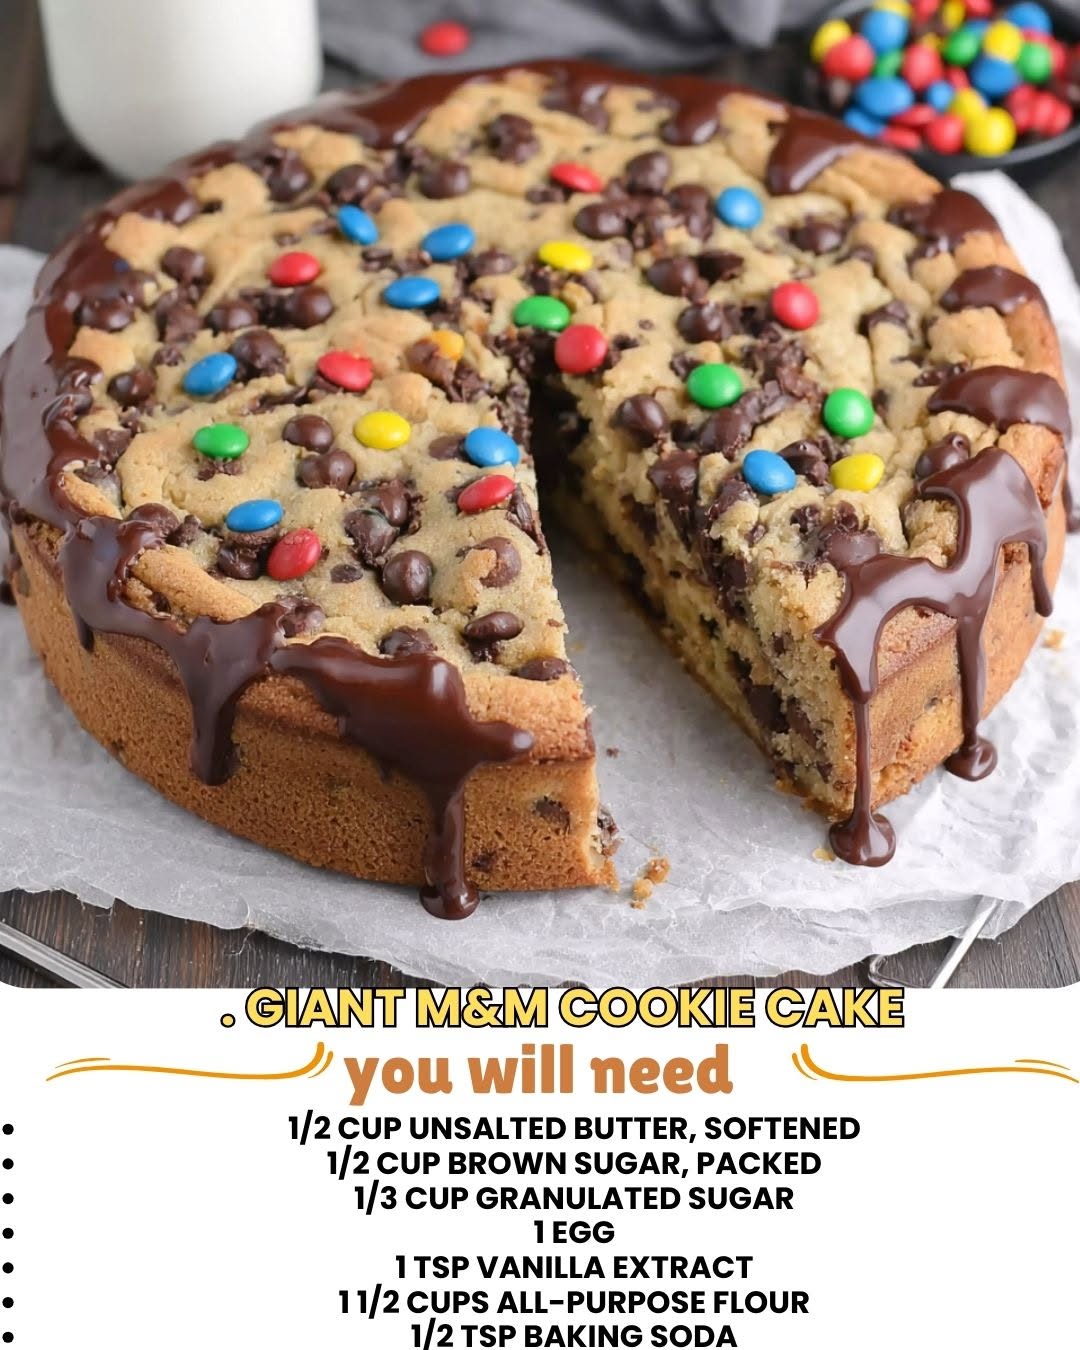
Giant M&M Cookie Cake: The Recipe That Changed My Dessert Game
I’ll be honest with you—I created this Giant M&M Cookie Cake on a Tuesday night when I was supposed to be meal prepping for the week. Instead, I found myself standing in my kitchen at 9 PM with a craving that wouldn’t quit. You know that feeling, right? When you want something warm, chewy, and absolutely indulgent, but you don’t want to fuss with a million individual cookies?
My partner walked in to find me pulling this massive, golden-brown cookie cake out of the oven, studded with colorful M&Ms that had melted just slightly into the dough. The smell alone was enough to make him forget he was annoyed about the abandoned meal prep containers. We cut into it while it was still warm, and I watched his face light up like a kid on Christmas morning. That’s when I knew I’d stumbled onto something special.
This Giant M&M Cookie Cake is basically a chocolate chip cookie that decided to go big and bold. It’s got all the cozy, nostalgic flavors you love—butter, brown sugar, vanilla—but baked in one glorious skillet instead of portioned into dozens of little cookies. The M&Ms add this fun, candy-store vibe that makes it feel less like a “proper” dessert and more like a celebration. It’s the kind of thing you make when you want to feel joy on a plate.
I’ve made this recipe probably fifty times now, and I’ve tested it with different mix-ins, baking times, and even pan sizes. I’m sharing exactly what works, what doesn’t, and how to make it your own. Whether you’re baking for a cozy night in, a casual dinner party, or just because Tuesday exists, this recipe has your back. Follow me on HaileeRecipes on Pinterest for more recipes like this one that feel like home.
Why You’ll Love This Recipe
Let me break down what makes this Giant M&M Cookie Cake such a winner:
- One pan, minimal cleanup. I’m all about recipes that don’t require a sink full of dishes. This bakes in a single skillet, which means less time scrubbing and more time enjoying.
- Feeds a crowd without the stress. Instead of scooping and baking dozens of individual cookies, you’ve got one beautiful cake that’s ready to slice and serve.
- Looks impressive but tastes homey. There’s something about a giant cookie cake that makes people feel special, even though it’s genuinely one of the easiest desserts you can make.
- Endlessly customizable. Want to swap the M&Ms for Reese’s pieces? Use different chocolate chips? Add sprinkles? This recipe is your canvas.
- Perfect texture balance. You get crispy edges, a chewy center, and that satisfying snap when you bite into it. It’s the Goldilocks of cookie cakes—just right.
- Great for any occasion. Birthday? Game night? Random Thursday? This works for literally everything.
Ingredients
Here’s what you’ll need to make this magic happen. I always use room-temperature butter because it creams better, and I never skip the vanilla—it’s what makes this taste like a real cookie and not just sweet dough.
- 1 cup (2 sticks) unsalted butter, room temperature
- 3/4 cup granulated sugar
- 3/4 cup packed brown sugar
- 2 large eggs, room temperature
- 2 teaspoons vanilla extract
- 2 1/4 cups all-purpose flour
- 1 teaspoon baking soda
- 1 teaspoon kosher salt
- 1 1/2 cups M&Ms (I use the regular-sized ones, not the peanut ones for this version, though you can totally use either)
- 1 cup semi-sweet chocolate chips (optional but highly recommended)
Hailee’s Tip: Don’t use cold butter straight from the fridge. I know it’s tempting to rush, but room-temperature butter creams with the sugar way better, and that’s what gives you that tender, cake-like texture. Let it sit on your counter for about 30 minutes while you gather everything else.
Hailee’s Tip: Brown sugar is your secret weapon here. It adds moisture and a deeper, more complex flavor than granulated sugar alone. Make sure it’s not rock-hard—if it is, break it up with your fingers or use a microwave trick (30 seconds, then stir) before you measure it.
Hailee’s Tip: I use kosher salt instead of table salt because it dissolves more evenly and doesn’t have that metallic aftertaste. If you only have table salt, use about 3/4 teaspoon instead of a full teaspoon.
Optional Add-Ins and Variations
This is where you can really have fun. The base recipe is solid, but here’s what I like to play with:
- Extra chocolate: Fold in white chocolate chips, dark chocolate chunks, or even crushed Oreos. I’ve done all three, and they’re all winners.
- Texture add-ons: Sprinkle crushed pretzels, toasted coconut, or chopped nuts on top before baking for a little crunch.
- Flavor boosters: A pinch of espresso powder brings out the chocolate. A dash of cinnamon adds warmth. A tiny bit of sea salt on top is *chef’s kiss*.
- Candy swaps: Use Skittles, Smarties, or even crushed candy canes depending on the season. I’ve made a peppermint version in December that was absolutely festive.
- Mix-in madness: Peanut butter swirl, caramel bits, toffee chips—if you can imagine it, you can probably add it to this cookie cake.
Step-by-Step Method
I’m going to walk you through this exactly how I do it at home, including the moments where I’ve messed up so you don’t have to.
Step 1: Preheat and prep. Get your oven to 350°F. Grab a 10 or 12-inch cast iron skillet (or a round baking pan—cast iron just looks cooler and holds heat better). I like to give mine a light spray of cooking spray, but you can also use a little butter. No need to line it or anything fancy.
Step 2: Cream the butter and sugars. In a large mixing bowl, combine your room-temperature butter, granulated sugar, and brown sugar. Using an electric mixer (or a wooden spoon and some elbow grease if you’re feeling hardcore), beat this together for about 2-3 minutes until it’s light, fluffy, and pale. This is where the magic starts. You’re incorporating air into the dough, which gives you that tender crumb.
What I messed up: The first time I made this, I didn’t cream long enough and wondered why my cookie cake was dense. Don’t be me. Give it the full 2-3 minutes. Your mixer arm can handle it.
Step 3: Add eggs and vanilla. Crack your eggs into a small bowl first (I learned this the hard way—nothing like crunching on eggshell). Add them one at a time to your butter mixture, beating well after each addition. Then add your vanilla extract. The mixture should look smooth and slightly fluffy. If it looks a little separated or curdled, don’t panic—that’s totally normal and will come together once you add the dry ingredients.
Step 4: Mix your dry ingredients. In a separate bowl, whisk together your flour, baking soda, and salt. This step matters because it distributes the baking soda evenly, so you don’t get weird bitter pockets.
Step 5: Combine wet and dry. Add your dry ingredients to the wet ingredients and mix on low speed until *just* combined. I’m talking until you don’t see any white streaks of flour—no more. Overmixing develops gluten, and you’ll end up with a tougher, more bread-like texture. We want tender and chewy, not tough and chewy.
What I messed up: I’ve absolutely overmixed this before, and the result was more like a brownie than a cookie cake. Mix until the streaks disappear and then stop. Your willpower will be rewarded.
Step 6: Fold in the M&Ms (and chocolate chips if using). Gently fold in about 1 cup of your M&Ms and the chocolate chips with a rubber spatula or wooden spoon. Save some M&Ms to press into the top of the dough before baking—they look so pretty and stay more intact that way.
Step 7: Transfer to your skillet. Press the dough evenly into your prepared skillet. It should be about 1/2 to 3/4 inch thick. Use your fingers or the back of a measuring cup to smooth it out. Now scatter those reserved M&Ms across the top, pressing them in gently so they stick.
Step 8: Bake. Pop it into your preheated 350°F oven for 20-24 minutes. You’re looking for the edges to be golden brown but the center to still look *slightly* underdone—like, you could press your finger into it and leave an indent. This is key. The cookie cake will continue to cook as it cools, and you’ll end up with that perfect chewy center and crispy edges.
What I messed up: I’ve definitely baked this too long before and ended up with a cake that was more cake than cookie. Start checking at 20 minutes. Every oven is different, so trust your eyes, not just the clock.
Step 9: Cool (if you can wait). Let it cool in the skillet for about 10 minutes. This gives it time to set up so it doesn’t fall apart when you slice it. If you’re like me and have zero patience, you can eat it warm with a spoon straight from the skillet. No judgment here.
Common Mistakes to Avoid
I’ve made every mistake in the book so you don’t have to. Here are the big ones:
- Using cold butter: It won’t cream properly, and your dough will be dense and greasy. Let it sit out for 30 minutes.
- Overmixing the dough: This develops gluten and makes your cookie cake tough instead of tender. Mix until the dry ingredients are just incorporated and stop.
- Baking too long: The center should still look slightly underdone when you pull it out. It’ll firm up as it cools.
- Not measuring flour correctly: Spoon flour into your measuring cup and level it off—don’t scoop directly from the bag. Too much flour makes things dry and dense.
- Skipping the cooling time: I get it, you want to eat it immediately. But letting it cool for 10 minutes in the skillet helps it hold together when you slice it.
My Tested Substitutions
Life happens, and sometimes you don’t have exactly what the recipe calls for. Here’s what I’ve successfully swapped:
- Butter: You can use salted butter if that’s what you have—just reduce the added salt to 1/2 teaspoon. Coconut oil works too, though the flavor will be slightly different and a bit more delicate.
- Eggs: If you’re baking for someone with an egg allergy, use a flax egg (1 tablespoon ground flaxseed mixed with 3 tablespoons water per egg). Your cookie cake will be slightly less fluffy but still delicious.
- All-purpose flour: You can use whole wheat flour for up to half the flour amount—it’ll be a bit denser and nuttier. I wouldn’t go all whole wheat with this one.
- M&Ms: Literally any candy works. I’ve used Reese’s pieces, Skittles, crushed Oreos, and even gummy bears. Adjust baking time slightly if using candies that melt easily.
- Brown sugar: If you don’t have it, mix 1 tablespoon of molasses with regular granulated sugar for each 1/4 cup of brown sugar you need.
How to Customize
This is my favorite part—making this recipe your own. Here are some combinations I’ve tested and loved:
- The Peanut Butter Cup: Use peanut butter M&Ms, add 1/4 cup peanut butter to the dough, and fold in some chocolate chips. Absolutely addictive.
- The Birthday Cake: Add 1/2 teaspoon almond extract to the vanilla, use rainbow M&Ms, and sprinkle colorful sprinkles on top before baking.
- The Salted Caramel: Use caramel M&Ms, add 1/4 cup caramel bits to the dough, and sprinkle fleur de sel on top right when it comes out of the oven.
- The Double Chocolate: Replace 1/4 cup of the flour with cocoa powder, use chocolate M&Ms, and add dark chocolate chips.
- The Nutella Dream: Swirl 1/4 cup Nutella into the dough before baking, use chocolate M&Ms, and top with crushed hazelnuts.
Serving Ideas
This Giant M&M Cookie Cake is honestly good on its own, but here’s how I like to serve it:
- Warm with vanilla ice cream: The melting ice cream against the warm cookie cake is pure heaven. This is my go-to move.
- With a glass of cold milk: Sometimes the simplest pairing is the best. I’ll cut a slice and grab a cold glass of milk, and I’m set for the evening.
- At a party with whipped cream: Top each slice with a dollop of whipped cream and maybe a drizzle of chocolate sauce. Feels fancy without being fussy.
- For breakfast the next day: Cold cookie cake for breakfast? Don’t mind if I do. It’s basically oatmeal with chocolate, right?
- Crumbled into a sundae: Break it into chunks and layer it with ice cream and toppings for an epic sundae situation.
Meal Prep and Storage
The beautiful thing about this Giant M&M Cookie Cake is that it keeps really well, so you can make it ahead.
Room temperature storage: Keep it covered on your counter for up to 3 days. I like to cover it loosely with foil or a kitchen towel—not plastic wrap, because that can make it sweat and get soggy.
Refrigerator storage: Wrap it well and keep it in the fridge for up to 5 days. It’ll be firmer and less chewy when cold, but honestly, it’s still delicious. Just let it come to room temperature before eating for the best texture.
Freezer storage: You can absolutely freeze this. Wrap it tightly in plastic wrap and then foil, and it’ll keep for up to 3 months. Thaw it overnight in the fridge or for a few hours at room temperature. I’ve done this a bunch of times, and it thaws beautifully.
Make-ahead tip: You can make the dough, press it into the skillet, cover it, and refrigerate it for up to 24 hours before baking. Just add 2-3 minutes to the baking time if baking from cold.
Nutritional Breakdown
Here’s what you’re looking at per serving (assuming you cut this into 8 slices):
- Calories: Approximately 420
- Protein: 5g
- Carbohydrates: 52g
- Fat: 22g
- Fiber: 1g
- Sugar: 38g
This is a treat, not a health food, and I’m totally okay with that. If you want to lighten it up, you could use half whole wheat flour or reduce the sugar slightly, but I’d encourage you to just enjoy it for what it is—a delicious, indulgent dessert that brings joy.
Final Thoughts
I genuinely love this Giant M&M Cookie Cake. It’s become one of those recipes I make when I want to feel like I’ve done something special for the people I love, even though
Giant M&M Cookie Cake
Ingredients
Method
- I'm going to walk you through this exactly how I do it at home, including the moments where I've messed up so you don't have to. Step 1: Preheat and prep. Get your oven to 350°F. Grab a 10 or 12-inch cast iron skillet (or a round baking pan—cast iron just looks cooler and holds heat better). I like to give mine a light spray of cooking spray, but you can also use a little butter. No need to line it or anything fancy. Step 2: Cream the butter and sugars. In a large mixing bowl, combine your room-temperature butter, granulated sugar, and brown sugar. Using an electric mixer (or a wooden spoon and some elbow grease if you're feeling hardcore), beat this together for about 2-3 minutes until it's light, fluffy, and pale. This is where the magic starts. You're incorporating air into the dough, which gives you that tender crumb. What I messed up: The first time I made this, I didn't cream long enough and wondered why my cookie cake was dense. Don't be me. Give it the full 2-3 minutes. Your mixer arm can handle it. Step 3: Add eggs and vanilla. Crack your eggs into a small bowl first (I learned this the hard way—nothing like crunching on eggshell). Add them one at a time to your butter mixture, beating well after each addition. Then add your vanilla extract. The mixture should look smooth and slightly fluffy. If it looks a little separated or curdled, don't panic—that's totally normal and will come together once you add the dry ingredients. Step 4: Mix your dry ingredients. In a separate bowl, whisk together your flour, baking soda, and salt. This step matters because it distributes the baking soda evenly, so you don't get weird bitter pockets. Step 5: Combine wet and dry. Add your dry ingredients to the wet ingredients and mix on low speed until *just* combined. I'm talking until you don't see any white streaks of flour—no more. Overmixing develops gluten, and you'll end up with a tougher, more bread-like texture. We want tender and chewy, not tough and chewy. What I messed up: I've absolutely overmixed this before, and the result was more like a brownie than a cookie cake. Mix until the streaks disappear and then stop. Your willpower will be rewarded. Step 6: Fold in the M&Ms (and chocolate chips if using). Gently fold in about 1 cup of your M&Ms and the chocolate chips with a rubber spatula or wooden spoon. Save some M&Ms to press into the top of the dough before baking—they look so pretty and stay more intact that way. Step 7: Transfer to your skillet. Press the dough evenly into your prepared skillet. It should be about 1/2 to 3/4 inch thick. Use your fingers or the back of a measuring cup to smooth it out. Now scatter those reserved M&Ms across the top, pressing them in gently so they stick. Step 8: Bake. Pop it into your preheated 350°F oven for 20-24 minutes. You're looking for the edges to be golden brown but the center to still look *slightly* underdone—like, you could press your finger into it and leave an indent. This is key. The cookie cake