Cheesy Garlic Butter Lobster Tails
Cheesy Garlic Butter Lobster Tails
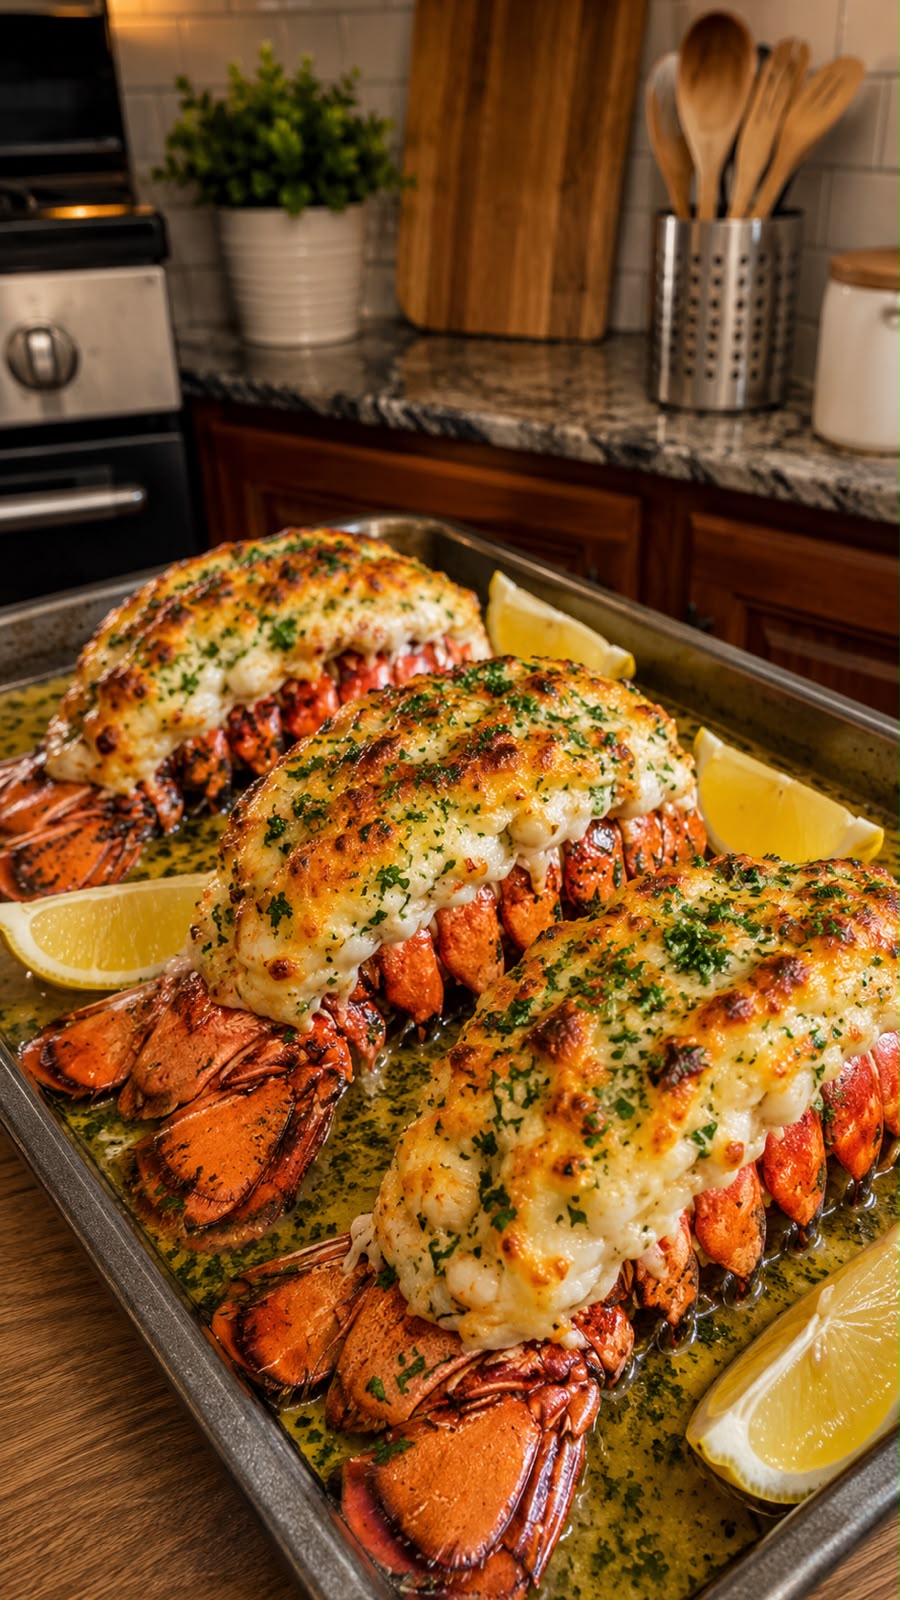
Cheesy Garlic Butter Lobster Tails is a luxurious yet approachable seafood dish that transforms simple lobster tails into a rich, savory centerpiece. The preparation centers on a velvety mixture of melted butter, aromatic garlic, and fresh herbs, which is brushed generously over the tender meat before baking. A layer of melted cheese, typically a blend like mozzarella or Gruyère, creates a golden, bubbling crust that contrasts beautifully with the sweet, delicate texture of the lobster. This dish is particularly useful for special occasions, holiday dinners, or when you want to elevate a weeknight meal without spending hours in the kitchen. The flavors are bold and comforting, making it an ideal choice for those who appreciate high-quality ingredients prepared with straightforward techniques.
For more culinary inspiration and visual guides, Follow Hailee Recipes on Pinterest.
Why This Recipe Works
The success of this dish relies on balancing the richness of the butter and cheese with the natural sweetness of the lobster. By using a garlic butter baste, you ensure that the meat stays moist during the high-heat cooking process, preventing the common pitfall of rubbery, overcooked shellfish. The cheese acts as both a flavor enhancer and a protective barrier, sealing in juices while adding a creamy texture that complements the firm bite of the tail. This method allows home cooks to achieve restaurant-quality results by focusing on proper temperature control and timing rather than complex culinary skills. The simplicity of the ingredient list ensures that every component shines, creating a harmonious dish where no single element overpowers the others.
Ingredients
To prepare this recipe successfully, precise measurements and quality ingredients are essential. You will need four large lobster tails, ideally weighing about 6 to 8 ounces each, to ensure they cook evenly without drying out. The fat base consists of one-half cup of unsalted butter, which provides the necessary richness and helps conduct heat efficiently. Fresh garlic is crucial for the signature flavor; use three cloves, minced finely to distribute the aroma throughout the sauce. For the cheesy topping, one cup of shredded mozzarella cheese works well for its meltability, though you may substitute half of it with Parmesan for a sharper taste. Fresh parsley, chopped, adds a touch of color and freshness to cut through the heaviness of the butter. A squeeze of lemon juice brightens the overall profile, and salt and black pepper are used to season the meat before applying the butter mixture.
- 4 large lobster tails (6–8 oz each)
- 1/2 cup unsalted butter, melted
- 3 cloves garlic, minced
- 1 cup shredded mozzarella cheese
- 1 tablespoon fresh parsley, chopped
- 1 tablespoon fresh lemon juice
- Salt and black pepper to taste
How To Make Cheesy Garlic Butter Lobster Tails
- Prepare the Lobster Tails: Preheat your oven to 400°F (200°C). Using kitchen shears, carefully cut through the top shell of each lobster tail lengthwise, stopping just before reaching the tail fin. Gently pry the shell open and lift the meat up, resting it on top of the split shell. This technique, often called “butterflying,” exposes the meat to direct heat and allows the butter mixture to penetrate deeply. Pat the meat dry with paper towels and season lightly with salt and pepper on all sides.
- Create the Garlic Butter Mixture: In a small bowl, combine the melted unsalted butter, minced garlic, and lemon juice. Stir thoroughly until the ingredients are fully emulsified. Taste the mixture; if you prefer a stronger garlic flavor, you can add a pinch more, but be cautious not to overwhelm the delicate taste of the lobster. Set aside a small amount of this mixture for brushing later if desired, though most will be used for the initial coating.
- Apply the Butter Base: Brush the exposed lobster meat generously with the garlic butter mixture, ensuring the meat is fully coated. Be careful not to let the butter pool excessively in the shell, as it can cause splattering in the oven. Place the prepared tails on a baking sheet lined with parchment paper or foil for easy cleanup. If you have any remaining butter mixture, reserve it for the final step.
- Add the Cheese Topping: Sprinkle the shredded mozzarella cheese evenly over the top of each lobster tail. Ensure the cheese covers the meat completely but does not pile so high that it prevents the meat from cooking through. The cheese should sit directly on the meat to create that signature gooey, golden layer.
- Bake to Perfection: Place the baking sheet in the preheated oven. Bake for 12 to 15 minutes, depending on the size of your tails. Watch closely as the cheese begins to bubble and turn a light golden brown. The lobster meat should become opaque and firm to the touch. Once done, remove the tray from the oven and immediately brush the reserved garlic butter mixture over the hot cheese and meat. Garnish with fresh chopped parsley before serving.
Doneness And Troubleshooting
Achieving the correct doneness is critical for lobster tails. Overcooking is the most common mistake, leading to tough, chewy meat that loses its sweetness. The best indicator of doneness is the internal temperature; the meat should reach 135°F to 140°F (57°C to 60°C) for optimal tenderness. Visually, the meat will transition from translucent gray to a solid white color. If the cheese browns too quickly before the meat is cooked, loosely tent the baking sheet with aluminum foil to prevent burning while allowing the heat to continue penetrating the meat. Conversely, if the meat appears undercooked after the recommended time, extend the baking time by two-minute increments, checking frequently. If the butter separates and pools at the bottom of the pan, it is likely due to overheating the butter before mixing; ensure the butter is warm but not boiling when combined with the garlic.
Substitutions And Variations
This recipe offers flexibility for different dietary preferences and pantry staples. If you do not have mozzarella, Swiss cheese or a mild cheddar can be used, though they will alter the melting characteristics slightly. For a richer flavor, swap half of the butter for olive oil, but note that the mouthfeel will be less creamy. Those who enjoy a bit of heat can add a pinch of red pepper flakes or a dash of cayenne pepper to the garlic butter mixture. If lobster tails are unavailable or too expensive, jumbo shrimp can be used as a substitute; simply peel and devein them, leaving the tails on for presentation, and reduce the cooking time to 8 to 10 minutes. For a dairy-free version, omit the cheese and top with a sprinkle of toasted breadcrumbs mixed with herbs to provide a crunchy texture instead.
Serving Suggestions
These lobster tails shine when served alongside simple, complementary sides that do not compete with their rich flavor. Steamed asparagus or roasted broccoli pairs wonderfully with the garlic butter notes. A side of fluffy white rice or quinoa helps soak up any extra sauce left on the plate. For a lighter option, serve with a crisp green salad dressed in a vinaigrette to balance the richness of the dish. White wine, such as a Chardonnay or Sauvignon Blanc, makes an excellent beverage pairing, enhancing the briny sweetness of the seafood. Garnish the platter with additional lemon wedges so diners can adjust the acidity to their liking.
Storage And Reheating
Leftover Cheesy Garlic Butter Lobster Tails should be stored in an airtight container in the refrigerator within two hours of cooking. They will remain safe to eat for up to three days. When reheating, avoid using a microwave, as this can make the lobster meat rubbery and cause the cheese to separate. Instead, place the leftovers in an oven-safe dish, cover loosely with foil, and warm in a 300°F (150°C) oven for about 10 to 15 minutes until heated through. Freezing is possible but not recommended for dishes with cheese toppings, as the texture of the cheese and the moisture content of the lobster can change significantly upon thawing. If you must freeze, store the cooked lobster without the cheese topping and add fresh cheese after reheating.
This recipe demonstrates that elegant dining does not require complicated techniques. With careful attention to temperature and timing, you can produce a stunning dish that feels special and satisfies even the most discerning palates. The combination of savory garlic, creamy cheese, and sweet lobster creates a memorable meal that is sure to impress your guests.
Cheesy Garlic Butter Lobster Tails
Ingredients
Method
- Preheat oven to 400°F. Butterfly lobster tails by cutting the top shell and lifting the meat onto the shell. Season with salt and pepper.
- Mix melted butter, minced garlic, and lemon juice in a small bowl.
- Brush the lobster meat generously with the garlic butter mixture.
- Top each tail with shredded mozzarella cheese.
- Bake for 12-15 minutes until cheese is bubbly and meat is opaque. Finish with reserved butter and parsley.