Kool-Aid No Churn Ice Cream Recipe | Homemade Bliss
Kool-Aid No Churn Ice Cream Recipe | Homemade Bliss
Kool-Aid No Churn Ice Cream: A Nostalgic Summer Treat That Actually Works
I was sitting on my mom’s porch last July, sweating through my third iced coffee of the day, when she casually mentioned she’d made ice cream without turning on the oven. Without an ice cream maker. Without any real effort, honestly. I thought she was messing with me. But then she pulled out this vibrant, creamy Kool-Aid ice cream from her freezer, and I took one bite and immediately understood why she’d been keeping this secret weapon to herself.
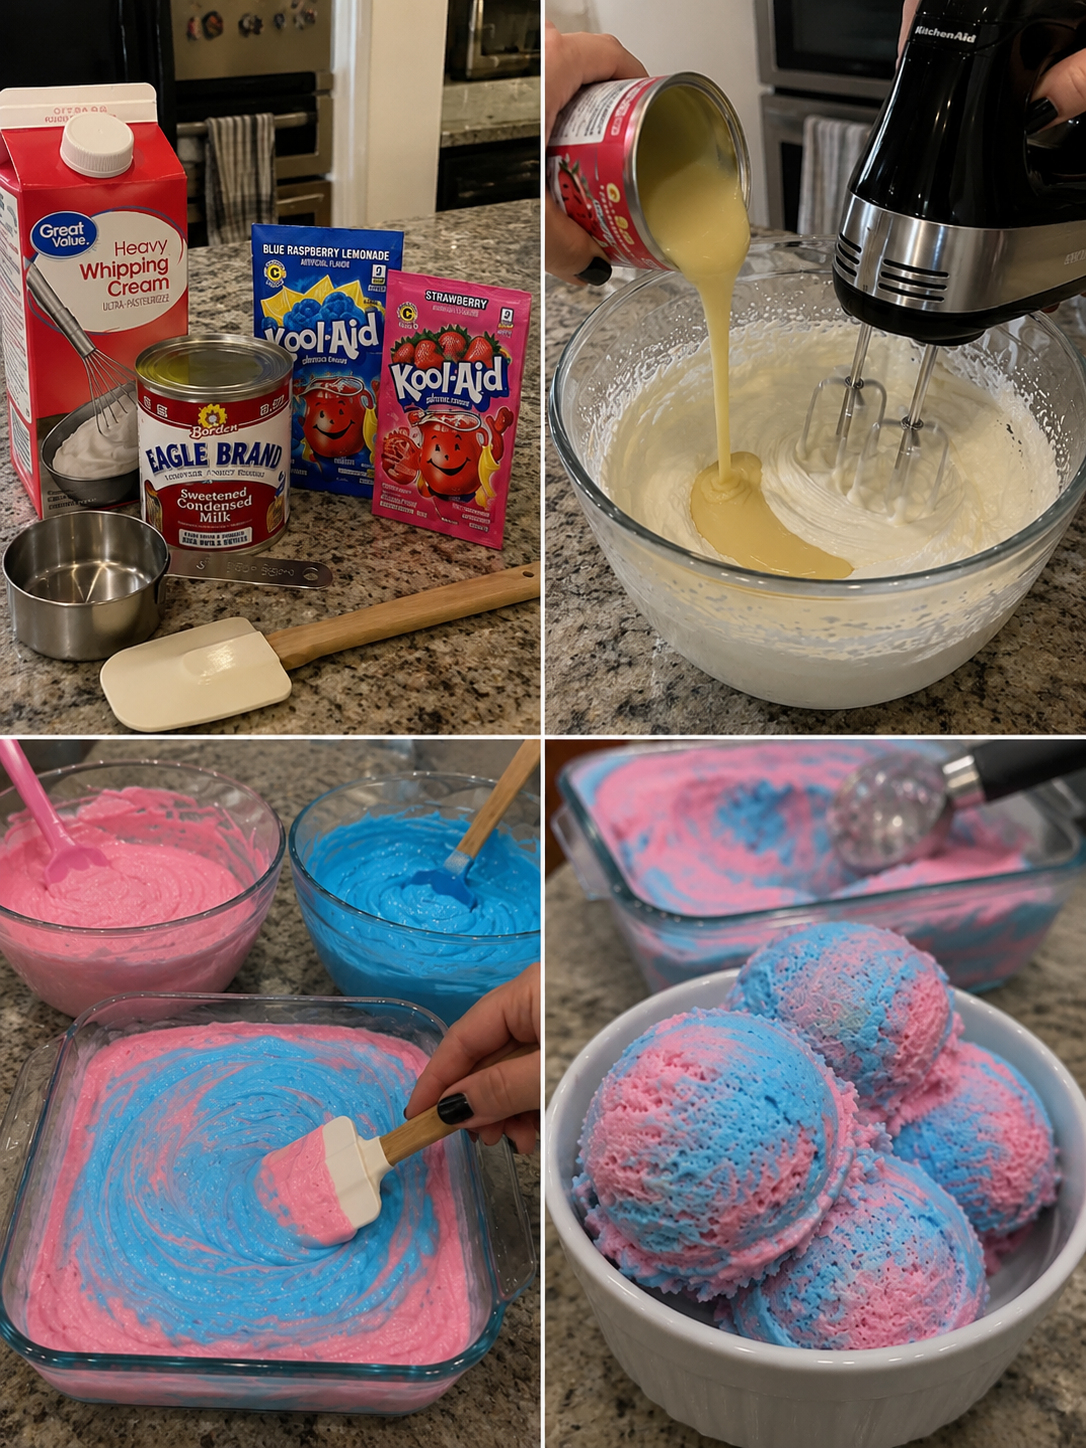
Here’s the thing about no-churn ice cream: it sounds like a hack, but it’s actually just science mixed with a little bit of magic. You’re basically taking heavy cream, sweetened condensed milk, and Kool-Aid powder, whipping it all together, and letting your freezer do the heavy lifting. No special equipment. No ice cream maker sitting in your cabinet collecting dust. Just a bowl, a mixer, and about five minutes of your time before you hand it off to the cold for a few hours.
I’ve made this recipe probably thirty times now—for summer barbecues, late-night cravings, when my kids’ friends show up unexpectedly and I need to look like I have my life together. It works every single time. The texture is silky and smooth, the flavor is pure and bright, and honestly, people are always shocked when I tell them there’s no ice cream maker involved.
This recipe is for anyone who loves homemade ice cream but doesn’t want the fuss. It’s for the person who sees Kool-Aid and gets hit with a wave of childhood nostalgia. It’s for busy parents, for people with small freezers, for anyone who wants to feel like a dessert wizard without actually being one. If you want to follow along with more easy recipes like this, follow me on HaileeRecipes on Pinterest where I’m always sharing cozy kitchen shortcuts.
Why You’ll Love This Recipe
Let me be real with you: this is not fancy restaurant ice cream. This is the ice cream you make on a random Tuesday because you’re bored and your freezer is empty. It’s nostalgic without trying too hard. It tastes like summer and childhood and that feeling when you find exactly what you needed without having to search for it.
The best part? It’s genuinely foolproof. I’ve tested this with different Kool-Aid flavors, different brands of sweetened condensed milk, and even with a hand mixer when I couldn’t find my electric one. It works. Every time. The texture comes out creamy and scoopable, not icy or weird or separated.
You also get to customize it completely. Cherry? Watermelon? Blue raspberry? Tropical punch? You can make whatever flavor is calling to you that day. And if you want to get fancy, you can add sprinkles, candy, brownies, or literally anything else your brain dreams up.
Ingredients
- 2 cups heavy whipping cream (cold, straight from the fridge)
- 1 can (14 ounces) sweetened condensed milk
- 1 packet (0.13 ounces) unsweetened Kool-Aid powder (any flavor you love)
- 2 tablespoons granulated sugar (optional, but I use it)
- Pinch of salt (trust me on this)
Hailee’s Tip: Cold cream is non-negotiable here. If your cream isn’t cold, your whipped cream won’t hold peaks, and you’ll end up with a soupy mess. Keep that heavy cream in the coldest part of your fridge until you’re ready to use it.
Hailee’s Tip: The Kool-Aid powder is unsweetened, which is why we need the sweetened condensed milk. Don’t accidentally grab the pre-sweetened packets—they’re a different product and will throw off your whole recipe. The unsweetened packets are usually cheaper anyway and way more versatile.
Hailee’s Tip: That pinch of salt? It sounds random, but it makes the Kool-Aid flavor pop. Salt enhances sweetness and makes everything taste more like itself. It’s my secret weapon in basically every dessert I make.
Optional Add-Ins and Variations
This is where you get to play. I love having a little fun with mix-ins because they make each batch feel special and personal.
- Crushed cookies: Oreos, graham crackers, or vanilla wafers all work beautifully. Fold them in after whipping.
- Brownie chunks: Make or buy brownies, cut them into chunks, and fold them in right before freezing.
- Sprinkles: Rainbow sprinkles, pearl sprinkles, or chocolate sprinkles all add a fun texture contrast.
- Candy pieces: M&Ms, Reese’s pieces, or crushed hard candy bring a nice surprise element.
- Fresh fruit: Crushed strawberries, blueberries, or diced peaches add brightness and a little tartness.
- Chocolate drizzle: Swirl in some melted chocolate or chocolate syrup right before freezing for a marble effect.
- Coconut flakes: Toasted or untoasted, depending on your mood.
The key with add-ins is to keep them relatively small and fold them in gently at the very end so they stay distributed throughout instead of sinking to the bottom. Well, unless sinking to the bottom is exactly what you want. No judgment here.
Step-by-Step Method
Step 1: Gather Your Cold Cream
Pour your cold heavy cream into a large mixing bowl. This is important—use a bowl that’s big enough to give the cream room to expand as you whip it. A small bowl will just frustrate you. I learned this the hard way when cream splattered all over my kitchen. Use a bowl that feels generous.
Step 2: Whip the Cream
Using an electric mixer on medium-high speed, whip the cream for about 2 to 3 minutes until it forms soft peaks. You’re looking for that fluffy, cloud-like texture where the cream holds a shape but still looks a little jiggly. Don’t walk away and go scroll your phone—this can turn into whipped cream butter real fast if you’re not paying attention.
What I Messed Up: I once got distracted and whipped the cream too long, and it basically turned into butter. It was still usable, but the texture wasn’t as light and airy. Now I set a timer and stay in the kitchen.
Step 3: Add the Kool-Aid Powder
Sprinkle the unsweetened Kool-Aid powder directly over the whipped cream. Add the sugar and the pinch of salt too. Now, gently fold everything together using a spatula or a large spoon. Fold, don’t stir. Folding keeps all those air bubbles intact, which is what gives you that creamy texture later.
What I Messed Up: I once got aggressive with the folding and basically deflated all my whipped cream. The ice cream still turned out okay, but it was denser and more icy than I wanted. Gentle is the word here. Pretend you’re folding a baby into a blanket.
Step 4: Add the Sweetened Condensed Milk
Pour the entire can of sweetened condensed milk into the bowl. Fold it in gently, making sure everything is combined and the color is even. This is when your ice cream base is going to look its most beautiful—vibrant and thick and creamy all at once.
Step 5: Transfer and Freeze
Pour the mixture into a loaf pan or a freezer-safe container. If you want to add any mix-ins, fold them in now. Cover the container with plastic wrap or a lid and slide it into the freezer.
Step 6: Patience (The Hardest Step)
Let it freeze for at least 4 hours, but ideally overnight. I know it’s hard. I’ve stood in front of my freezer at the 3-hour mark hoping it was done. It wasn’t. Give it the full time. Your future self will thank you.
Common Mistakes to Avoid
Using warm cream: Warm cream won’t whip properly. It’ll just sit there looking sad. Make sure your cream is cold, and ideally, chill your mixing bowl too.
Skipping the salt: I know it sounds weird to add salt to ice cream, but it really does make a difference. It brightens the flavor and makes the Kool-Aid taste more like itself.
Over-folding: This deflates all your beautiful whipped cream and gives you dense, icy ice cream instead of creamy ice cream. Fold gently and stop as soon as everything is combined.
Not freezing it long enough: Four hours is the minimum. Overnight is better. If you try to scoop it before it’s fully frozen, you’ll get a slushy mess.
Forgetting to cover it: Uncovered ice cream in the freezer gets freezer burn and absorbs all the weird flavors from your frozen pizza and that mysterious container in the back. Cover it.
My Tested Substitutions
If you don’t have sweetened condensed milk: You can use 1 cup of heavy cream mixed with 3/4 cup of powdered sugar blended together until smooth. It’s not exactly the same, but it works in a pinch.
If you want it less sweet: Reduce the sugar to 1 tablespoon or skip it entirely. The sweetened condensed milk is already pretty sweet, so you might not need extra sugar at all.
If you want to use a different flavor powder: Any unsweetened Kool-Aid works. You can also experiment with unsweetened drink mixes from other brands. Just make sure they’re unsweetened.
If you only have a hand mixer: It takes longer, but it works. Your arm will get a workout, but I’ve done it and lived to tell the tale.
If you want it dairy-free: Use full-fat coconut cream instead of heavy cream and a dairy-free sweetened condensed milk alternative. The texture will be slightly different, but it’s still delicious.
How to Customize
The beauty of this recipe is that you can make it completely your own. Here are some flavor combinations I’ve loved:
- Cherry with chocolate chips: Classic and never gets old.
- Watermelon with crushed graham crackers: Tastes like summer and campfires.
- Blue raspberry with white chocolate chunks: Sweet and a little tart.
- Tropical punch with toasted coconut: Feels like a vacation.
- Strawberry with brownie pieces: Basically a fancy dessert.
You can also layer it. Make one batch, freeze it for 2 hours, then add another layer of a different flavor. It’s a little extra, but it looks so cool when you scoop it.
Serving Ideas
Okay, so your ice cream is frozen and ready. Now what? Here are my favorite ways to serve it:
- In a cone: Classic, simple, perfect.
- In a bowl with toppings: Sprinkles, whipped cream, chocolate syrup, crushed cookies—go wild.
- As a float: Scoop it into a glass and pour your favorite soda over it. It’s nostalgic and delicious.
- Between two cookies: Make an ice cream sandwich with your favorite cookies.
- With pie or cake: It’s ice cream. It goes with everything sweet.
- On its own: Sometimes the best way to eat ice cream is just to eat ice cream.
Meal Prep and Storage
This ice cream keeps beautifully in the freezer for up to 2 weeks, which is longer than it usually lasts in my house. Store it in an airtight container with plastic wrap pressed directly onto the surface to prevent freezer burn.
If your ice cream gets a little hard and difficult to scoop, let it sit on the counter for 5 to 10 minutes before scooping. It’ll soften up just enough to be manageable.
You can also make this recipe ahead of time for parties or events. Make it a day or two before you need it, and it’ll be perfect and ready to go.
Nutritional Breakdown
Here’s the nutritional information per serving (assuming 8 servings):
- Calories: 380
- Protein: 3g
- Carbohydrates: 38g
- Fat: 24g
- Fiber: 0g
Keep in mind that this can vary depending on which Kool-Aid flavor you use and any add-ins you include. This is just an estimate based on the basic recipe.
Final Thoughts
Making Kool-Aid no churn ice cream has become one of my favorite summer traditions. It’s easy enough that I can make it on a random Tuesday afternoon, but it feels special enough that I’m always proud to serve it to people I love. There’s something really satisfying about turning a few simple ingredients into something that tastes like a memory.
I think the best recipes are the ones that don’t require you to be a professional chef or have fancy equipment. They’re the ones that let you be creative and have fun in the kitchen without any pressure or stress. This is one of those recipes.
So go ahead and make a batch. Pick your favorite Kool-Aid flavor. Add some sprinkles if you want. Freeze it overnight. And then enjoy it knowing you made something delicious with your own two hands and basically zero effort. That’s the dream, right there.
—
Recipe Card
Kool-Aid No Churn Ice Cream Recipe | Homemade Bliss
Ingredients
Method
- Pour cold heavy cream into a large mixing bowl and whip on medium-high speed for 2 to 3 minutes until soft peaks form.
- Sprinkle Kool-Aid powder, sugar, and salt over the whipped cream.
- Gently fold everything together using a spatula until combined and the color is even.
- Pour in the sweetened condensed milk and fold gently until fully incorporated.
- Transfer the mixture to a freezer-safe container and cover with plastic wrap or a lid.
- Freeze for at least 4 hours, preferably overnight, until firm and scoopable.
- Scoop and serve. Store in an airtight container in the freezer for up to 2 weeks.