Strawberry Crunch Ice Cream
Strawberry Crunch Ice Cream
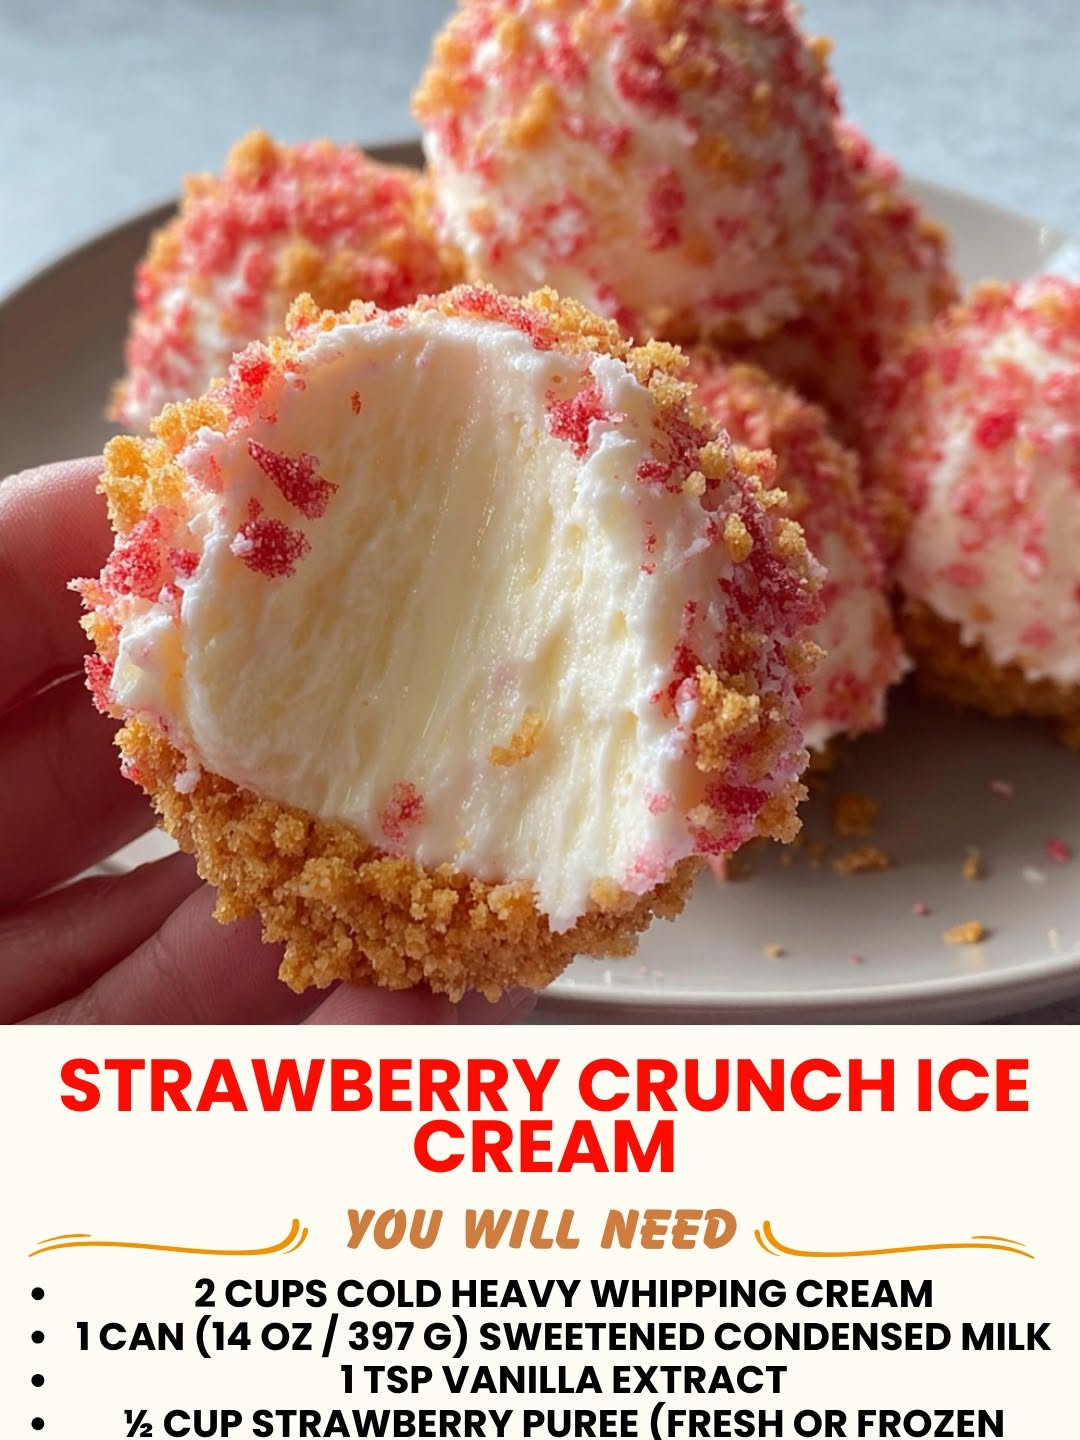
Strawberry Crunch Ice Cream: A Summer Love Story
You know that feeling when you bite into something and it’s exactly what you didn’t know you needed? That’s strawberry crunch ice cream for me. I first made this on a sweltering July afternoon when my air conditioning decided to quit, and honestly, I was desperate. I had fresh strawberries from the farmers market, a half-empty container of heavy cream, and the kind of mood where I needed something to go right. What I ended up with was this ridiculously good, creamy, fruity ice cream with these little pockets of sweet, crunchy texture that just makes you want to keep going back for one more spoonful.
The thing I love most about strawberry crunch ice cream is that it tastes like summer in a bowl. It’s not overly complicated, it doesn’t require an ice cream maker (though you can use one), and it actually tastes like real strawberries—not that artificial candy flavor you get from some store-bought versions. The crunch comes from a simple brown sugar granola or candied walnut topping that you layer in, and I promise you, once you taste it, you’ll understand why this has become my go-to dessert for hot nights, family gatherings, and those moments when I just need a little comfort.
This recipe is for anyone who loves homemade ice cream but doesn’t want to spend hours fussing around. It’s for people who have a food processor or blender and about fifteen minutes of actual hands-on time. It’s for families, for date nights, for solo indulgence at midnight. And if you want to see more recipes like this, follow me on HaileeRecipes on Pinterest—I’m always sharing cozy, real-life food that actually works.
Why You’ll Love This Recipe
Let me be honest: making ice cream at home used to intimidate me. I thought I needed fancy equipment and a culinary degree. But this strawberry crunch ice cream changed that for me, and I think it will for you too.
First, the flavor is genuinely incredible. You’re using fresh strawberries, so you get that bright, natural taste. No artificial sweeteners, no weird stabilizers—just real ingredients that you recognize. The texture is creamy and smooth without being heavy, and because we’re using a simple no-churn method, you don’t have to stand around waiting for a machine to do its thing.
Second, the crunch factor is what makes people ask for seconds. That contrast between the cold, smooth ice cream and the sweet, toasty crunch is honestly addictive. I’ve served this to people who claim they don’t even like strawberry ice cream, and they’ve come back asking for the recipe.
Third, this is genuinely flexible. You can make it with or without an ice cream maker. You can swap the berries. You can adjust the sweetness. You can make it dairy-free if you need to. It’s a recipe that works with your life, not against it.
Ingredients
For the Ice Cream Base:
- 1 pound fresh strawberries, hulled and halved
- 3/4 cup granulated sugar (divided: 1/2 cup for berries, 1/4 cup for cream)
- 2 tablespoons fresh lemon juice
- 2 cups heavy cream, cold
- 1 cup whole milk, cold
- 1 teaspoon vanilla extract
- Pinch of sea salt
For the Crunch Topping:
- 1 cup old-fashioned rolled oats
- 1/2 cup chopped walnuts or pecans
- 1/3 cup brown sugar, packed
- 3 tablespoons melted butter
- 1/4 teaspoon cinnamon
- Pinch of salt
Hailee’s Tip: Use the coldest cream and milk you have. I actually keep mine in the freezer for about thirty minutes before making ice cream. Cold ingredients mean better texture and faster churning.
Hailee’s Tip: For the strawberries, choose ones that are ripe and fragrant. Pale, hard berries will give you pale, hard-tasting ice cream. You want berries that smell like summer.
Hailee’s Tip: If you’re using an ice cream maker, make sure your bowl is frozen solid. I keep mine in the freezer at all times because I make ice cream more often than I probably should.
Optional Add-Ins and Variations
One of my favorite things about this recipe is how easy it is to make it your own. Here are some variations I’ve tested and genuinely loved:
- Strawberry Shortcake Version: Layer in crumbled vanilla wafers or pound cake pieces along with the crunch topping. It’s like eating the dessert inside the dessert.
- Balsamic Strawberry: Add one tablespoon of aged balsamic vinegar to the strawberry mixture. It sounds weird, but it deepens the flavor in the most sophisticated way.
- Honey Swirl: Drizzle raw honey between layers. You get pockets of sweetness and a slightly different texture.
- Chocolate Chip Crunch: Mix dark chocolate chips into the granola topping. Strawberry and chocolate is never a bad idea.
- Boozy Version: Stir in two tablespoons of strawberry liqueur or champagne to the cream mixture. Adults only, obviously.
- Dairy-Free: Substitute the heavy cream with full-fat coconut cream and use oat milk or cashew milk instead of dairy milk. It works beautifully.
Step-by-Step Method
Making the Strawberry Base
Step 1: Macerate the Berries
Combine your halved strawberries with 1/2 cup of granulated sugar and the lemon juice in a bowl. Stir it together gently and let it sit for about fifteen to twenty minutes. What you’re doing here is drawing out the strawberry juices and creating a natural syrup. This is honestly one of my favorite steps because the kitchen starts smelling incredible.
After the berries have released their juices, pour everything into a food processor or blender and blend until smooth. If you like a bit of texture, pulse instead of fully blending. I prefer it completely smooth for this recipe, but you do you.
What I Messed Up: The first time I made this, I skipped the maceration step and blended cold berries straight up. The texture was icy and grainy. Don’t be me. Give the berries time to get juicy.
Step 2: Prepare the Cream Mixture
In a separate bowl, combine your cold heavy cream, cold milk, the remaining 1/4 cup of sugar, vanilla extract, and sea salt. Whisk it together until the sugar is dissolved and the mixture is smooth. Taste it and adjust sweetness if needed—I like mine just slightly sweet because the berries add their own sweetness.
Step 3: Combine Everything
Pour the strawberry mixture into the cream mixture and stir gently until everything is combined. You should have a beautiful pale pink liquid that smells like summer.
Making the Crunch Topping
Step 4: Toast the Granola
Preheat your oven to 325 degrees. In a bowl, combine the oats, chopped nuts, brown sugar, melted butter, cinnamon, and salt. Mix until everything is coated and a bit clumpy.
Spread it onto a baking sheet and bake for about twelve to fifteen minutes, stirring halfway through, until it’s golden and fragrant. Let it cool completely on the pan—it’ll crisp up as it cools. Break it into small, bite-sized pieces.
What I Messed Up: I once forgot to break up the granola after it cooled, and it turned into one giant clump. You want pieces, not a brick.
Churning and Freezing
Step 5: Choose Your Method
If You Have an Ice Cream Maker: Pour your mixture into the machine and churn according to the manufacturer’s instructions, usually about twenty to thirty minutes. When it’s almost done, fold in about half of your crunch topping. Transfer to a freezer-safe container, top with remaining crunch, and freeze for at least four hours.
If You Don’t Have an Ice Cream Maker (My Preferred Method): Pour the mixture into a shallow freezer-safe container. Freeze for about two hours until it’s slushy around the edges but still liquid in the center. Take a fork and scrape and stir everything together, breaking up any ice crystals. Fold in half of your crunch topping. Freeze again for two hours, then repeat the scraping process one more time. Fold in the remaining crunch and freeze until solid, about four more hours or overnight.
Hailee’s Tip: The no-churn method takes longer overall, but the hands-on time is minimal, and honestly, I find it kind of meditative. Plus, you get really creamy ice cream because you’re breaking up the ice crystals manually.
Step 6: Let It Soften Slightly
When you’re ready to serve, let the ice cream sit on the counter for about five minutes. This makes it easier to scoop and lets the crunch stay crunchy instead of turning rock-hard.
Common Mistakes to Avoid
Using Warm Ingredients: Warm cream and milk will take forever to freeze and won’t give you that smooth texture. Cold is your friend here.
Skipping the Maceration Step: I know it seems like an extra step, but it makes a huge difference in flavor and texture. Trust me.
Not Breaking Up Ice Crystals: If you’re using the no-churn method, don’t skip those intermediate freezing and stirring steps. That’s what keeps it creamy instead of icy.
Adding the Crunch Too Early: If you fold it in at the very beginning, it’ll get soggy. Add it near the end of churning or freezing.
Storing It Wrong: Ice cream picks up freezer flavors, so keep it in an airtight container away from anything strong-smelling.
My Tested Substitutions
Berries: Raspberries, blackberries, and blueberries all work beautifully. Use the same weight and follow the same maceration process. Mix berries are gorgeous too—I’ve done a strawberry-raspberry combo that was incredible.
Nuts in the Crunch: Almonds, cashews, pecans, or even seeds like sunflower or pumpkin work great. Just make sure they’re roughly the same size so they toast evenly.
Sweetener: If you want to use honey instead of sugar, use about 2/3 cup of honey for every 3/4 cup of sugar. It’ll be slightly softer when frozen, which is actually kind of nice.
Cream: I’ve made this with half-and-half instead of heavy cream, and it’s still good, just a bit less rich. Greek yogurt mixed with cream is also divine—adds a little tang that’s really nice with strawberries.
Dairy-Free: Full-fat coconut cream, oat cream, or cashew cream all work. The texture might be slightly different, but it’s still delicious.
How to Customize
This is really your canvas. Want it sweeter? Add more sugar. Want it less sweet? Use less. Want it more berry-forward? Use a pound and a half of strawberries. Want it creamier? Add a tablespoon of cream cheese to the base. Want it tangier? Add a splash of buttermilk or Greek yogurt.
The beauty of homemade ice cream is that you can taste as you go and adjust. Store-bought ice cream doesn’t let you do that.
Serving Ideas
I love serving strawberry crunch ice cream with warm pound cake or shortbread cookies. The contrast between cold and warm is chef’s kiss. You can also serve it with fresh berries on top, a drizzle of honey, or even a splash of balsamic vinegar if you’re feeling fancy.
For a simple dessert, I sometimes just put a scoop in a bowl with a few fresh strawberries and call it a night. It’s elegant without being fussy.
If you’re serving this at a gathering, scoop it into bowls about ten minutes before serving so it has time to soften slightly. Nobody wants to wrestle with rock-hard ice cream.
Meal Prep and Storage
This ice cream keeps beautifully in the freezer for about two weeks in an airtight container. After that, it starts to develop ice crystals and get that grainy texture. It’s still edible, but it’s not at its best.
You can make the strawberry base up to two days ahead and keep it in the fridge. You can also make the crunch topping up to a week ahead and store it in an airtight container at room temperature. Then you just combine everything and freeze when you’re ready.
If you want to make a big batch for a party, I’d recommend making it the day before. It’ll be perfectly frozen and ready to scoop.
Nutritional Breakdown
Per serving (about 1/2 cup), this strawberry crunch ice cream has approximately:
- Calories: 280
- Protein: 3g
- Carbohydrates: 28g
- Fat: 18g
- Fiber: 1g
- Sugar: 24g
Hailee’s Note: These are estimates based on standard ingredients. If you make substitutions, the numbers will change. The crunch topping adds most of the fat and calories, but it’s also what makes this special, so I say it’s worth it.
Final Thoughts
Making strawberry crunch ice cream at home is one of those simple pleasures that reminds me why I love cooking in the first place. It’s not complicated, it doesn’t require fancy equipment, and it brings genuine joy to the people who eat it. There’s something really special about serving someone ice cream you made yourself, especially when they take that first bite and their eyes light up.
I hope you make this recipe and love it as much as I do. I hope you experiment with it, make it your own, and maybe even make it for someone you care about. And if you do, I’d genuinely love to hear about it. Food is better when it’s shared, and stories about food are better when they’re told.
Happy freezing, and enjoy every crunchy, creamy bite.
With warmth,
Hailee
—
Strawberry Crunch Ice Cream
Ingredients
Method
- Combine halved strawberries with 1/2 cup granulated sugar and lemon juice in a bowl. Let sit for 15-20 minutes until berries release their juices.
- Blend strawberry mixture in a food processor until smooth. Set aside.
- Preheat oven to 325 degrees. Mix oats, nuts, brown sugar, melted butter, cinnamon, and salt on a baking sheet. Bake for 12-15 minutes, stirring halfway, until golden. Cool completely and break into bite-sized pieces.
- In a separate bowl, whisk together cold heavy cream, cold milk, remaining 1/4 cup sugar, vanilla extract, and sea salt until sugar dissolves.
- Pour strawberry mixture into cream mixture and stir until combined.
- If using an ice cream maker: Churn according to manufacturer's instructions, fold in half the crunch topping