Bacon-Wrapped Roast Beef
Bacon-Wrapped Roast Beef
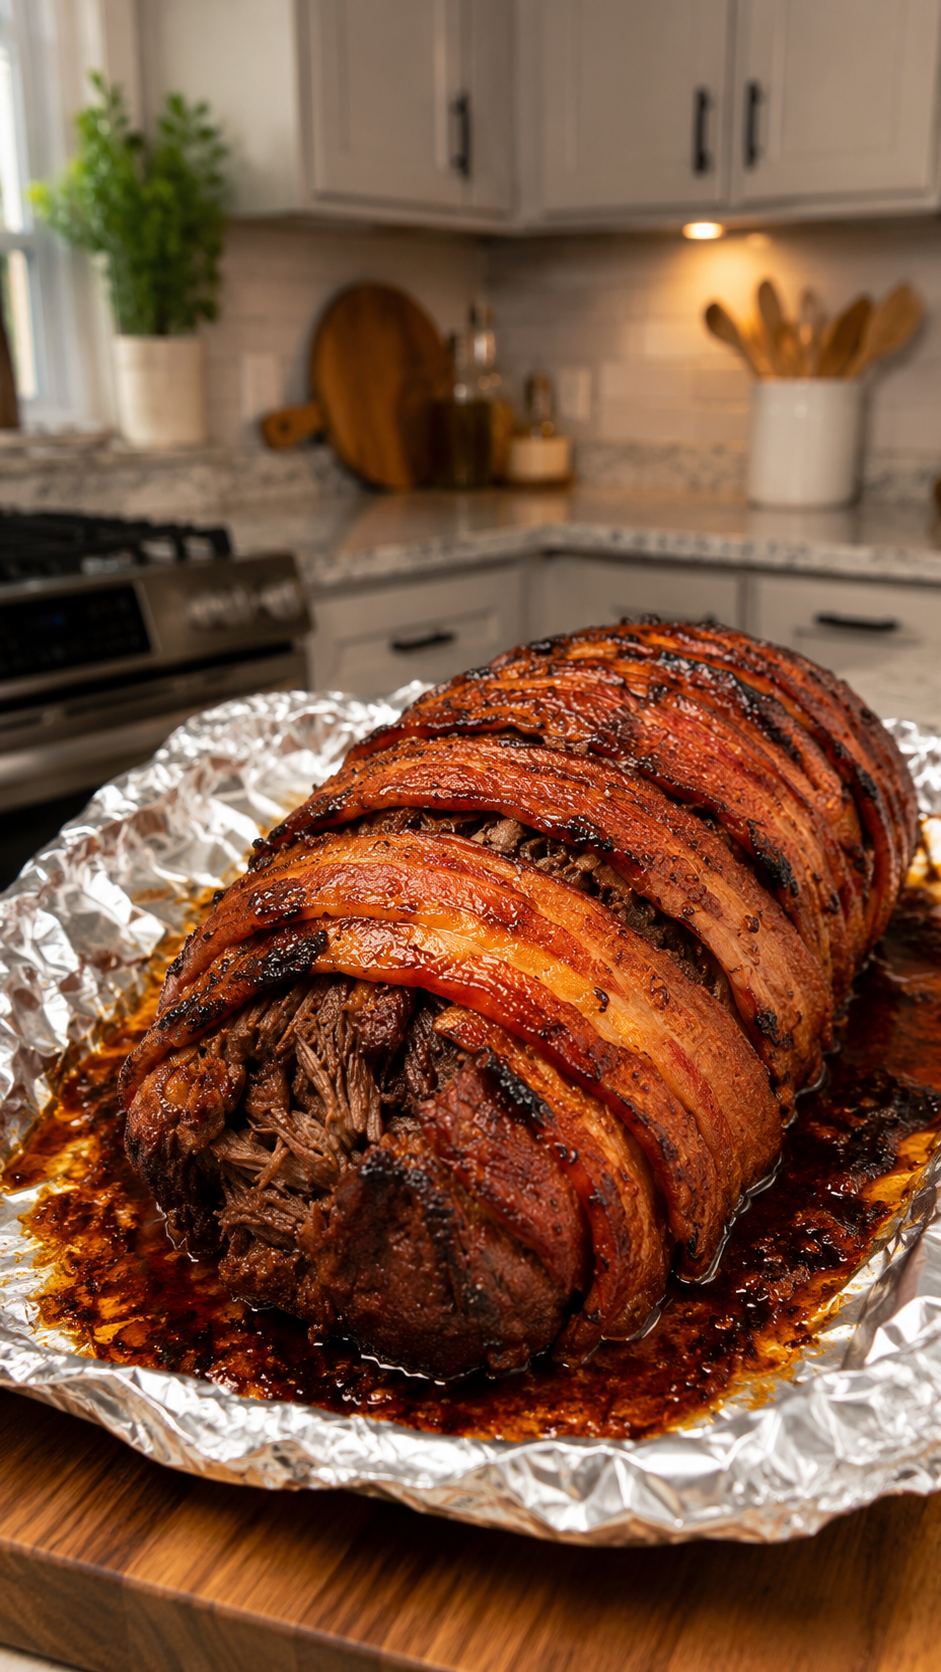
Bacon-Wrapped Roast Beef: A Cozy Dinner That Feels Like a Hug
I still remember the first time I made bacon-wrapped roast beef for my family. It was one of those nights where I wanted to cook something that felt special but didn’t require me to stress for hours. My partner had been asking for a “proper” dinner—something that felt restaurant-quality but tasted like home. I pulled out a beautiful beef roast from the grocery store, grabbed a package of bacon, and honestly just started wrapping.
What came out of the oven was pure magic. The bacon crisped up beautifully, the beef stayed incredibly tender and juicy, and the whole house smelled like a steakhouse had moved into my kitchen. My kids actually asked for seconds without me bribing them with dessert. That’s when I knew this was a keeper.
Here’s the thing about bacon-wrapped roast beef: it looks fancy enough to impress guests, but it’s genuinely one of the easiest proteins you can roast. The bacon does half the work for you—it keeps the meat moist, adds flavor, and honestly makes everything look gorgeous. Whether you’re cooking for a Sunday family dinner, a special occasion, or just a Tuesday night when you want to feel a little fancier than usual, this recipe delivers.
I’ve made this dish dozens of times now, and I’m sharing everything I’ve learned—the mistakes I made so you don’t have to, the tweaks that made it even better, and all the real-life tips that matter. If you love this kind of comforting, elegant cooking, I’d love to have you Follow me on HaileeRecipes on Pinterest where I share all my favorite cozy kitchen adventures.
Why You’ll Love This Recipe
Let me be honest: I love this recipe because it’s a total confidence booster. You’re doing something that sounds complicated—wrapping a roast in bacon and roasting it to perfection—but it’s actually straightforward. The bacon wrapping keeps everything together, keeps the meat from drying out, and adds this incredible savory crust that people think you spent way more time on than you actually did.
The flavor is unbeatable. You get that rich, beefy taste from the roast, combined with crispy, salty bacon, and if you season it right, you’ve got a restaurant-quality main course sitting on your dinner table. The texture contrast is beautiful too—crispy bacon exterior, tender pink center if you like it medium-rare, or cooked through if that’s your preference.
It’s also surprisingly flexible. You can make it with different cuts of beef, add herbs and garlic, roast it with vegetables, or keep it simple. It works for small family dinners or when you’re cooking for guests. And the leftovers? Incredible on sandwiches or sliced over salads.
Ingredients
- One 3-4 pound beef roast (I use ribeye or sirloin, but chuck works beautifully too)
- 12-16 slices of bacon (however much you need to wrap it)
- 2 teaspoons kosher salt
- 1 teaspoon black pepper
- 1 teaspoon garlic powder
- 1 teaspoon onion powder
- 1 teaspoon smoked paprika (optional, but I always use it)
- 2 tablespoons olive oil (for searing)
- Optional: fresh rosemary and thyme sprigs
Hailee’s Tip: Don’t skip the searing step. I know it feels like an extra thing, but browning the outside of your roast before roasting creates this incredible crust that keeps everything juicy inside. Trust me on this one.
Hailee’s Tip: Buy good bacon. I’m not saying splurge on the fanciest brand, but thicker-cut bacon wraps better and crisps more evenly than paper-thin stuff. Your future self will thank you.
Hailee’s Tip: Room temperature beef cooks more evenly. Take your roast out of the fridge about 30 minutes before you start cooking. I know it sounds fussy, but it genuinely makes a difference in how evenly it cooks through.
Optional Add-Ins and Variations
This is where you can make the recipe your own. I’m giving you the classic version, but here’s what I’ve played with:
- Garlic lovers: Tuck fresh garlic slivers under the bacon before wrapping. It gets soft and sweet as it roasts.
- Herb situation: Lay fresh rosemary or thyme sprigs on top of the roast before wrapping it in bacon. The herbs infuse into the meat as it cooks.
- Spice kick: Add cayenne pepper or a pinch of chili powder to your seasoning blend if you like heat.
- Fancy move: Brush the roast with Dijon mustard before wrapping it in bacon. Sounds weird, tastes incredible.
- Vegetable roast: Surround the roast with potatoes, carrots, and onions during the last 45 minutes of cooking. Everything gets flavored by the bacon fat and beef drippings.
Step-by-Step Method
Step 1: Prep Your Roast
Take your beef roast out of the fridge and let it sit on the counter for about 30 minutes. This is important because it cooks more evenly when it’s not ice-cold. While it’s coming to room temperature, preheat your oven to 375°F.
Pat the roast completely dry with paper towels. This is crucial for getting a good sear. Any moisture on the surface will steam instead of brown, and we want that beautiful crust.
Step 2: Season It
Mix together your salt, pepper, garlic powder, onion powder, and smoked paprika in a small bowl. Rub this all over the roast—top, bottom, sides, everywhere. Don’t be shy. This is your flavor foundation.
Step 3: Sear the Roast
Heat your olive oil in a large oven-safe skillet (cast iron is perfect here) over medium-high heat. Once the oil is shimmering and hot, carefully place the roast in the pan. You want to hear a good sizzle. Let it sit without moving it for about 3-4 minutes to get a nice brown crust on that side.
Flip it and sear the other side for another 3-4 minutes. Then quickly sear the ends and any other exposed sides. This whole process takes about 12-15 minutes total, and yes, it’s worth every second. You’re building flavor here.
What I Messed Up: The first time I made this, I skipped the searing because I was impatient. The roast was still good, but it didn’t have that gorgeous crust and the exterior was kind of pale and boring. Now I never skip it.
Step 4: Wrap It in Bacon
Remove the roast from the heat and let it cool for just a minute or two. Now comes the fun part. Take your bacon slices and start wrapping them around the roast. I usually start at one end and spiral around, overlapping each slice slightly so they hold together. You want the bacon to cover as much of the roast as possible.
If your bacon slices are short, you might need to use two pieces end-to-end to wrap all the way around. That’s totally fine. The goal is coverage and security so the bacon doesn’t unravel in the oven.
What I Messed Up: I once tried to wrap the bacon too tightly, and it actually cut into the roast a little as it cooked and expanded. Wrap it snug, but not strangling-tight. You want it secure but comfortable.
Step 5: Into the Oven
Place your bacon-wrapped roast back in the same skillet (no need to wash it—those drippings are liquid gold) and transfer it to your preheated 375°F oven.
Roast for about 45 minutes to 1 hour, depending on how you like your beef cooked. I use a meat thermometer because it takes the guesswork out. For medium-rare, you’re looking for 130-135°F internal temperature. Medium is 140-145°F. If you like it well-done, go to 160°F, though I’d gently suggest medium-rare is where this roast really shines.
Step 6: Rest It
This is the step people skip and then wonder why their meat is dry. Remove the roast from the oven and let it rest on a cutting board for at least 10 minutes. I usually go for 15. During this time, the juices redistribute throughout the meat, and it stays incredibly moist when you slice it. If you cut into it right out of the oven, all those juices run out onto the cutting board instead of staying in your meat.
Step 7: Slice and Serve
After resting, slice your roast into thick slices—about three-quarters of an inch or so. The bacon will have crisped up beautifully, and the beef underneath will be perfectly cooked. Arrange on a platter and drizzle with any pan juices. Absolutely gorgeous.
Common Mistakes to Avoid
Using cold beef straight from the fridge: I mentioned this, but it’s important enough to repeat. Cold meat doesn’t cook evenly. You’ll end up with overdone edges and an undercooked center. Give it 30 minutes on the counter.
Skipping the sear: I know I keep coming back to this, but seriously. The sear creates flavor and texture. Don’t skip it.
Wrapping the bacon too tightly: The bacon shrinks as it cooks, and if it’s already tight, it can dig into the meat or even cut through it. Wrap it firmly but with a little give.
Not using a meat thermometer: Guessing on doneness is how you end up with either dry overdone beef or an undercooked center. A meat thermometer costs like ten dollars and eliminates all the stress. Get one.
Cutting into the roast immediately: I get it—it smells amazing and looks beautiful and you want to eat it now. But those 10-15 minutes of resting time make a huge difference in how juicy it is. Resist the urge.
Using super thin bacon: It just doesn’t wrap well and doesn’t crisp up the same way. Thicker-cut bacon is your friend here.
My Tested Substitutions
Different cuts of beef: I’ve made this with ribeye, sirloin, chuck roast, and even brisket. They all work. Ribeye and sirloin are more tender and cook a bit faster. Chuck roast needs a little longer but stays incredibly juicy. Brisket is leaner, so watch it carefully so it doesn’t dry out.
Prosciutto instead of bacon: For a fancier version, I’ve wrapped the roast in prosciutto. It’s thinner, so you need more pieces, but it creates this elegant Italian-ish vibe. The flavor is more delicate but still delicious.
Pancetta: If you can find good pancetta, it’s amazing here. It’s thicker than bacon, has a slightly different flavor profile, and crisps up beautifully.
Turkey bacon: If you’re looking for something lighter, turkey bacon works, though it’s not quite as crispy and flavorful. I’d use more of it to compensate.
Oil substitutions: I use olive oil for searing, but avocado oil or ghee work great too. Anything with a high smoke point will do the job.
How to Customize
The beauty of this recipe is that it’s a blank canvas for your preferences. If you love garlic, add more garlic powder or tuck fresh cloves under the bacon. If you’re into herbs, go wild with fresh rosemary and thyme. If you want heat, add cayenne or chili powder to your seasoning blend.
You can also change up what you roast alongside it. Some nights I do a full vegetable roast situation with potatoes, carrots, and Brussels sprouts. Other nights I keep it simple and serve it with a salad and some crusty bread.
The seasoning blend is totally flexible too. If you don’t have smoked paprika, regular paprika is fine. If you don’t like onion powder, skip it. This is your kitchen, and this is your dinner. Make it taste like what you love.
Serving Ideas
I usually serve bacon-wrapped roast beef with something that soaks up the pan juices. Mashed potatoes are perfect. So is a creamy polenta or even just good crusty bread.
On the side, I love roasted vegetables—carrots, Brussels sprouts, asparagus, or green beans all work beautifully. A simple salad is great too, especially something with a light vinaigrette that cuts through the richness of the beef and bacon.
If I’m feeling fancy, I’ll make a quick pan sauce by adding a splash of red wine or beef broth to the skillet after I remove the roast, scraping up all those browned bits, and letting it reduce for a few minutes. Drizzle that over the sliced roast and you’ve got something that looks like it came from a fancy restaurant.
For leftovers, this roast is incredible on sandwiches with horseradish cream or sliced thin over a salad. Some people even shred it for tacos, which I haven’t tried but sounds amazing.
Meal Prep and Storage
Storing leftovers: Keep your cooked bacon-wrapped roast in an airtight container in the fridge for up to 4 days. The bacon will soften a bit as it sits, but it’s still delicious.
Reheating: I reheat slices in a low oven (around 300°F) for about 10-15 minutes until they’re warmed through. You can also reheat them gently in a skillet on the stovetop over medium heat. Avoid the microwave if you can—it tends to make the bacon rubbery.
Freezing: You can freeze cooked roast beef for up to 3 months. Let it cool completely, wrap it well in plastic wrap and then foil, and label it with the date. Thaw in the fridge overnight before reheating.
Make-ahead: You can prep this in the morning—season the roast, wrap it in bacon, and keep it in the fridge until you’re ready to sear and roast. Just add about 10 extra minutes to your cooking time since it’ll be cold when it goes in the oven.
Nutritional Breakdown
A 4-ounce serving of bacon-wrapped roast beef (roughly one slice from a 3-pound roast) contains approximately:
- Calories: 320
- Protein: 28g
- Fat: 24g
- Carbohydrates: 0g
- Fiber: 0g
This is a protein-rich, low-carb meal that’s satisfying and keeps you full. The fat content comes from both the beef and the bacon, and it’s the kind of fat that tastes incredible and keeps you satisfied.
Final Thoughts
Bacon-wrapped roast beef has become one of my go-to recipes when I want to feel like I’ve cooked something special without spending all day in the kitchen. It’s the kind of dish that makes your family or guests feel cared for, and honestly, there’s something really nice about that.
I love how straightforward it is once you know what you’re doing. There’s no fancy technique you need to master, no weird ingredients you’ve never heard of. Just good beef, good bacon, good seasoning, and your oven doing most of the work.
The first time you make this, you might feel a little nervous. That’s normal. But I promise you, if you follow these steps, use a meat thermometer, and let the roast rest before slicing, you’re going to end up with something absolutely delicious. And the second time? You’ll feel like a pro.
I’d love to hear how this turns out for you. If you make it, come find me and let me know how it went. Did you add garlic? Try it with different herbs? Make it with a different cut of beef? I genuinely love hearing about how people make recipes their own.
Happy cooking, friend. You’ve got this.
—
Recipe Card
**Bacon-Wrapped Roast Beef**
**Ingredients**
* One 3-4 pound beef roast (ribeye, sirloin,