Cheesy Garlic Pull-Apart Bread
Cheesy Garlic Pull-Apart Bread
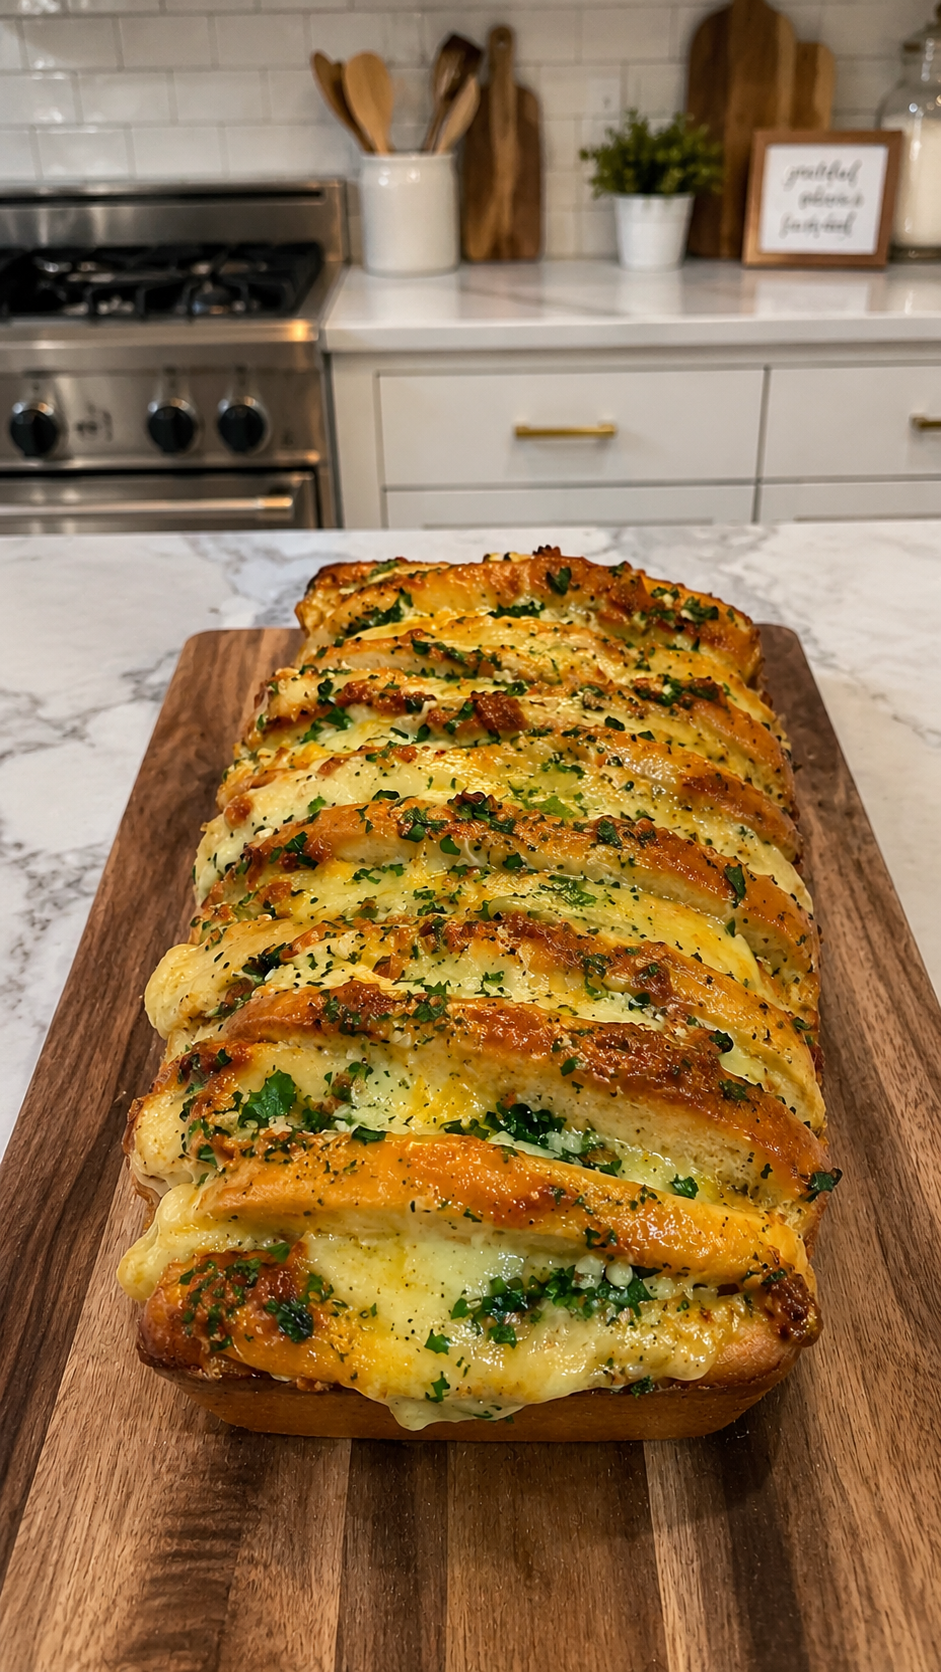
Imagine a loaf of bread that is golden on the outside, soft and pillowy on the inside, and dripping with a rich, savory garlic butter mixture studded with melted cheese. This Cheesy Garlic Pull-Apart Bread is exactly that: a comforting, shareable side dish designed to bring people together around the table. It transforms simple ingredients into something that feels special without requiring advanced culinary skills. The texture is a delightful contrast between the crisp, browned edges of the bread slices and the gooey, stretchy cheese that binds everything together. As you pull apart the sections, steam rises with the aroma of toasted garlic and herbs, making it an irresistible addition to any dinner party, game night, or family meal.
This recipe is particularly useful when you need a crowd-pleaser that requires minimal effort but delivers maximum flavor. Whether you are serving it alongside a hearty pasta dish, a robust steak, or a fresh garden salad, this bread acts as the perfect vehicle for dipping in sauces or simply enjoying on its own. The visual appeal is immediate; the bread looks rustic and homemade, sitting proudly on a wooden cutting board, ready to be sliced and shared. For more inspiration on how to style your dishes and find new ideas, Follow Hailee Recipes on Pinterest.
Why This Recipe Works
The success of this dish lies in the technique of slicing the bread rather than just topping it. By cutting vertical slits into a standard loaf without going all the way through, you create pockets that allow the garlic butter and cheese mixture to seep deep into the center of the bread. This ensures that every bite, from the crust to the core, is infused with flavor. If you were to simply spread butter on top, the interior would remain plain and dry. The pull-apart method guarantees moisture throughout.
Using a combination of butter, garlic, and herbs creates a classic flavor profile that pairs universally well with almost any main course. The butter melts into the crevices during baking, acting as a binder that holds the cheese in place while preventing the bread from drying out. The cheese choice is critical here; using a blend of cheeses that melt well, such as mozzarella and cheddar, ensures a consistent, creamy texture rather than a greasy or separated one. The green herbs visible in the final presentation add a fresh, aromatic note that cuts through the richness of the fat, balancing the overall taste.
Ingredients
To make this recipe, you will need a few high-quality staples found in most kitchens. The foundation is a large loaf of white or Italian bread, which provides the necessary structure and chewiness. You will also need unsalted butter, which allows you to control the salt level in the dish. Fresh garlic is essential for that pungent, savory kick, though minced jarred garlic can work in a pinch if fresh is unavailable. A generous amount of shredded cheese is required to fill the gaps between the bread slices. Finally, dried parsley or fresh chopped parsley adds the necessary color and herbal freshness.
- 1 large loaf (about 1 pound) white or Italian bread: Ensure the loaf is fresh but not overly soft; a slightly firm crust helps hold the shape during baking.
- 1/2 cup (1 stick) unsalted butter: Melted. Using unsalted butter lets you season the dish precisely.
- 4 cloves fresh garlic: Minced finely. Fresh garlic provides a brighter flavor than powdered versions.
- 1 1/2 cups shredded mozzarella cheese: Pre-shredded bags work fine, but block cheese shredded at home melts more smoothly.
- 1/2 cup shredded cheddar cheese: Adds a sharpness that complements the mild mozzarella.
- 2 tablespoons fresh parsley: Chopped finely. Dried parsley can be used as a substitute, but use half the amount.
- 1/4 teaspoon salt: Optional, depending on the saltiness of your cheese and bread.
- 1/8 teaspoon black pepper: To taste.
How To Make Cheesy Garlic Pull-Apart Bread
- Prepare the Oven and Pan: Begin by preheating your oven to 375°F (190°C). Line a standard 9×13 inch baking dish or a large rimmed baking sheet with aluminum foil for easy cleanup. Lightly grease the foil or the pan with a small amount of cooking spray or butter to prevent sticking.
- Slice the Loaf: Place the loaf of bread upright on a sturdy cutting board. Using a serrated bread knife, carefully cut vertical slices about 1 inch apart down the length of the loaf. Do not cut all the way through the bottom; leave about 1/2 inch uncut so the loaf remains intact as a single unit. This creates the “pull-apart” sections. Gently open the slices slightly to create room for the filling.
- Mix the Garlic Butter: In a medium bowl, combine the melted butter, minced garlic, chopped parsley, salt, and black pepper. Whisk these ingredients together until they are fully incorporated. The mixture should look like a fragrant, herb-flecked liquid. Taste it now; if you prefer a stronger garlic flavor, you can add a bit more minced garlic, but be careful not to overwhelm the other flavors.
- Assemble the Bread: Pour the garlic butter mixture evenly over the top of the bread, ensuring it drips down into the cuts you made earlier. Use a spoon or your fingers to gently press the butter into the crevices. Next, sprinkle the shredded mozzarella and cheddar cheese generously over the top, pushing some of the cheese down into the spaces between the slices. The goal is to have cheese distributed throughout the loaf, not just on the surface.
- Bake Until Golden: Cover the baking dish loosely with another piece of aluminum foil to keep the bread from drying out too quickly. Bake for 15 minutes. After 15 minutes, remove the foil and continue baking for another 10 to 15 minutes. Watch closely during this time; the bread is done when the cheese is fully melted and bubbly, and the edges of the bread slices are golden brown and crispy. The internal temperature should reach at least 165°F (74°C) to ensure the cheese is safe and fully melted.
- Cool and Serve: Remove the bread from the oven and let it rest for 5 minutes. This brief cooling period allows the cheese to set slightly, making it easier to pull apart without everything sliding off. Serve warm directly from the pan.
Doneness And Troubleshooting
Knowing when the bread is perfectly baked is key to avoiding a soggy or burnt result. The primary visual cue is the color of the cheese and the bread edges. The cheese should be bubbling vigorously, and the tips of the bread slices should have a deep golden-brown hue. If the top browns too quickly before the cheese is melted, tent the loaf loosely with foil again to slow down the browning process while the heat continues to penetrate the center.
If you find the bread is still doughy in the middle after the recommended baking time, it may be due to the thickness of the loaf or the density of the bread. In this case, extend the baking time by 5-minute increments, checking frequently. Conversely, if the bread is burning on the outside but cold inside, lower the oven temperature to 350°F (175°C) and cover it tightly with foil for the remainder of the cooking time. Always ensure the garlic butter has penetrated the cuts; if the butter pools on top without soaking in, use a brush to push it deeper before baking.
Substitutions And Variations
This recipe is highly adaptable to suit different dietary needs or flavor preferences. For a dairy-free version, you can substitute the butter with a high-quality plant-based margarine or olive oil, and use a vegan mozzarella-style shreds. Keep in mind that vegan cheeses often melt differently and may not become as stringy as dairy cheese, so check them frequently.
If you want to elevate the flavor profile, consider adding red pepper flakes to the garlic butter mixture for a spicy kick. You could also swap the cheddar for provolone or fontina for a milder, creamier melt. Adding cooked, crumbled bacon or diced ham into the cheese layer before baking turns this side dish into a heartier meal component. For a healthier twist, you might reduce the amount of butter slightly and increase the ratio of vegetables, such as adding sautéed spinach or sun-dried tomatoes between the slices, though this will alter the traditional texture.
Serving Suggestions
Cheesy Garlic Pull-Apart Bread shines as a companion to many meals. It pairs exceptionally well with Italian classics like spaghetti and meatballs, lasagna, or chicken parmesan. The savory notes complement tomato-based sauces beautifully. It is also an excellent side for roasted meats, such as prime rib, grilled chicken, or pork chops. During holiday gatherings, serve it alongside a platter of appetizers or as part of a brunch spread with eggs and fruit.
For a complete dining experience, offer a selection of dipping sauces on the side. A marinara sauce, a creamy ranch dressing, or a balsamic glaze can enhance the flavors of the bread. Because the bread is rich and savory, it balances well with lighter sides like a crisp green salad with a vinaigrette or steamed broccoli with lemon.
Storage And Reheating
Leftovers can be stored in an airtight container in the refrigerator for up to three days. To maintain the best texture, allow the bread to cool completely before sealing it to prevent condensation from making the crust soggy. When reheating, avoid the microwave if possible, as it tends to make the bread rubbery. Instead, wrap individual portions in foil and warm them in a 350°F (175°C) oven for about 10 to 15 minutes until heated through. Alternatively, you can reheat the whole loaf in the oven, covered with foil, for 15 to 20 minutes.
You can also freeze the unbaked assembled loaf. Wrap the prepared bread tightly in plastic wrap and then in aluminum foil. Freeze for up to two months. When ready to cook, thaw the loaf overnight in the refrigerator and bake as directed, adding an extra 10 minutes to the baking time since the bread will start cold. Cooked leftovers should not be frozen, as the texture of the cheese and bread will degrade significantly upon thawing.
This Cheesy Garlic Pull-Apart Bread is a testament to the power of simple ingredients prepared with care. By focusing on the technique of infusion and the balance of flavors, you create a dish that feels indulgent yet approachable. Whether you are feeding a hungry family or hosting a gathering, this bread is sure to disappear quickly, leaving everyone asking for seconds.
Cheesy Garlic Pull-Apart Bread
Ingredients
Method
- Preheat oven to 375°F (190°C). Line a 9x13 inch baking dish with foil and grease lightly.
- Slice the loaf vertically into 1-inch thick pieces, stopping 1/2 inch from the bottom to keep the loaf intact.
- Whisk melted butter, garlic, parsley, salt, and pepper in a bowl.
- Pour the butter mixture over the bread, pressing it into the cuts. Sprinkle mozzarella and cheddar cheese over the top, tucking some into the gaps.
- Cover with foil and bake for 15 minutes. Remove foil and bake for another 10-15 minutes until cheese is bubbly and edges are golden.
- Let cool for 5 minutes before pulling apart and serving.