Cinnamon Roll Blondies: Gooey, Swirled, and Ready in 30 Minutes
Cinnamon Roll Blondies Recipe | Easy 30-Minute Dessert
Cinnamon Roll Blondies: Gooey, Swirled, and Ready in 30 Minutes
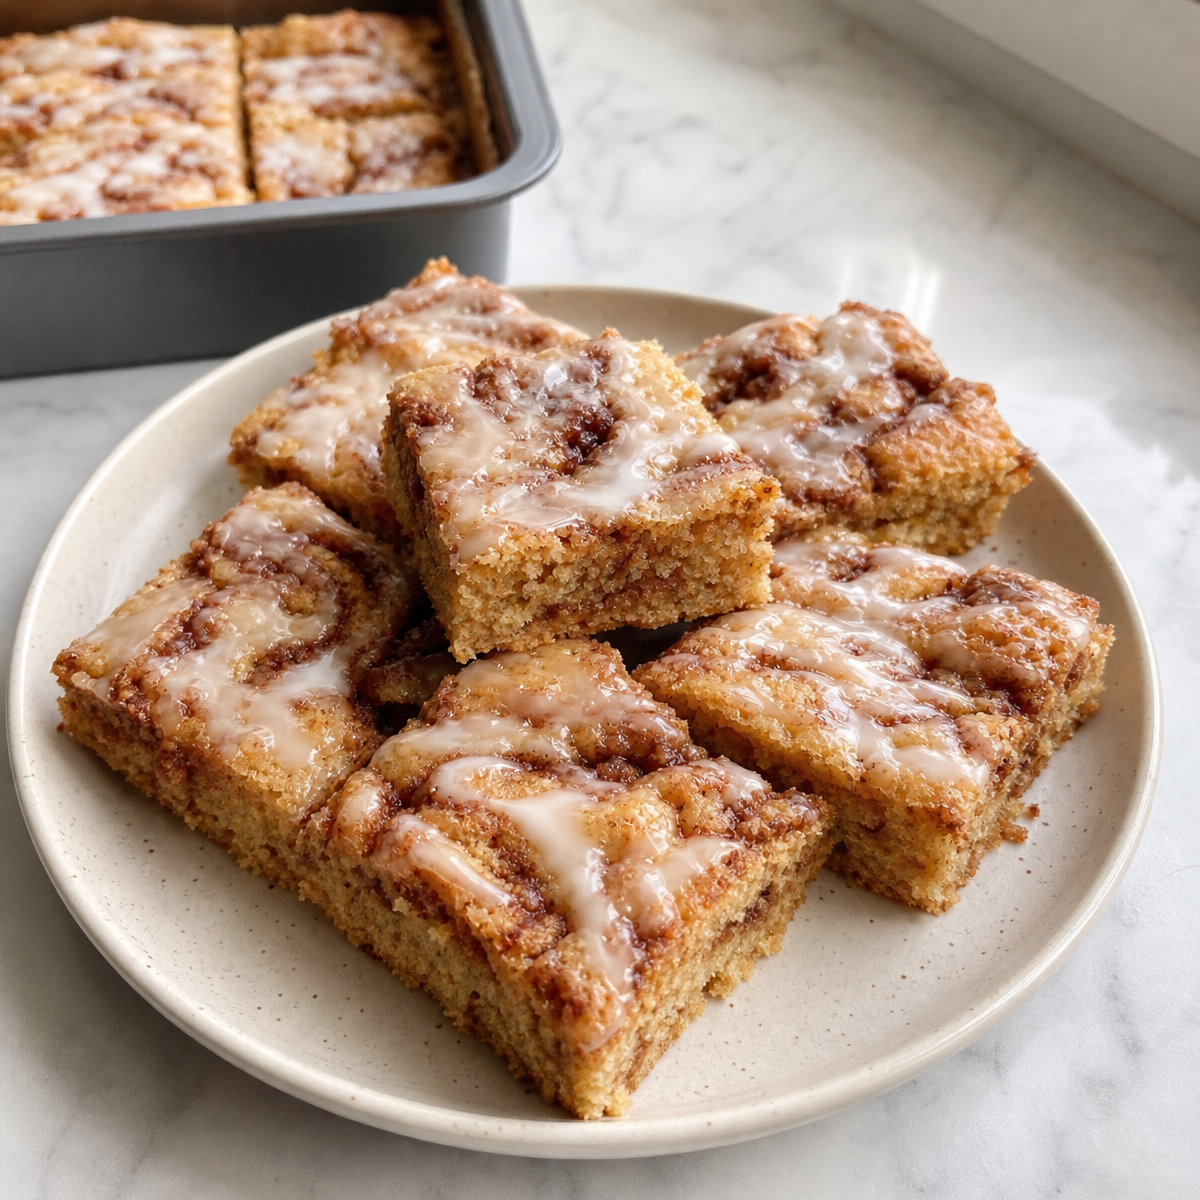
I’ve always been a cinnamon roll person. There’s something about that warm, doughy center with the sweet cinnamon swirl that just feels like a hug. But here’s the thing—cinnamon rolls take time. You need to proof the dough, roll it out, let it rise again, and then bake. On a Tuesday night when I’m craving that cozy cinnamon flavor but don’t have three hours to spare, I reach for these cinnamon roll blondies instead. They deliver every bit of that cinnamon roll magic in a chewy, fudgy bar that’s ready in just 30 minutes. These cinnamon roll blondies start with a rich brown sugar base that’s buttery and dense, almost like a blondie version of a brownie. Then comes the star of the show—a cinnamon swirl that ribbons through the middle, creating those gorgeous marbled layers. The edges get crispy and caramelized while the center stays gooey and tender. Top them with a quick cream cheese frosting, and you’ve got a dessert that tastes like you spent way more time than you actually did.
I first made these on a whim one Saturday afternoon when I had brown sugar, butter, and cinnamon on hand but nothing else in the pantry. I wasn’t sure they’d work, honestly. But the moment I pulled them out of the oven and caught that first whiff of cinnamon and caramel, I knew I’d stumbled onto something special. My family devoured them before they’d even fully cooled. Now they’re a regular in my baking rotation, especially when I need a quick dessert for a potluck or just want something warm and comforting for myself.
What I love most about cinnamon roll blondies is how forgiving they are. The batter comes together in minutes, the swirl is foolproof, and even if you slightly overbake them, they’re still delicious. They’re also incredibly versatile—you can customize them with different add-ins, skip the frosting if you’re in a hurry, or even make them in a larger pan if you’re feeding a crowd. Whether you’re a seasoned baker or someone who rarely ventures into the kitchen, these blondies are going to become a favorite.
Why You’ll Love This Recipe
These cinnamon roll blondies hit all the right notes. First, there’s the texture—they’re chewy and fudgy with crispy edges, kind of like the best of both a brownie and a blondie. The brown sugar base gives them a deep, caramel-like sweetness that’s not overpowering, and the cinnamon swirl adds warmth and spice without being too intense.
Second, they’re genuinely easy. No special equipment, no complicated techniques. You mix the base, swirl in the cinnamon filling, and bake. That’s it. Even if you’ve never made blondies before, you’ll nail this recipe.
Third, they’re fast. From start to finish, you’re looking at about 35 minutes, including cooling time. That means you can satisfy a dessert craving on a weeknight without a ton of planning.
And finally, they’re crowd-pleasers. I’ve brought these to potlucks, made them for my kids’ school bake sales, and served them at dinner parties. Everyone asks for the recipe. There’s something about the combination of brown sugar, butter, and cinnamon that just works.
Ingredients
For the Blondie Base:
- 1/2 cup (115g) unsalted butter, softened
- 3/4 cup (165g) packed brown sugar
- 1/4 cup (50g) granulated sugar
- 1 large egg
- 1 teaspoon vanilla extract
- 1 1/4 cups (155g) all-purpose flour
- 1/2 teaspoon baking soda
- 1/4 teaspoon salt
For the Cinnamon Swirl:
- 3 tablespoons unsalted butter, melted
- 1/3 cup (75g) packed brown sugar
- 2 tablespoons granulated sugar
- 2 1/2 teaspoons ground cinnamon
For the Cream Cheese Frosting (Optional):
- 4 oz cream cheese, softened
- 2 tablespoons unsalted butter, softened
- 1/2 cup (60g) powdered sugar
- 1/4 teaspoon vanilla extract
- Pinch of salt
Sophia’s Tip: Use room-temperature butter and cream cheese for the smoothest mixing. Cold ingredients can create lumps and make the batter harder to work with. I usually pull them out of the fridge about 30 minutes before baking.
Optional Add-Ins and Variations
While the classic version is perfect on its own, there are so many ways to customize these blondies. If you love nuts, fold 1/2 cup of chopped pecans or walnuts into the base batter. They add a nice crunch that contrasts beautifully with the chewy center. I’m not usually a nut person in my desserts, but I made a batch with pecans once and was genuinely surprised by how good they were.
You can also add 1/2 cup of white chocolate chips or even milk chocolate chips to the base. The white chocolate especially complements the cinnamon beautifully. Just fold them in gently at the end so they don’t break apart.
If you want to lean even more into the cinnamon roll vibe, sprinkle a little cinnamon sugar on top of the swirl before baking. It creates a crispy, sweet crust that’s absolutely addictive. I do this about half the time, and honestly, I can’t decide which version I prefer.
For a more indulgent version, add a tablespoon of molasses to the base batter. It deepens the brown sugar flavor and adds a subtle complexity that makes people ask what your secret ingredient is.
Step-by-Step Instructions
Step 1: Prepare Your Pan
Preheat your oven to 350°F. Line an 8×8-inch baking pan with parchment paper, leaving a little overhang on two sides so you can easily lift the blondies out later. This is a game-changer for cleanup and makes cutting them into neat squares so much easier.
Step 2: Make the Base Batter
In a large bowl, cream together the softened butter, brown sugar, and granulated sugar. Beat for about 2 to 3 minutes until the mixture is light and fluffy. This is important—it incorporates air into the batter, which helps the blondies rise slightly and get that tender crumb.
Add the egg and vanilla extract, and beat until fully combined. The mixture should look smooth and creamy.
In a separate bowl, whisk together the flour, baking soda, and salt. Gently fold the dry ingredients into the wet ingredients until just combined. Don’t overmix—you want a few streaks of flour to disappear, but you don’t want to develop too much gluten, which can make the blondies tough and cakey.
Sophia’s Kitchen Note: I use a rubber spatula for this step instead of an electric mixer. It gives me more control and helps me avoid overmixing. Plus, it’s one less thing to clean.
Step 3: Spread the Base
Pour about two-thirds of the batter into your prepared pan. Use an offset spatula or the back of a spoon to spread it into an even layer. Don’t worry about making it perfect—you just want it relatively level. Reserve the remaining batter for later.
Step 4: Make the Cinnamon Swirl
In a small bowl, combine the melted butter, brown sugar, granulated sugar, and cinnamon. Stir until you have a thick, paste-like mixture. This is your cinnamon swirl filling, and it’s going to be absolutely delicious.
Dollop spoonfuls of the cinnamon mixture over the base layer. Then, using a butter knife or skewer, gently swirl it through the batter, creating those beautiful marbled patterns. Don’t overmix—you want distinct swirls, not a uniform cinnamon color throughout.
Step 5: Add the Top Layer
Dollop the reserved batter over the cinnamon swirl, and gently spread it to cover most of the filling. It doesn’t need to be perfect—some of the cinnamon swirl peeking through actually looks beautiful.
Step 6: Bake
Bake for 22 to 26 minutes, until the top is light golden brown and a toothpick inserted in the center comes out with just a few moist crumbs. This is crucial—you want them chewy, not dry. The center should still jiggle slightly when you gently shake the pan.
Sophia’s Kitchen Note: Every oven is different, so start checking at 22 minutes. If the edges are browning too quickly but the center isn’t done, tent the pan loosely with foil for the last few minutes.
Step 7: Cool and Frost
Let the blondies cool in the pan for at least 15 minutes before frosting. This gives them time to set slightly so the frosting doesn’t melt into them.
While they cool, make the frosting if you’re using it. Beat the softened cream cheese and butter together until smooth. Add the powdered sugar, vanilla, and salt, and beat until fluffy and spreadable. Spread the frosting over the cooled blondies, then refrigerate for 10 minutes to let it set.
Step 8: Cut and Serve
Use the parchment paper overhang to lift the entire block out of the pan. Place it on a cutting board and cut into 12 squares. A sharp knife dipped in hot water and wiped clean between cuts makes for the neatest edges.
Common Mistakes to Avoid
I’ve made these blondies dozens of times, and I’ve definitely had a few mishaps along the way. The most common mistake is overbaking. It’s so easy to leave them in the oven just a minute too long, and suddenly they’re dry instead of chewy. Remember, they continue cooking as they cool, so pull them out when the center still looks slightly underdone.
Another mistake is overmixing the batter. I learned this the hard way early on. When you overmix, you develop too much gluten, and the blondies become dense and tough instead of tender and chewy. Mix just until the dry ingredients are incorporated, then stop.
A third mistake is not using room-temperature ingredients. Cold butter and eggs don’t incorporate smoothly, which can lead to a lumpy batter and uneven baking. I always pull my butter and eggs out of the fridge about 30 minutes before I start baking.
Finally, don’t skip the parchment paper. It makes lifting the blondies out of the pan so much easier, and it prevents them from sticking to the edges.
My Tested Substitutions
I’ve experimented with quite a few variations of this recipe, and here are the substitutions that actually work.
If you don’t have brown sugar, you can make a substitute by mixing granulated sugar with a little molasses or even honey. Use about 3/4 cup granulated sugar plus 1 tablespoon of molasses. It won’t be exactly the same, but it’s pretty close.
For the egg, you can use a flax egg (1 tablespoon ground flaxseed mixed with 3 tablespoons water, let sit for 5 minutes) if you’re baking for someone with an egg allergy. The texture will be slightly different—a bit more crumbly—but they’ll still taste good.
If you don’t have cream cheese for the frosting, you can make a simple vanilla glaze instead. Mix 1 cup powdered sugar with 2 to 3 tablespoons milk and 1/2 teaspoon vanilla extract. Drizzle it over the cooled blondies. It’s not quite as rich, but it’s delicious and much faster.
You can also use coconut oil instead of butter in both the base and the frosting. Use the same amount, and make sure it’s refined coconut oil so it doesn’t add a coconut flavor. The blondies will be slightly less rich, but still delicious.
How to Customize This Recipe
One of my favorite things about this recipe is how easy it is to make it your own. If you love the flavor of brown butter, brown your butter before using it in the base. It adds a nutty, complex flavor that’s absolutely incredible.
If you want them more indulgent, add a layer of dulce de leche or caramel sauce between the base and the cinnamon swirl. Spread a thin layer of dulce de leche over the base batter, then add the cinnamon swirl on top. It’s decadent and amazing.
For a spiced version, add 1/4 teaspoon of nutmeg and a tiny pinch of cloves to the cinnamon swirl. It makes them taste like a spiced cinnamon roll, which is perfect in the fall.
If you want to make them in a larger pan, use a 9×13-inch pan and increase all the ingredients by 50%. So you’d use 3/4 cup butter, 1 1/8 cups brown sugar, and so on. You’ll need to add about 5 to 10 minutes to the baking time.
[INTERNAL LINK: For more easy dessert bar recipes, check out my Blackberry Cobbler Bars, which have a similar chewy texture and are ready in about the same amount of time.]
Serving Suggestions
These blondies are perfect on their own, but they’re even better with a few simple additions. Serve them warm with a scoop of vanilla ice cream. The cold ice cream melts into the warm, chewy blondie, and it’s absolutely heavenly. A drizzle of caramel sauce on top takes it over the top.
They’re also delicious with a cup of coffee or tea. The cinnamon and brown sugar flavors pair beautifully with both. I often make a batch on Sunday and enjoy them throughout the week with my morning coffee.
If you’re serving them at a party or gathering, dust them lightly with cinnamon sugar for a pretty presentation. It looks fancy but takes about 30 seconds.
You can also crumble them up and use them as a topping for vanilla yogurt or ice cream. It’s like a deconstructed cinnamon roll sundae, and it’s surprisingly delicious.
Meal Prep and Storage
These blondies are fantastic for meal prep because they actually taste better the next day. The flavors have time to meld together, and they become even more moist and chewy.
Store them in an airtight container at room temperature for up to 4 days. If you’ve frosted them, keep them in the fridge to prevent the frosting from getting too soft. They’ll still taste great cold, or you can let them come to room temperature before eating.
You can also freeze them for up to 3 months. Wrap each blondie individually in plastic wrap, then place them in a freezer-safe container. Thaw them at room temperature for about an hour before serving. They thaw beautifully and taste almost as good as fresh.
If you want to make them ahead for a party or gathering, bake them the day before and frost them a few hours before serving. This keeps the frosting fresh and prevents it from getting too soft.
Nutrition Information
Per blondie (without frosting): approximately 180 calories, 8g fat, 26g carbohydrates, 0g fiber, 18g sugar, 2g protein.
Per blondie (with frosting): approximately 220 calories, 11g fat, 30g carbohydrates, 0g fiber, 22g sugar, 3g protein.
These are estimates based on standard ingredient measurements. Actual nutrition will vary depending on your specific ingredients and how you cut the blondies.
Frequently Asked Questions
Can I make cinnamon roll blondies ahead of time?
Absolutely! These blondies actually taste better the next day as the flavors meld together. Store them in an airtight container at room temperature for up to 4 days, or freeze for up to 3 months. Just thaw at room temperature before serving.
What’s the difference between blondies and brownies?
Blondies use brown sugar instead of chocolate, giving them a rich, buttery, caramel-like flavor. They’re chewy and fudgy without any chocolate. Brownies are chocolate-based. Both are delicious, but blondies are perfect for cinnamon swirl variations like this recipe.
Do I need to use cream cheese frosting?
The cream cheese frosting is optional but highly recommended. It adds a tangy sweetness that complements the cinnamon perfectly. If you skip it, the blondies are still delicious on their own. You could also drizzle them with vanilla glaze or cinnamon sugar instead.
Why are my blondies too cakey instead of chewy?
Overbaking is the most common culprit. Remove them from the oven when the center still jiggles slightly—they’ll continue cooking as they cool. Also, make sure you’re not overmixing the batter, which can develop too much gluten and make them dense.
Can I double this recipe?
Yes! Double all the ingredients and bake in a 9×13-inch pan instead of an 8×8-inch pan. You may need to add 5 to 10 minutes to the baking time. Check for doneness by inserting a toothpick in the center—it should have a few moist crumbs, not be completely clean.
Final Thoughts
Cinnamon roll blondies have become one of my go-to desserts, and I hope they become one of yours too. They’re easy enough for a beginner baker, impressive enough for a dinner party, and delicious enough to make you wonder why you haven’t been making them all along.
The beauty of this recipe is that it’s a starting point. You can customize it with different add-ins, skip the frosting if you’re in a hurry, or make it in a larger pan if you’re feeding a crowd. The core recipe is solid and forgiving, which means you can experiment and make it your own.
I’d love to hear how you make them. Do you add nuts? Skip the frosting? Make them in a larger pan? Drop me a comment below—I read and respond to every single one. And if you make these blondies, please come back and let me know how they turned out. There’s nothing I love more than hearing that a recipe worked out for someone.
[INTERNAL LINK: If you love cinnamon flavors, you might also enjoy my S’more Cookie Skillet, which combines chocolate, marshmallow, and graham cracker flavors in a similar easy-to-make format.]
Recipe Card
Cinnamon Roll Blondies: Gooey, Swirled, and Ready in 30 Minutes
Ingredients
Equipment
Method
- Preheat oven to 350°F. Line an 8x8-inch baking pan with parchment paper, leaving overhang on two sides.
- In a large bowl, cream together softened butter, brown sugar, and granulated sugar for 2-3 minutes until light and fluffy.
- Add egg and vanilla extract to the butter mixture and beat until fully combined.
- In a separate bowl, whisk together flour, baking soda, and salt.
- Gently fold dry ingredients into wet ingredients until just combined. Do not overmix.
- Pour about two-thirds of the batter into the prepared pan and spread into an even layer.
- In a small bowl, combine melted butter, brown sugar, granulated sugar, and cinnamon to create the cinnamon swirl filling.
- Dollop spoonfuls of cinnamon mixture over the base layer and gently swirl through with a butter knife or skewer.
- Dollop remaining batter over the cinnamon swirl and gently spread to cover most of the filling.
- Bake for 22-26 minutes until the top is light golden brown and a toothpick inserted in the center comes out with just a few moist crumbs.
- Cool in the pan for at least 15 minutes before frosting.
- For frosting: Beat softened cream cheese and butter together until smooth. Add powdered sugar, vanilla, and salt, and beat until fluffy.
- Spread frosting over cooled blondies and refrigerate for 10 minutes to set.
- Use parchment paper overhang to lift blondies out of pan. Cut into 12 squares using a sharp knife dipped in hot water.
- Serve warm or at room temperature. Store in an airtight container at room temperature for up to 4 days or freeze for up to 3 months.
Notes
Store in an airtight container at room temperature for up to 4 days.
Freeze individual blondies wrapped in plastic wrap for up to 3 months.
For a nuttier flavor, brown the butter before using it in the base.
Add 1/2 cup chopped pecans or walnuts to the base batter for extra crunch.
Dust with cinnamon sugar before baking for a crispy, sweet crust.
Serve warm with vanilla ice cream and caramel sauce for an indulgent treat.
Do not overbake—remove when center still jiggles slightly.
Use room-temperature butter and eggs for best results.