Classic Baked Chicken Parmesan
Classic Baked Chicken Parmesan
Classic Baked Chicken Parmesan: A Comfort Meal That Actually Feels Special
I grew up watching my mom make chicken parm on Friday nights, and honestly, it felt like magic. She’d pound those chicken breasts thin, dredge them in breadcrumbs, and the whole kitchen would smell like toasted garlic and melting mozzarella. But here’s the thing—I didn’t realize until I was older that she was actually doing something pretty smart. She was baking it instead of frying it, which meant less oil splatter, fewer dishes, and a result that was just as crispy and delicious.
I’ve made this recipe probably a hundred times now, and I’m sharing it with you because it’s genuinely foolproof, deeply satisfying, and way easier than people think. Classic Baked Chicken Parmesan isn’t some fancy restaurant dish you need a culinary degree to pull off—it’s just tender chicken coated in a golden crust, smothered in sauce and melted cheese, then baked until everything comes together in the most comforting way possible.
This is the kind of meal I make when I want to feel like I’ve really cooked something, but I don’t want to spend hours in the kitchen. It’s perfect for weeknight dinners, for impressing someone at your table, or for those nights when you’re craving something warm and carb-loaded but you still want it to taste like you care. And honestly? You do care, because you’re about to make it yourself.
Whether you’re a seasoned cook or someone who’s intimidated by breading chicken, I’m going to walk you through this step by step. I’ll tell you where I’ve messed up, what actually matters, and what you can totally skip or swap depending on what’s in your pantry. Follow me on HaileeRecipes on Pinterest for more recipes just like this one.
Why You’ll Love This Recipe
Let me be real with you: there are a lot of chicken parm recipes out there. So why this one?
First, it’s baked, not fried. I know, I know—fried sounds better. But baked is actually incredible once you know the trick to getting it crispy. You’re using panko breadcrumbs, a little oil in the coating, and a hot oven. The result is golden, crunchy, and you don’t end up with grease-soaked chicken or a kitchen that smells like a deep fryer for three days.
Second, it comes together fast. We’re talking prep to table in about 35 minutes. That’s real life. That’s a weeknight dinner that doesn’t require you to plan ahead or stress.
Third, the flavor is balanced. You get tender chicken, a tangy-sweet tomato sauce, melted cheese, and that satisfying crunch from the breadcrumb coating. Every element has a job, and they all work together.
And finally—this matters—it’s customizable. You can make it with what you have, swap ingredients without guilt, and it still turns out great. That’s the kind of recipe I actually cook with, and I’m betting you will too.
Ingredients
- 4 boneless, skinless chicken breasts (about 6 to 8 ounces each)
Hailee’s Tip: If your chicken breasts are thick, pound them to about a half-inch thickness. This ensures even cooking and a better texture. I use a meat mallet or even the bottom of a heavy pan.
- 1 cup panko breadcrumbs
Hailee’s Tip: Don’t skip panko for regular breadcrumbs. Panko is coarser and creates that signature crispy texture. Regular breadcrumbs get dense and soggy.
- 1 cup freshly grated Parmesan cheese (divided: 1/2 cup for coating, 1/2 cup for topping)
Hailee’s Tip: Please grate it fresh if you can. The pre-grated stuff has anti-caking agents that prevent it from melting smoothly. It makes a real difference.
- 2 large eggs
- 1/2 cup all-purpose flour
- 1 teaspoon garlic powder
- 1 teaspoon dried Italian seasoning (or a mix of dried basil and oregano)
- 1/2 teaspoon salt
- 1/4 teaspoon black pepper
- 2 tablespoons olive oil (for the breadcrumb mixture)
- 2 cups marinara sauce (store-bought is totally fine; I like Rao’s, but use what you love)
- 1 1/2 cups shredded mozzarella cheese (fresh or low-moisture; I prefer low-moisture for less water)
- Fresh basil (optional, for garnish)
Optional Add-Ins and Variations
This is where you can make it yours. Here’s what I sometimes add or change:
- Fresh mozzarella: Layer it under the sauce for a creamier result. It’ll be softer than low-moisture mozzarella, so know that going in.
- Prosciutto or pancetta: Lay a thin slice under the sauce before baking. It adds a salty, savory depth that’s honestly incredible.
- Roasted red peppers: Chop them up and mix into your sauce, or layer them on top of the chicken.
- Spinach: Sauté it first, then layer it under the sauce. It’s a sneaky way to add vegetables.
- Extra garlic: If you’re like me, add minced fresh garlic to your breadcrumb mixture. Just don’t overdo it or it’ll burn.
- Lemon zest: A little zest mixed into the breadcrumb coating adds brightness and keeps things from feeling too heavy.
Step-by-Step Method
Step 1: Prep Your Chicken
Pat your chicken breasts dry with paper towels. This is actually important—moisture prevents browning and makes the breading stick unevenly. Once they’re dry, place them on a cutting board and pound them to about half an inch thick. Use even pressure, working from the center outward. You want them uniform so they cook at the same rate.
Step 2: Set Up Your Breading Station
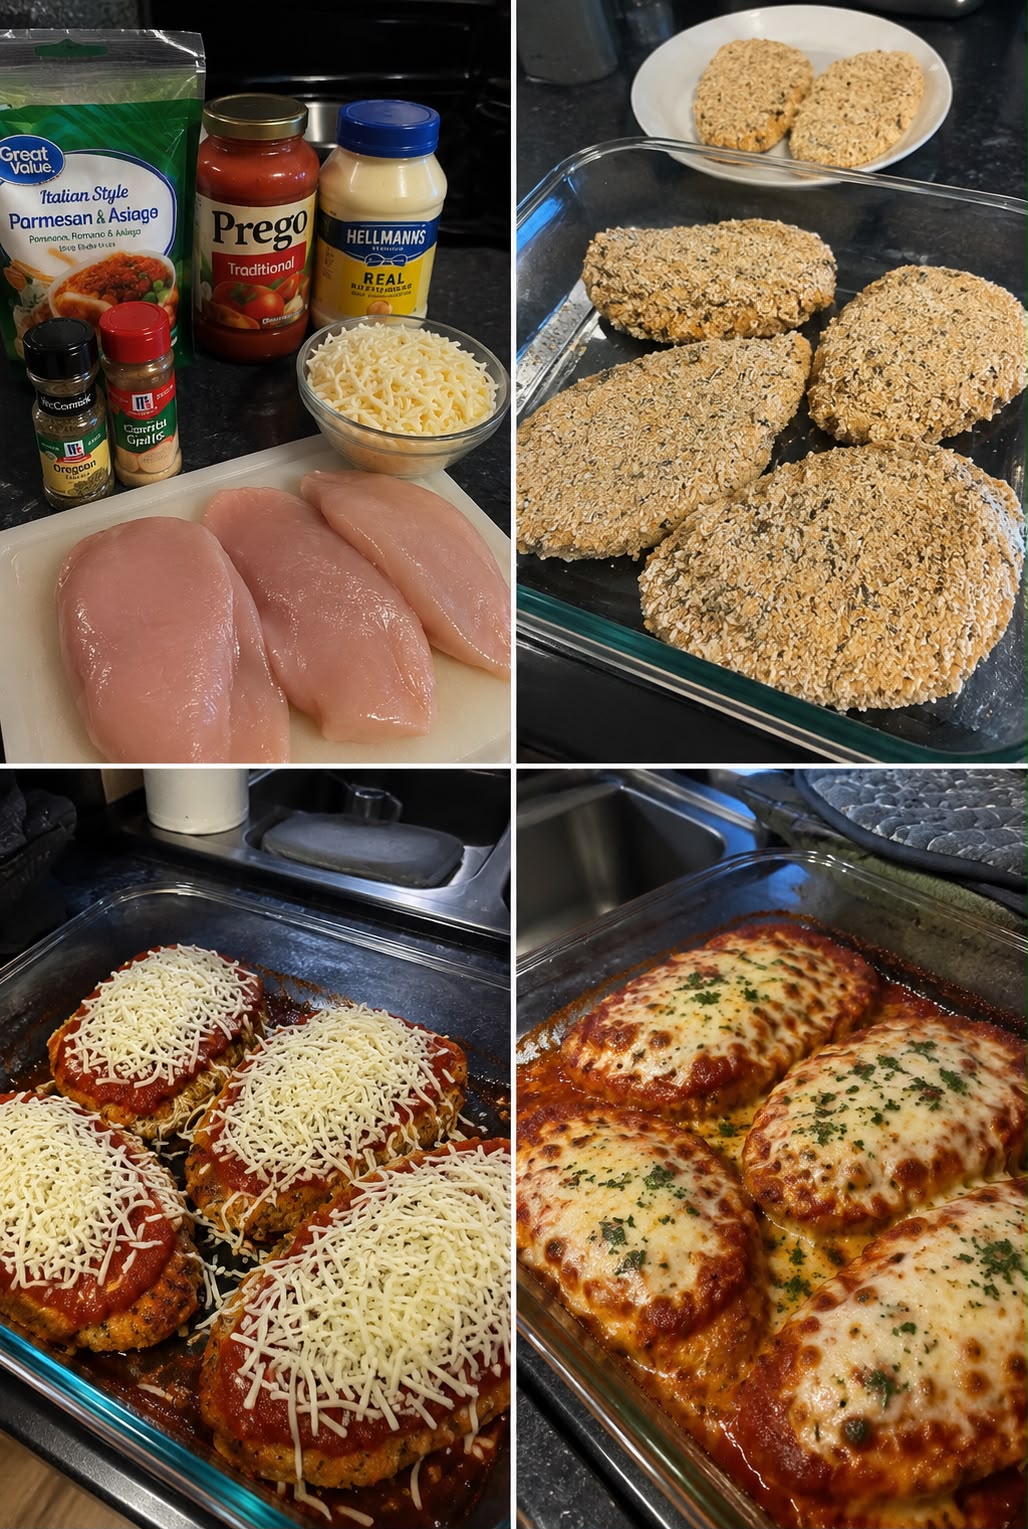
This is where organization saves you. Get three shallow bowls or plates. In the first, whisk together your flour, garlic powder, Italian seasoning, salt, and pepper. In the second, beat your eggs with a splash of water. In the third, mix your panko breadcrumbs with half your Parmesan cheese and the olive oil. Use a fork to break up any clumps in the panko mixture—the oil should be evenly distributed so everything gets golden.
What I messed up once: I didn’t mix the oil into the breadcrumbs, and half my chicken came out pale and half came out dark. Now I take 30 seconds to make sure it’s even.
Step 3: Bread Your Chicken
Working with one piece at a time, coat it in the flour mixture, shaking off excess. Then dip it in the egg, letting any drips fall back into the bowl. Finally, press it into the panko mixture, coating both sides generously. Place it on a parchment-lined baking sheet. Repeat with all four pieces.
Pro move: if you have a second baking sheet, use it. Crowding the pan means the chicken steams instead of bakes, and you lose that crispiness.
Step 4: Bake the Chicken
Preheat your oven to 400°F. Once it’s hot, slide your baking sheet in and bake for 15 minutes. The chicken should be mostly cooked through and the coating should start to look golden. It won’t be fully crispy yet—that’s okay.
Step 5: Add Sauce and Cheese
Remove the baking sheet from the oven. Spoon about 1/4 cup of marinara sauce over each piece of chicken. Top with mozzarella and the remaining Parmesan. I like to be generous here, but do what makes you happy.
Step 6: Final Bake
Return to the oven for 10 to 12 minutes, until the cheese is melted and bubbly and starting to brown at the edges. If you like your cheese more browned, give it another minute or two, but watch it—it can go from golden to burnt quickly.
Step 7: Rest and Serve
Let it sit for 2 to 3 minutes out of the oven. This lets everything set slightly so it doesn’t slide around when you move it to a plate. Garnish with fresh basil if you have it, and serve with your favorite sides.
Common Mistakes to Avoid
Skipping the pounding step: Thick chicken takes longer to cook, and you end up with dry edges and a raw center. Pound it thin and even.
Using wet chicken: Moisture is the enemy of crispiness. Dry it off before you bread it.
Overcrowding the pan: If your chicken pieces are touching, they steam. Space them out, or use two baking sheets.
Skipping the first bake: Some recipes tell you to add sauce right away. I bake first to set the coating, then add sauce. It makes a difference in texture.
Using pre-grated Parmesan: I mentioned this, but I’m saying it again because it really matters. Fresh grated melts beautifully. Pre-grated gets clumpy.
Baking at too low a temperature: If your oven is too cool, the chicken cooks before the coating crisps. 400°F is your friend here.
My Tested Substitutions
For the breadcrumbs: You can use crushed cornflakes, crushed crackers, or even crushed pretzels if you’re feeling adventurous. The result will be slightly different in texture, but it’ll still be delicious.
For the cheese: Asiago or Pecorino Romano work great if you want something with more bite. Provolone is wonderful if you want something milder.
For the sauce: Make your own if you have time. A simple sauce of canned tomatoes, garlic, olive oil, and basil is perfect. Or use alfredo sauce for a completely different vibe.
For the egg wash: If you’re out of eggs, use a little milk mixed with a tablespoon of flour. It works just as well.
For the chicken: Turkey cutlets work beautifully here. Pork cutlets too, though they might need a minute or two longer to cook through.
How to Customize
The beauty of this recipe is that it’s forgiving. Here’s how I play with it:
Make it spicy: Add red pepper flakes to your breadcrumb mixture, or use a spicy marinara sauce.
Make it lighter: Skip the mozzarella on top and use just Parmesan. It’s still delicious and feels less heavy.
Make it fancier: Layer in fresh mozzarella, prosciutto, and roasted red peppers. Serve with a simple arugula salad dressed in lemon and olive oil.
Make it heartier: Stuff the chicken breast with fresh mozzarella and basil before breading. Pound gently so you don’t squeeze the filling out.
Serving Ideas
Classic Baked Chicken Parmesan is pretty versatile. Here’s what I serve it with:
- Pasta: Spaghetti, penne, or angel hair tossed with the extra sauce. This is the traditional move for a reason.
- Garlic bread: Crusty, buttery, and perfect for soaking up sauce.
- Simple salad: Arugula or mixed greens with a light vinaigrette cuts through the richness.
- Roasted vegetables: Zucchini, eggplant, or bell peppers roasted with olive oil and garlic.
- Cauliflower rice: If you want to keep it lighter, this works surprisingly well.
- Crusty bread: Just for dipping in the sauce. No shame in that game.
Meal Prep and Storage
Make-Ahead: You can bread the chicken up to 8 hours ahead. Keep it on a parchment-lined tray in the fridge, uncovered. Bake it fresh when you’re ready to eat.
Leftovers: Store covered in the fridge for up to 3 days. Reheat in a 350°F oven for about 10 minutes, covered with foil to prevent the cheese from drying out.
Freezing: Freeze the breaded, unbaked chicken on a tray, then transfer to a freezer bag for up to 3 months. Bake from frozen, adding 5 to 7 minutes to the cooking time.
Freezing after baking: You can also freeze the fully cooked dish. Thaw in the fridge overnight and reheat gently in the oven.
Nutritional Breakdown
Per serving (one piece of chicken with sauce and cheese):
- Calories: 420
- Protein: 42g
- Carbohydrates: 18g
- Fat: 18g
- Fiber: 1g
Note: This is an estimate based on standard ingredients. Your numbers may vary depending on brands and portion sizes.
Final Thoughts
I love this recipe because it proves you don’t need to be fancy or complicated to make something really satisfying. Classic Baked Chicken Parmesan is about taking simple ingredients, treating them with care, and ending up with something that feels special on your plate.
The first time you make this, follow the recipe as written. The second time, make it your own. Add the things you love, skip the things you don’t, and remember that cooking is supposed to feel good, not stressful.
I’d love to hear how it turns out for you. Come back and tell me what you changed, what you loved, what you’d do differently next time. That’s how we all get better at this.
Happy cooking, friend. You’ve got this.
—
Recipe Card
Classic Baked Chicken Parmesan
Ingredients
Method
- Pat chicken breasts dry and pound to about half-inch thickness. Preheat oven to 400°F.
- Set up three shallow bowls: one with flour mixed with garlic powder, Italian seasoning, salt, and pepper; one with beaten eggs; one with panko breadcrumbs mixed with half the Parmesan and olive oil.