Cool Whip Dessert Bowls: Creamy Treats You’ll Love
Cool Whip Dessert Bowls: Creamy Treats You'll Love

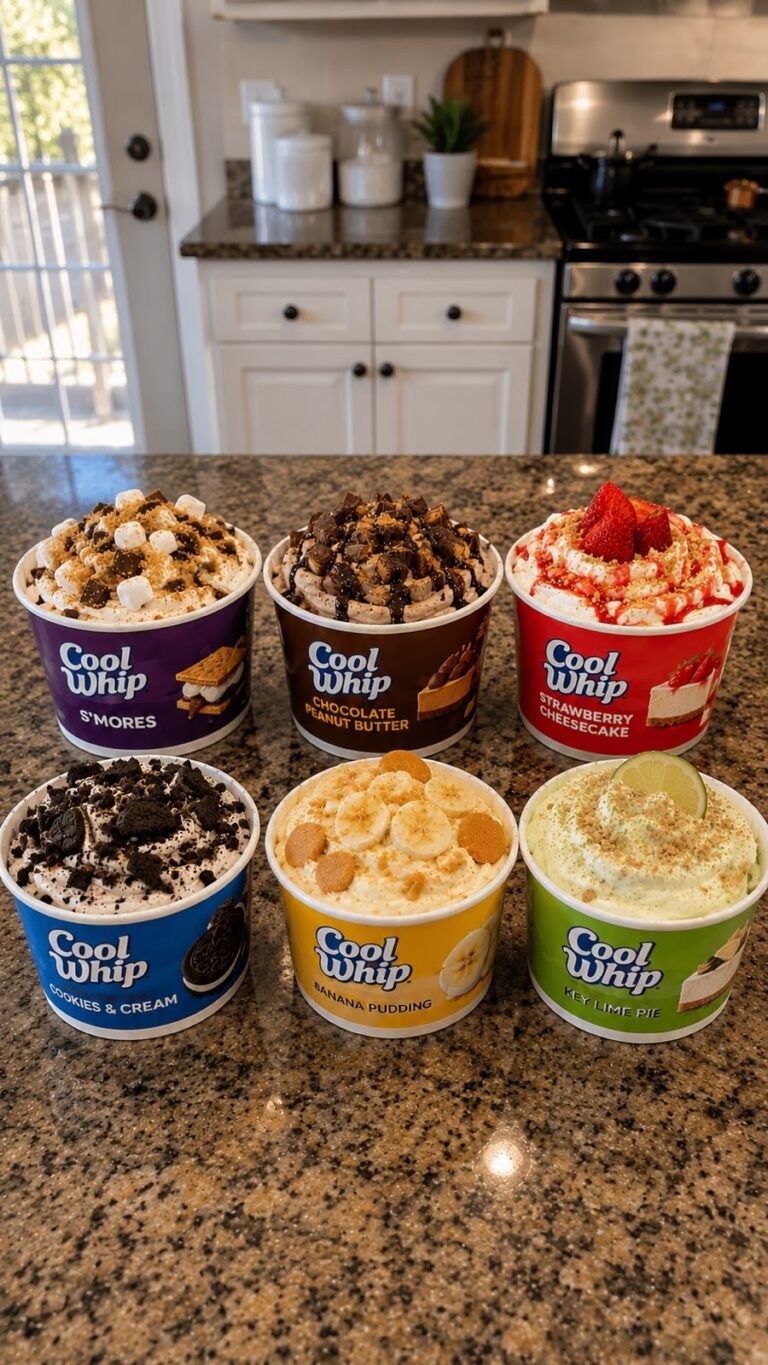
I’m obsessed with Cool Whip dessert bowls because they’re the perfect answer when you want something sweet and indulgent without spending hours in the kitchen. These no-bake treats come together in minutes, which means you can satisfy your cravings on a random Tuesday night or throw together an impressive dessert for guests without the stress. Whether you’re a peanut butter fanatic, an Oreo devotee, or someone who loves fruity flavors, I’ve got you covered with five amazing recipes that are about to become your new go-to desserts.
What I love most about these bowls is how customizable they are. You can easily swap in your favorite candies, cookies, or mix-ins to make them exactly what you’re craving that day. They’re also perfect for meal prep since you can make them ahead and keep them in the fridge, ready to grab whenever that dessert craving hits. I’m sharing my absolute favorite combinations here because these are the ones my family keeps asking me to make again and again.
Save these recipes so you always have a quick dessert idea on hand. Trust me, once you make your first Cool Whip bowl, you’ll understand why I can’t stop making them. If you love easy, delicious recipes like these, Follow me on HaileeRecipes on Pinterest for more ideas that’ll make your life in the kitchen so much easier.
1. Peanut Butter Cup Cool Whip Bowl
This indulgent Peanut Butter Cup Cool Whip Bowl combines creamy, fluffy layers with rich chocolate and peanut butter flavors for an elegant yet effortless dessert. The whipped topping creates an airy base, while crushed peanut butter cups and chocolate sauce add delightful crunch and decadence. Perfect for dinner parties, potlucks, or whenever you need an impressive dessert that requires minimal effort, this bowl delivers that homemade taste without hours in the kitchen. The combination of textures and flavors makes it irresistible to peanut butter and chocolate lovers of all ages.
Why You’ll Love It
- No-bake dessert that comes together in minutes with pantry staples.
- Impressive presentation that looks fancy enough for company but tastes like pure comfort.
- Customizable sweetness level and easily adaptable to different dietary preferences.
Ingredients
- 1 container (8 ounces) Cool Whip, thawed
- 1/2 cup creamy peanut butter, softened
- 1/4 cup powdered sugar
- 1/2 cup chocolate sauce or syrup
- 6 to 8 peanut butter cups, chopped into chunks
- 1/4 cup crushed chocolate cookies or graham crackers
- 2 tablespoons chopped roasted peanuts
- Whipped cream for topping, optional
How To Make It
- In a large mixing bowl, combine the softened peanut butter and powdered sugar, stirring until well blended and smooth.
- Gently fold the thawed Cool Whip into the peanut butter mixture using a spatula, being careful not to deflate the whipped topping. Mix until just combined with light, fluffy texture.
- Divide the peanut butter Cool Whip mixture evenly among four to six serving bowls, creating a smooth, rounded base in each.
- Drizzle chocolate sauce generously over the top of each bowl, allowing some to pool on the surface.
- Sprinkle the chopped peanut butter cups over the chocolate sauce, distributing them evenly across the bowls.
- Add a handful of crushed chocolate cookies or graham crackers to each bowl for added texture and crunch.
- Finish with a sprinkle of chopped roasted peanuts and an optional dollop of fresh whipped cream on top.
- Serve immediately for the best texture, or refrigerate for up to two hours before serving.
Variations And Substitutions
Swap the chocolate sauce for caramel or dulce de leche for a different flavor profile. Replace peanut butter cups with chopped Reese’s pieces, chocolate chips, or crushed candy bars. For a lighter version, use half the peanut butter or substitute with almond butter. Add a layer of brownie crumbles or chocolate pudding between the peanut butter mixture and toppings. Make it extra indulgent by drizzling peanut butter sauce alongside the chocolate sauce.
Make-Ahead, Storage, And Serving Tips
Prepare the peanut butter Cool Whip mixture up to four hours ahead and store it covered in the refrigerator. Add toppings just before serving to maintain crunchiness and prevent sogginess. If making individual bowls for a party, assemble them within two hours of serving. Store any leftovers in an airtight container in the refrigerator for up to one day, though the texture is best enjoyed fresh. For a firmer consistency, refrigerate the assembled bowls for thirty minutes before serving.
2. Oreo Cool Whip Bowl
This indulgent Oreo Cool Whip Bowl combines the beloved cookie with clouds of whipped topping for a no-bake dessert that’s both elegant and effortless. The creamy, cool texture contrasts beautifully with crunchy cookie pieces, creating layers of flavor and satisfaction. Perfect for summer gatherings, potlucks, or when you need a dessert that requires zero oven time, this bowl comes together in minutes and impresses every time. The combination of rich chocolate and sweet vanilla makes it universally appealing to both kids and adults alike.
Why You’ll Love It
- No baking required—ready to serve in under 10 minutes.
- Uses simple pantry staples that most households already have on hand.
- Easily customizable and scalable for any crowd size.
Ingredients
- 2 cups Cool Whip, thawed
- 15 Oreo cookies, crushed into chunks
- 1/4 cup heavy cream
- 2 tablespoons powdered sugar
- 1/2 teaspoon vanilla extract
- Pinch of salt
- Additional crushed Oreos for topping
How To Make It
- In a large bowl, combine the thawed Cool Whip with powdered sugar, vanilla extract, and salt.
- Gently fold in the heavy cream until the mixture reaches a light, fluffy consistency.
- Reserve a handful of crushed Oreo chunks for garnish, then carefully fold the remaining crushed cookies into the Cool Whip mixture.
- Divide the mixture evenly among serving bowls or glasses.
- Top each bowl with reserved crushed Oreos and a few whole cookie pieces for visual appeal.
- Chill until ready to serve, or serve immediately for a softer texture.
Variations And Substitutions
Swap regular Oreos for Double Stuf or Golden varieties for different flavor profiles. Add a drizzle of chocolate syrup or caramel sauce before serving for extra indulgence. Mix in crushed brownies or chocolate cake pieces for added depth. For a lighter version, use whipped cream instead of Cool Whip, or incorporate a small amount of mascarpone for tanginess. Try cookie butter or chocolate cookie crumbles as alternatives to Oreos.
Make-Ahead, Storage, And Serving Tips
Prepare the Cool Whip mixture up to 4 hours ahead and refrigerate in an airtight container; add crushed cookies just before serving to maintain crunchiness. Store completed bowls covered in the refrigerator for up to 2 days, though texture is best within 24 hours. Serve directly from the fridge for the coldest, most refreshing experience. If the mixture becomes too soft, briefly refreeze for 15-20 minutes before serving.
3. Strawberry Cheesecake Cool Whip Bowl
This Strawberry Cheesecake Cool Whip Bowl combines the beloved flavors of classic strawberry cheesecake in an easy, no-bake dessert format. Layers of creamy cheesecake filling, fresh strawberries, and fluffy Cool Whip create a light yet indulgent treat with a delicate texture that melts on your tongue. The graham cracker crust adds a satisfying crunch that contrasts beautifully with the smooth, velvety layers. Perfect for summer gatherings, potlucks, or whenever you crave cheesecake without the fuss of baking. This dessert works wonderfully because it delivers all the cheesecake satisfaction in minutes, making it ideal for busy weeknights or last-minute entertaining.
Why You’ll Love It
- No-bake recipe that requires zero oven time and minimal kitchen skills.
- Tastes like authentic strawberry cheesecake but takes a fraction of the time.
- Naturally lighter than traditional cheesecake while still feeling indulgent and satisfying.
Ingredients
- 8 ounces cream cheese, softened
- 1 cup Cool Whip, thawed
- 1/4 cup powdered sugar
- 1 teaspoon vanilla extract
- 1 cup fresh strawberries, sliced
- 1/2 cup graham cracker crumbs
- 2 tablespoons melted butter
- 1 tablespoon granulated sugar
How To Make It
- In a medium bowl, beat softened cream cheese until smooth and creamy, about 1 minute.
- Add powdered sugar and vanilla extract to the cream cheese, mixing until well combined.
- Gently fold in the thawed Cool Whip using a spatula until no white streaks remain.
- In a small bowl, combine graham cracker crumbs, melted butter, and granulated sugar, stirring until the mixture resembles wet sand.
- Divide the graham cracker mixture among serving bowls, pressing gently to create a thin crust layer.
- Spoon half of the cheesecake filling evenly over the crust in each bowl.
- Top with sliced strawberries, then finish with remaining cheesecake filling.
- Chill for at least 30 minutes before serving, or top with additional strawberries just before serving.
Variations And Substitutions
Swap strawberries for raspberries, blueberries, or mixed berries for different flavor profiles. Use crushed vanilla wafers or digestive biscuits instead of graham crackers for a different texture. Add a tablespoon of strawberry jam to the cheesecake filling for deeper berry flavor. For a chocolate twist, drizzle melted chocolate over the top layer. You can also substitute whipped cream for Cool Whip if preferred, though the texture will be slightly different.
Make-Ahead, Storage, And Serving Tips
Prepare the cheesecake filling up to 2 days ahead and store it in an airtight container in the refrigerator. Assemble the bowls up to 4 hours before serving for best texture. Store assembled bowls covered in the fridge for up to 24 hours, though the crust may soften slightly. For a firmer texture, freeze assembled bowls for 1 to 2 hours before serving. If the cream cheese mixture seems too thick, whisk in a tablespoon of milk to reach your desired consistency.
4. Reese's Peanut Butter Cool Whip Bowl
This decadent Reese’s Peanut Butter Cool Whip Bowl combines creamy peanut butter layers with fluffy whipped topping and chocolate crunch for an irresistible no-bake dessert. The rich, indulgent flavors of peanut butter cups meet the light, airy texture of Cool Whip, creating the perfect balance of sweet and satisfying. Serve this chilled bowl at summer gatherings, potlucks, or whenever you need an impressive dessert that requires minimal effort. It’s perfect for peanut butter lovers and comes together in minutes without any baking required.
Why You’ll Love It
- No baking needed, just simple layering and chilling for an elegant result.
- Combines beloved peanut butter cup flavors in an easy, crowd-pleasing format.
- Can be made ahead and stored in the refrigerator for convenient entertaining.
Ingredients
- 16 ounces Cool Whip, thawed
- 1 cup creamy peanut butter
- 3/4 cup powdered sugar
- 1/2 cup chocolate syrup
- 1/2 cup crushed Reese’s Peanut Butter Cups
- 1/4 cup chocolate chips
- 2 tablespoons peanut butter chips
- Whipped cream for topping, optional
How To Make It
- In a large bowl, whisk together the thawed Cool Whip, creamy peanut butter, and powdered sugar until smooth and well combined.
- Divide the peanut butter mixture evenly among four serving bowls or glasses.
- Drizzle each bowl with chocolate syrup, using about 2 tablespoons per serving.
- Sprinkle the crushed Reese’s Peanut Butter Cups generously over the chocolate syrup layer.
- Top with a combination of chocolate chips and peanut butter chips for extra texture and flavor.
- Add an additional dollop of whipped cream on top if desired for extra indulgence.
- Refrigerate for at least 30 minutes before serving to allow flavors to meld and textures to set.
Variations And Substitutions
Swap the chocolate syrup for hot fudge sauce for a warmer flavor profile. Use natural peanut butter if you prefer a less sweet option, or try almond butter for a different nutty taste. Replace crushed Reese’s with chopped peanut butter cups, crushed pretzels, or peanut brittle for varied textures. Layer in a large trifle bowl instead of individual servings for a stunning presentation at parties. Add a tablespoon of espresso powder to the peanut butter mixture for subtle coffee undertones.
Make-Ahead, Storage, And Serving Tips
Prepare the peanut butter Cool Whip mixture up to one day ahead and store in an airtight container in the refrigerator. Assemble individual bowls no more than 4 hours before serving to prevent the chocolate syrup from making the topping soggy. Store completed bowls covered in the refrigerator for up to 24 hours. These bowls are best served chilled straight from the refrigerator. If the mixture becomes too soft, return it to the refrigerator for 15 minutes before serving. For a frozen version, freeze assembled bowls for 2-3 hours for a firmer, ice cream-like consistency.
5. Cookie Dough Cool Whip Bowl
This indulgent Cookie Dough Cool Whip Bowl combines the nostalgic appeal of edible cookie dough with fluffy, sweet whipped cream for a dessert that tastes like a dream. Layers of creamy Cool Whip, soft cookie dough pieces, and chocolate chips create a rich, satisfying texture that’s perfect for summer gatherings or whenever you need an impressive no-bake treat. The combination of cool, airy whipped cream with chewy cookie dough bites delivers both comfort and elegance, making it ideal for serving at brunches, potlucks, or casual dinner parties.
Why You’ll Love It
- No baking required, making it perfect for hot weather entertaining.
- Tastes indulgent and impressive while requiring minimal effort.
- Customizable with different mix-ins and toppings to suit your preferences.
Ingredients
- 16 ounces Cool Whip, thawed
- 1 cup edible cookie dough, chopped into small pieces
- 3/4 cup semi-sweet chocolate chips
- 1/4 cup sweetened condensed milk
- 1 teaspoon vanilla extract
- 2 tablespoons butter, softened
- 1/4 cup brown sugar
- Pinch of sea salt
How To Make It
- In a large bowl, combine the thawed Cool Whip with sweetened condensed milk and vanilla extract, folding gently until well blended.
- Prepare your edible cookie dough by mixing softened butter, brown sugar, and a pinch of salt until creamy, then fold in chocolate chips.
- Chop the cookie dough mixture into small, bite-sized pieces for easy eating.
- Gently fold half of the chopped cookie dough pieces and half of the chocolate chips into the Cool Whip mixture.
- Transfer the mixture to a serving bowl or individual bowls.
- Top with remaining cookie dough pieces and chocolate chips for visual appeal.
- Chill for at least 30 minutes before serving to allow flavors to meld.
- Drizzle with chocolate sauce or caramel sauce just before serving if desired.
Variations And Substitutions
Swap semi-sweet chocolate chips for dark chocolate, white chocolate, or brownie chunks. Replace traditional cookie dough with brownie batter or add crushed cookies like Oreos or graham crackers for different textures. For a peanut butter version, incorporate peanut butter into the cookie dough mixture. You can also use whipped cream instead of Cool Whip for a lighter, fresher taste, or add a splash of coffee liqueur for an adult version.
Make-Ahead, Storage, And Serving Tips
Prepare this dessert up to 24 hours in advance and store covered in the refrigerator. The texture remains creamy and fresh when chilled properly. Serve directly from the refrigerator for the best consistency. If the mixture becomes too soft, simply refreeze for 15 minutes before serving. For individual portions, layer ingredients in clear cups or bowls to showcase the pretty texture contrast. This dessert is best enjoyed within two days of preparation.
Final Thoughts
Cool Whip dessert bowls are the perfect solution when you want something sweet without spending hours in the kitchen. Whether you’re drawn to the simplicity of a classic berry bowl or the indulgence of a chocolate creation, there’s a recipe here that will satisfy your cravings. These no-bake treats come together in minutes, making them ideal for busy weeknights, last-minute gatherings, or whenever you need a little dessert magic.
If you’re new to making these bowls, we recommend starting with the simplest recipe that speaks to you—maybe the strawberry shortcake version or a cookies and cream combination. Once you see how easy it is to layer, chill, and enjoy, you’ll find yourself experimenting with your favorite flavors and toppings. Your family and friends will be impressed, and you’ll have a go-to dessert that feels special every single time.
Peanut Butter Cup Cool Whip Bowl
Ingredients
Method
- In a large mixing bowl, combine thawed Cool Whip with creamy peanut butter.
- Add powdered sugar, vanilla extract, and a pinch of salt to the mixture.
- Fold ingredients together gently until smooth and well combined.
- Drizzle chocolate syrup into the bowl and gently swirl it through the peanut butter mixture.
- Divide the mixture into serving bowls.
- Top each bowl with crushed peanut butter cups, chocolate chips, and chopped peanuts.
- Serve immediately or refrigerate until ready to enjoy.