Crispy Zucchini Fritters Recipe
Crispy Zucchini Fritters Recipe
Crispy Zucchini Fritters Recipe: A Cozy Kitchen Favorite
I still remember the exact moment I fell in love with zucchini fritters. It was a random Tuesday evening, my garden was absolutely overflowing with zucchini (you know how it is—plant two seeds and suddenly you’re drowning in them), and I was standing in my kitchen feeling genuinely uninspired. I’d already made zucchini bread, grilled zucchini, roasted zucchini… I was at my wit’s end. Then I remembered my grandmother’s trick: grate it, squeeze it dry, mix it with cheese and eggs, and pan-fry it until golden. That first bite? Absolute magic. Crispy on the outside, tender and savory on the inside, with this incredible contrast that just made me want to eat the whole batch.
Now, years later, these crispy zucchini fritters are something I make constantly—not just when I’m desperate to use up produce, but because they’re genuinely one of my favorite things to eat. They’re the kind of recipe that feels fancy enough to serve to guests but simple enough that you can whip them up on a weeknight with stuff you probably already have. They’re vegetable-forward without feeling like deprivation, crispy without being heavy, and honestly? They’re just plain fun to make.
If you’re looking for a way to sneak more vegetables into your meals, impress your family with something a little different, or just make something that tastes absolutely incredible, this is your recipe. I’m going to walk you through exactly how I make mine, the mistakes I’ve made so you don’t have to, and all the ways you can make this work for your kitchen. Follow me on HaileeRecipes on Pinterest for more recipes like this one.
Why You’ll Love This Recipe
Let me be honest about what makes this recipe worth your time and oven space.
- They’re genuinely crispy. Not soggy, not greasy—that perfect golden-brown exterior that actually crunches when you bite into it. This is the result of properly squeezing out moisture and getting your pan hot enough.
- They’re packed with real food. Zucchini, cheese, eggs, a little flour. That’s it. No weird additives or things you can’t pronounce.
- They work for so many occasions. Serve them as an appetizer, a side dish, a light lunch, or even part of a grain bowl. They’re versatile in the best way.
- They’re budget-friendly. Zucchini is cheap, especially in summer. Cheese and eggs you probably have. This is real food that doesn’t break the bank.
- They satisfy cravings without the guilt. You’re eating vegetables here. Real, whole vegetables. The crispy part comes from proper cooking technique, not from drowning them in oil.
- They come together fast. From “I’m hungry” to “I’m eating” is maybe 20 minutes. That’s faster than delivery.
Ingredients
- 3 medium zucchini (about 1.5 pounds), grated
- 1 teaspoon salt (for drawing out moisture)
- 1 cup shredded sharp cheddar cheese (or Gruyère if you’re feeling fancy)
- 1/2 cup grated Parmesan cheese
- 2 large eggs
- 1/3 cup all-purpose flour
- 1/4 cup fresh breadcrumbs (panko works beautifully)
- 2 cloves garlic, minced
- 1/2 teaspoon black pepper
- 1/4 teaspoon red pepper flakes (optional, but I always include them)
- 2 tablespoons fresh dill or parsley (fresh is so much better than dried here)
- 2-3 tablespoons olive oil for pan-frying
- Sour cream or Greek yogurt for serving
Hailee’s Tip: Don’t skip the salt-and-squeeze step. I know it seems like an extra thing, but wet zucchini makes soggy fritters. Trust me on this one.
Hailee’s Tip: Sharp cheddar or Gruyère are my go-tos because they have actual flavor. Mild cheddar will work, but your fritters will taste a bit blander. Cheese is where a lot of the deliciousness comes from, so don’t cheap out here.
Hailee’s Tip: Fresh herbs make a real difference. If you only have dried dill, use about 1 teaspoon instead of 2 tablespoons, because dried herbs are more concentrated.
Optional Add-Ins and Variations
Here’s where you can make this recipe feel like yours. I love the base version, but I also love playing around with it depending on my mood and what I have in the fridge.
- Crispy bacon: Crumble 2-3 strips of cooked bacon into the mixture. This is not a light snack anymore, but it’s absolutely worth it.
- Corn: About 1/2 cup fresh or frozen corn adds sweetness and texture. Summer vibes.
- Jalapeños: Finely diced, these add a gentle heat and brightness. I usually add 1-2, depending on how spicy I’m feeling.
- Onion: Finely minced red onion (about 1/4 cup) adds a little sharpness and complexity.
- Lemon zest: A teaspoon or so brightens everything up. Pair this with fresh dill for a Mediterranean vibe.
- Feta cheese: Swap out half the cheddar for crumbled feta for a tangier, more Mediterranean flavor profile.
- Spinach: About 1/2 cup chopped and squeezed dry works beautifully. Adds nutrition and color.
Step-by-Step Method
Step 1: Prepare Your Zucchini
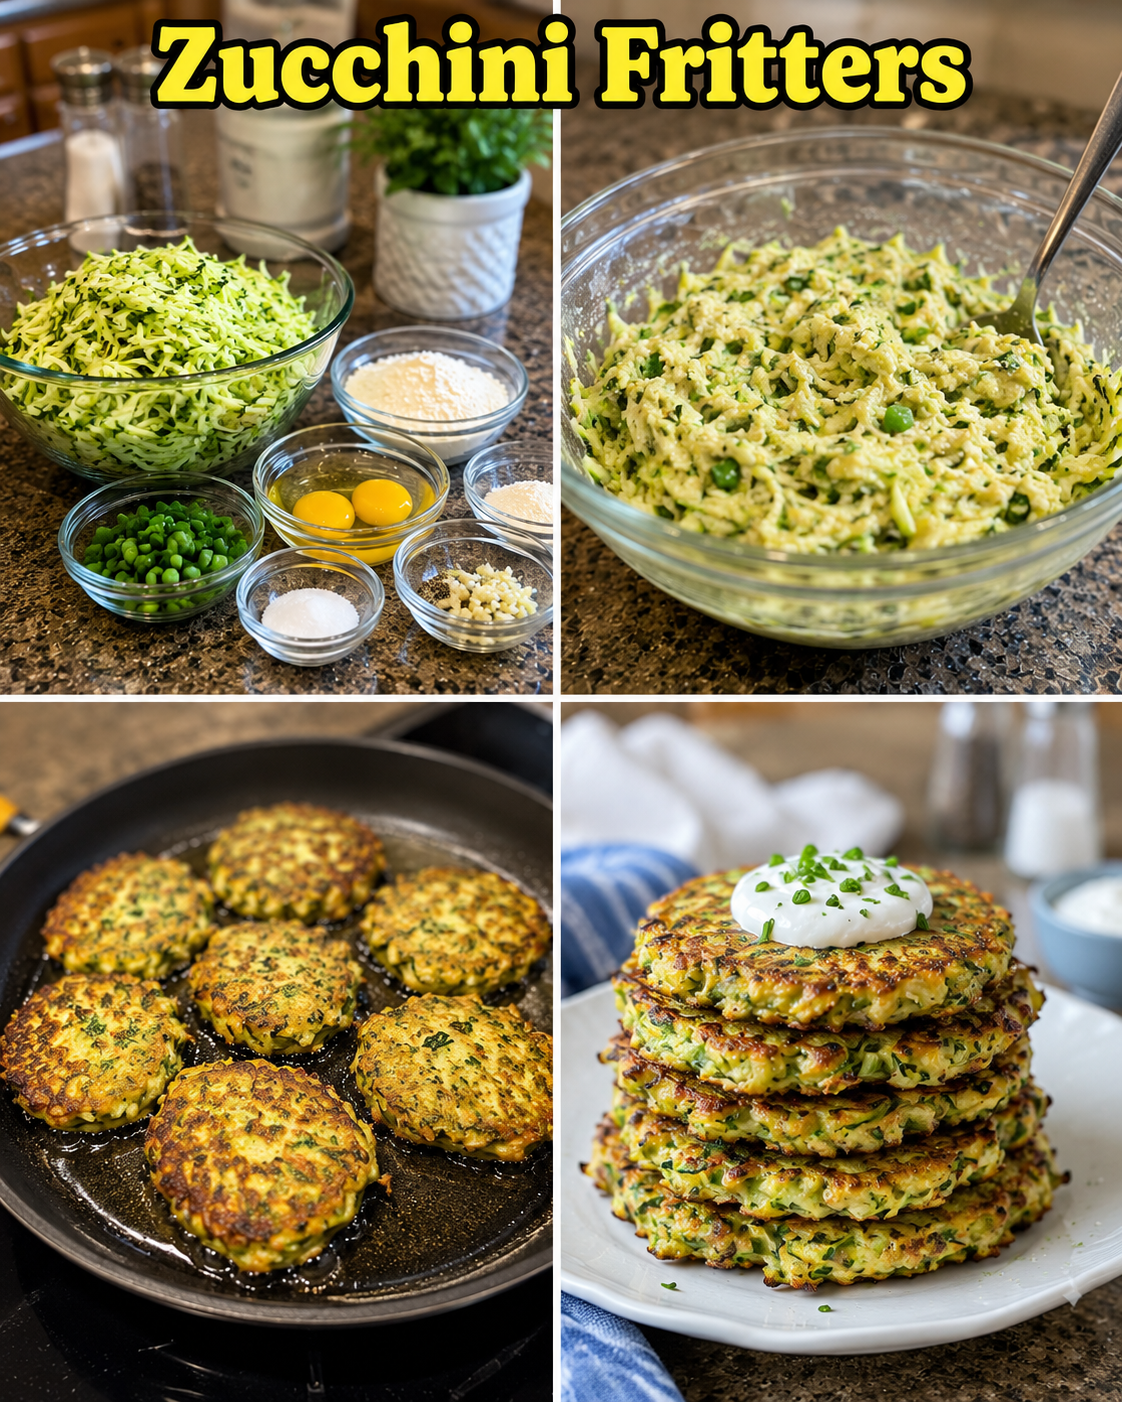
Grate your zucchini using the large holes on a box grater or a food processor. You want shreds, not mush. Once it’s all grated, transfer it to a clean kitchen towel or cheesecloth. Sprinkle with 1 teaspoon of salt and let it sit for about 5 minutes. This draws out the moisture.
Now here’s the part that feels a little weird but is absolutely essential: squeeze. Gather up the towel and wring it out like you’re squeezing out a wet washcloth. You’re going to be surprised at how much liquid comes out. I’m talking like 1/4 cup or more. This step is what separates crispy fritters from soggy ones, so don’t skip it.
What I Messed Up: Early on, I didn’t squeeze hard enough because I was worried about breaking the zucchini. Guess what? You can’t break grated zucchini, and under-squeezing meant my fritters came out kind of limp. Squeeze like you mean it.
Step 2: Mix Your Base
In a large bowl, combine your squeezed zucchini with the cheddar, Parmesan, eggs, flour, breadcrumbs, garlic, black pepper, red pepper flakes, and fresh herbs. Stir until everything is evenly combined. The mixture should hold together but still look a little shaggy—not wet, not overly dense.
Hailee’s Tip: If your mixture feels too wet, add another tablespoon of flour. If it feels too dry, add another egg. You want something that holds together but isn’t gluey.
Step 3: Heat Your Pan
Get a large skillet or griddle over medium-high heat. Add your olive oil and let it get hot—you want it shimmering and almost smoking slightly. This is what creates the crispy exterior. Don’t skip the preheating step. I learned this the hard way with pale, sad fritters.
What I Messed Up: I used to start cooking in a lukewarm pan, thinking I was being more careful. All that did was make the fritters absorb oil and come out greasy. Hot pan = crispy fritters. It’s worth the extra 2 minutes of waiting.
Step 4: Form and Fry
Using a spoon or small ice cream scoop, drop heaping tablespoon-sized portions onto your hot pan. Gently flatten each one with the back of a spatula until it’s about 1/2 inch thick. You want them thin enough to get crispy all the way through but thick enough to hold together.
Let them cook undisturbed for about 3-4 minutes. This is important—don’t poke them, don’t flip them early. Let them develop that golden crust on the bottom. Once they’re golden brown on one side, flip and cook the other side for another 2-3 minutes until it’s equally golden.
Step 5: Drain and Serve
Transfer your finished fritters to a paper towel-lined plate to drain any excess oil. They’ll continue to firm up as they cool slightly. Serve them warm with sour cream, Greek yogurt, or even a simple salsa.
Common Mistakes to Avoid
Not squeezing out enough moisture. I cannot stress this enough. Wet zucchini equals soggy fritters. Squeeze until you think you’re done, then squeeze some more.
Skipping the breadcrumbs. Some recipes use only flour, but breadcrumbs (especially panko) add texture and help them stay crispy. They’re worth including.
Pan not hot enough. A lukewarm pan will make them absorb oil instead of getting crispy. Get that pan hot.
Overcrowding the pan. Give each fritter space to breathe. If you’re cooking more than 4-5 at a time, work in batches. Crowded fritters steam instead of crisp.
Flipping too early. Let them cook on the first side long enough to develop a golden crust. Premature flipping means they fall apart or don’t get crispy enough.
Using bland cheese. Mild cheddar or pre-shredded cheese with anti-caking agents will make these taste flat. Use real, flavorful cheese.
My Tested Substitutions
For the cheese: Gruyère is wonderful if you want something fancier. Feta works if you want Mediterranean flavors. In a pinch, I’ve used a combination of sharp cheddar and Swiss. Avoid pre-shredded cheese if you can—it has anti-caking agents that affect the texture.
For the flour: You can use gluten-free all-purpose flour one-to-one. The texture will be slightly different but still good. I’ve also used half whole wheat flour and half all-purpose for a nuttier flavor.
For the breadcrumbs: Panko is my favorite, but regular breadcrumbs work. You could even use crushed crackers or finely grated Parmesan for extra flavor.
For the oil: Olive oil is my go-to, but avocado oil works beautifully too and has a higher smoke point. Coconut oil will work but will add its own flavor, which is either a pro or a con depending on your preference.
For the fresh herbs: Dill and parsley are my favorites, but chives, basil, or even cilantro all work. Use whatever fresh herbs you have or love.
How to Customize
The beautiful thing about this recipe is how flexible it is. You’re basically making a vegetable pancake base, and you can season it however you want.
Mediterranean version: Add lemon zest, use feta instead of some of the cheddar, include fresh dill and parsley, and skip the red pepper flakes. Serve with a dollop of Greek yogurt mixed with garlic.
Spicy version: Double the red pepper flakes, add diced jalapeños, include fresh cilantro, and serve with a spicy aioli or sriracha mayo.
Breakfast version: Add crumbled bacon and fresh chives, serve with a fried egg on top and a side of toast.
Loaded version: Add corn, diced bell peppers, green onions, and crispy bacon. These become almost a meal on their own.
Serving Ideas
These are so versatile that I genuinely make them differently depending on what I’m in the mood for.
- As an appetizer: Serve them warm with a simple sour cream dip or a homemade herb yogurt sauce. People always ask for the recipe.
- As a side dish: Pair them with grilled chicken, baked fish, or a simple salad for a complete meal.
- As a light lunch: Serve them over a bed of greens with a lemon vinaigrette and some crumbled feta.
- In a grain bowl: Layer them over quinoa or rice with roasted vegetables and tahini dressing.
- For breakfast: Top with a fried egg and serve with whole grain toast.
- As a snack: Honestly, I eat these cold straight from the fridge. They’re still delicious.
Meal Prep & Storage
Make-Ahead: You can prepare the mixture up to 24 hours in advance and store it in an airtight container in the fridge. When you’re ready to eat, just cook them fresh. This is a game-changer for weeknight dinners.
Cooked Storage: Leftover fritters keep in an airtight container in the fridge for up to 4 days. Reheat them in a 375°F oven for about 8-10 minutes to restore crispiness. The microwave will make them soggy, so skip that.
Freezing: You can freeze cooked fritters for up to 3 months. Lay them on a baking sheet to freeze individually, then transfer to a freezer bag. Reheat from frozen at 375°F for about 12-15 minutes.
Hailee’s Tip: I like to make a double batch and freeze half. On nights when I’m tired and don’t want to cook, I can have these ready in 15 minutes.
Nutritional Breakdown
This is based on one fritter (makes about 12 fritters from this recipe). Keep in mind that nutrition can vary based on exact sizes and brands used.
- Calories: approximately 95
- Protein: 5g
- Carbohydrates: 6g
- Fat: 6g
- Fiber: 1g
These are actually pretty reasonable nutritionally. You’re getting protein from the eggs and cheese, fiber from the zucchini, and the fat content is moderate because you’re pan-frying, not deep-frying.
Final Thoughts
I’ve been making this crispy zucchini fritters recipe for years now, and I still get excited every time I make a batch. There’s something so satisfying about turning a simple vegetable into something crispy and delicious and genuinely crave-worthy. It’s the kind of recipe that makes you feel like you’re doing something good for yourself while also enjoying something that tastes indulgent.
What I love most about sharing this recipe is seeing people realize that eating vegetables doesn’t have to be boring or feel like a sacrifice. These fritters prove that. They’re proof that a few simple, real ingredients and a little technique can create something that’s both nourishing and genuinely delicious.
I’d love to hear how yours turn out. Make them, enjoy them, and don’t be shy about adding your own spin to them. Cooking is supposed to be fun and personal, and this recipe is flexible enough to handle whatever you throw at it.
Happy cooking, friend. I hope your kitchen smells as good as mine does right now.
—
Crispy Zucchini Fritters Recipe
Ingredients
Method
- Step 1: Prepare Your Zucchini Grate your zucchini using the large holes on a box grater or a food processor. You want shreds, not mush. Once it's all grated, transfer it to a clean kitchen towel or cheesecloth. Sprinkle with 1 teaspoon of salt and let it sit for about 5 minutes. This draws out the moisture. Now here's the part that feels a little weird but is absolutely essential: squeeze. Gather up the towel and wring it out like you're squeezing out a wet washcloth. You're going to be surprised at how much liquid comes out. I'm talking like 1/4 cup or more. This step is what separates crispy fritters from soggy ones, so don't skip it. What I Messed Up: Early on, I didn't squeeze hard enough because I was worried about breaking the zucchini. Guess what? You can't break grated zucchini, and under-squeezing meant my fritters came out kind of limp. Squeeze like you mean it. Step 2: Mix Your Base In a large bowl, combine your squeezed zucchini with the cheddar, Parmesan, eggs, flour, breadcrumbs, garlic, black pepper, red pepper flakes, and fresh herbs. Stir until everything is evenly combined. The mixture should hold together but still look a little shaggy—not wet, not overly dense. Hailee's Tip: If your mixture feels too wet, add another tablespoon of flour. If it feels too dry, add another egg. You want something that holds together but isn't gluey. Step 3: Heat Your Pan Get a large skillet or griddle over medium-high heat. Add your olive oil and let it get hot—you want it shimmering and almost smoking slightly. This is what creates the crispy exterior. Don't skip the preheating step. I learned this the hard way with pale, sad fritters. What I Messed Up: I used to start cooking in a lukewarm pan, thinking I was being more careful. All that did was make the fritters absorb oil and come out greasy. Hot pan = crispy fritters. It's worth the extra 2 minutes of waiting. Step 4: Form and Fry Using a spoon or small ice cream scoop, drop heaping tablespoon-sized portions onto your hot pan. Gently flatten each one with the back of a spatula until it's about 1/2 inch thick. You want them thin enough to get crispy all the way through but thick enough to hold together. Let them cook undisturbed for about 3-4 minutes. This is important—don't poke them, don't flip them early. Let them develop that golden crust on the bottom. Once they're golden brown on one side, flip and cook the other side for another 2-3 minutes until it's equally golden. Step 5: Drain and Serve Transfer your finished fritters to a paper towel-lined plate to drain any excess oil. They'll continue to firm up as they cool slightly. Serve them warm with sour cream, Greek yogurt, or even a simple salsa.