Dairy Queen Buster Bars | Frozen Treats You’ll Crave
Dairy Queen Buster Bars | Frozen Treats You'll Crave
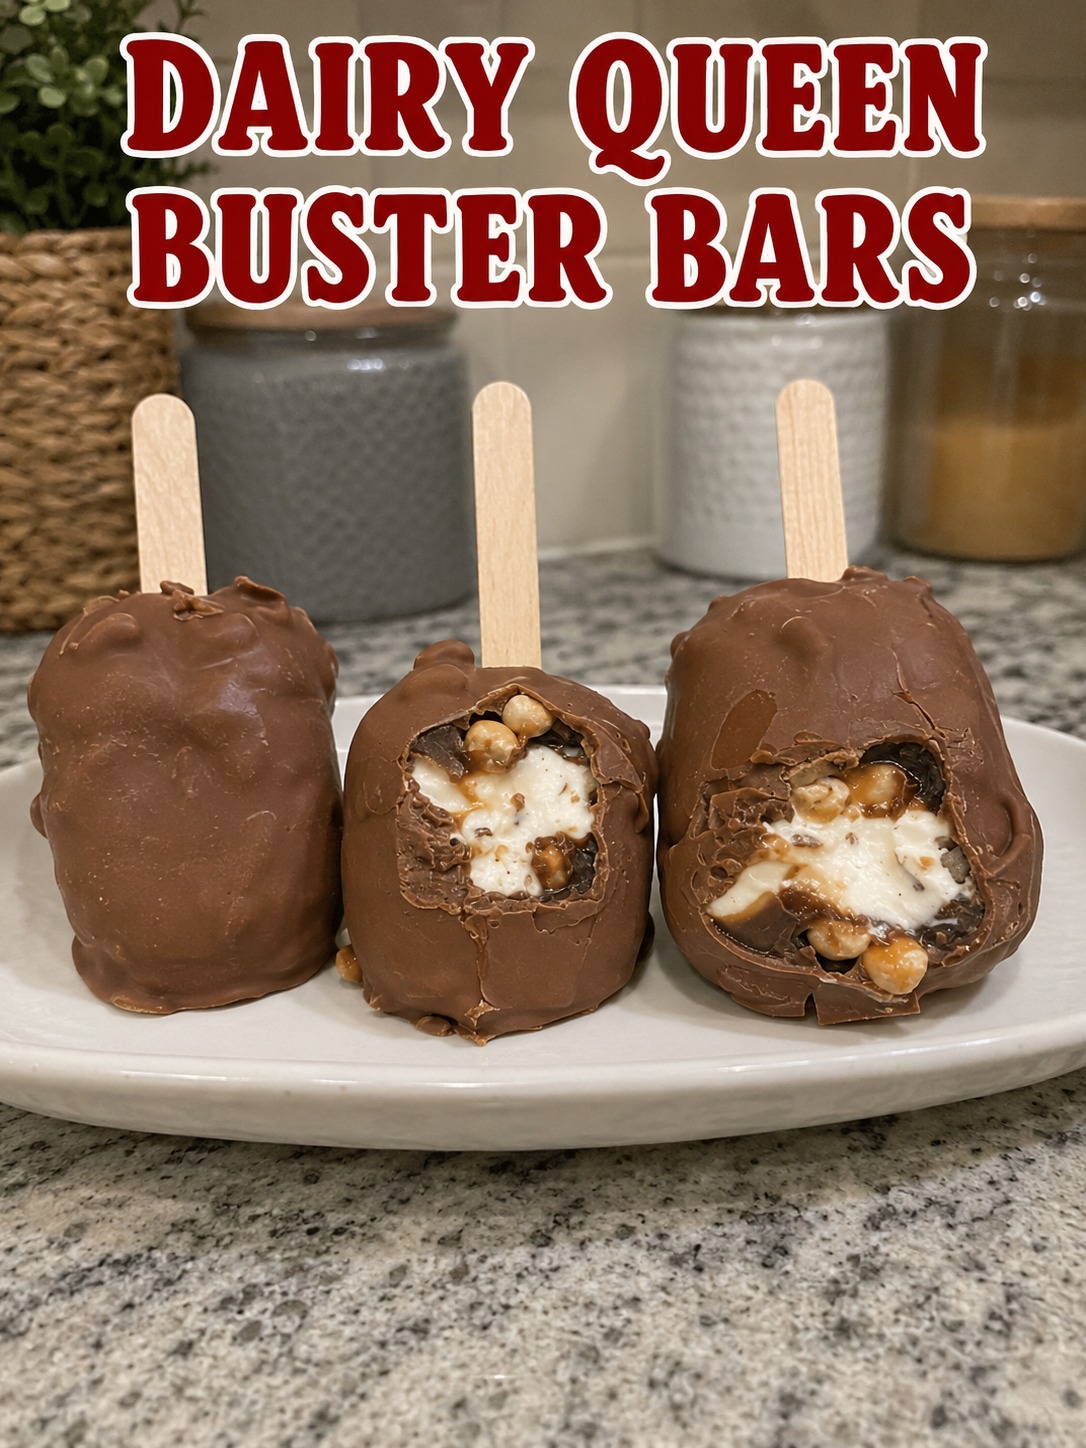
Homemade Dairy Queen Buster Bars: A Nostalgia-Filled Treat You Can Actually Make
I have this memory from when I was about eight years old. My dad took me to Dairy Queen on a hot summer afternoon, and I ordered a Buster Bar without really knowing what I was getting into. One bite and I was absolutely hooked. The way that chocolate shell cracked between my teeth, followed by the creamy vanilla ice cream and those crunchy peanuts? I was convinced I’d discovered the eighth wonder of the world.
Fast forward to my adult years, and I’m standing in my kitchen on a random Tuesday evening, craving that exact same feeling. But here’s the thing: I didn’t want to drive to DQ. I wanted to make it myself. So I did some experimenting, failed a few times (we’ll talk about that), and eventually landed on this recipe that tastes shockingly close to the real deal. And honestly? Making them at home is even better because you control every single ingredient, and they’re fresher than anything you’ll grab from a freezer case.
These Dairy Queen Buster Bars are perfect for anyone who grew up with that specific ice cream nostalgia, anyone who loves the contrast of textures (crispy shell meets creamy center), or anyone who just wants an impressive homemade dessert that looks way more complicated than it actually is. They’re freezer-friendly, they’re customizable, and they’re the kind of thing that makes people say, “Wait, you made these?”
If you’re looking for more easy-to-make frozen treats and nostalgic recipes, follow me on HaileeRecipes on Pinterest for regular updates and inspiration.
Why You’ll Love This Recipe
Let me be real with you: there are a lot of reasons to make these bars. First, they’re genuinely simple. You’re not doing anything scary or requiring special equipment you don’t already own. Second, they taste incredibly close to the original, which means you get that satisfaction without leaving your house. Third, you can make a whole batch and have them waiting in your freezer for whenever that ice cream craving hits.
But beyond the practical stuff, there’s something special about making a childhood favorite yourself. It’s like capturing a memory and then improving it. You get to choose your ice cream flavor, decide how many peanuts go into each bar, and make them exactly the way you want them. That’s powerful.
These bars also come together in stages, which means you can make them over two days if you want. No rushing, no stress. And if you’re planning a gathering, these are the kind of dessert that makes you look like you spent hours in the kitchen when you really just spent about thirty minutes of active time.
Ingredients
- 2 cups vanilla ice cream (or your favorite flavor), slightly softened
- 1 cup roasted, salted peanuts (or mixed nuts if you prefer), finely chopped
- 8 ounces semi-sweet chocolate (or milk chocolate, chopped)
- 3 tablespoons coconut oil (or vegetable oil)
- 1 tablespoon butter
- Pinch of sea salt (for the chocolate coating)
Hailee’s Tip: The quality of your chocolate really matters here. I use a good quality semi-sweet chocolate bar that I chop myself rather than chocolate chips. The chips have additives that make them harder to work with for dipping, and honestly, the taste difference is noticeable.
Hailee’s Tip: Don’t skip the coconut oil in the chocolate mixture. It keeps the chocolate shell from getting too thick and hard when it freezes. This is what took me three tries to figure out.
Optional Add-Ins and Variations
Here’s where you get to play around. The beauty of making these at home is that you’re not locked into one version.
- Chocolate ice cream base with crushed Oreos instead of peanuts
- Salted caramel ice cream with candied pecans
- Cookies and cream ice cream with crushed pretzels for a sweet-and-salty vibe
- Strawberry ice cream with chopped almonds
- Peanut butter ice cream with chocolate chips mixed into the peanut coating
The formula stays the same: ice cream, nuts or crunch, chocolate shell. You really can’t go wrong.
Step-by-Step Method
Step 1: Line your pan and prepare your base
Line an 8×8-inch baking pan with parchment paper, letting some hang over the sides. This makes removal so much easier later. Let your ice cream sit on the counter for about five minutes so it’s soft enough to spread but not melted. Spread it evenly across the bottom of the pan. This is going to be the filling for your bars. Pop it in the freezer for at least two hours, or overnight if you have the time.
Hailee’s Tip: If your ice cream is too soft, it’ll be impossible to work with. If it’s too hard, you’ll tear it apart trying to spread it. I know this from experience. Patience here pays off.
Step 2: Prepare your peanut layer
Once your ice cream is solid, spread a thin layer of softened ice cream on top (about a quarter-inch). This acts as an adhesive for your nuts. Then press your chopped peanuts into it, covering as much surface as you can. You want a good, solid layer of crunch here. Freeze again for at least one hour.
What I Messed Up: The first time I made these, I skipped the middle ice cream layer and just tried to press peanuts directly onto the frozen ice cream. They fell off immediately when I tried to cut and dip. Learn from my mistakes.
Step 3: Cut your bars
Remove the pan from the freezer and let it sit at room temperature for literally one minute. This makes cutting so much cleaner. Using a sharp knife, cut the whole thing into four or six bars, depending on how generous you’re feeling. Place them on a parchment-lined baking sheet and freeze for at least thirty minutes before dipping.
Step 4: Make your chocolate shell
Chop your chocolate into small pieces and place it in a microwave-safe bowl with the coconut oil and butter. Microwave in thirty-second intervals, stirring between each one, until everything is melted and smooth. Add your pinch of salt and stir well. Let it cool for about two minutes so it’s warm but not hot.
Hailee’s Tip: This cooling step is important. If your chocolate is too hot, it’ll slide right off the ice cream bars. Too cold and it’ll be thick and clumpy.
Step 5: Dip and freeze
Working quickly, dip each frozen bar into the chocolate, coating all sides. You can use a fork or dipping tool, or honestly, just use your fingers if you’re brave enough. Place each dipped bar back on the parchment-lined sheet. Once you’ve dipped all of them, freeze for at least one hour before serving.
What I Messed Up: I tried to dip multiple bars at once and they started melting. Work one at a time, and work fast. Your freezer is your friend here.
Common Mistakes to Avoid
Chocolate that’s too thick: This is usually because you didn’t use enough oil or because your chocolate cooled too much before dipping. Warm it up slightly and add a touch more coconut oil.
Peanuts falling off: You need that middle layer of ice cream to hold them in place. Don’t skip it, even though it seems like an extra step.
Bars melting during dipping: Keep them in the freezer until the very last second, and work as quickly as you can. If they start to soften, pop them back in the freezer for ten minutes before continuing.
Chocolate shell cracking: This usually happens when the chocolate is too cold or too thick. The coconut oil helps prevent this, but if it’s still happening, make sure your chocolate mixture is smooth and warm enough before dipping.
My Tested Substitutions
For the chocolate: You can use milk chocolate, dark chocolate, or even white chocolate. Just keep the ratio of chocolate to oil the same. Dark chocolate will taste less sweet, which some people prefer.
For the oil: Coconut oil, vegetable oil, and even a neutral-flavored olive oil all work. Avoid butter alone because it hardens too much when frozen. The oil keeps things pliable.
For the nuts: Almonds, pecans, walnuts, or even crushed pretzels all work beautifully. You can also use a combination. I’ve done half peanuts and half crushed Oreos, and it was incredible.
For the ice cream: Any flavor works, but I’d stick with something classic. Vanilla, chocolate, strawberry, butter pecan. Avoid super soft-serve style ice creams because they don’t freeze as firm.
How to Customize
Want to make these your own? Here’s how:
Go fancy: Use high-quality artisanal ice cream. Upgrade your chocolate to something really special. Add a sprinkle of fleur de sel on top of the chocolate before it sets.
Go nostalgic: Use the exact ice cream flavor you remember from childhood. Make them exactly as you remember them.
Go health-conscious: Use a lower-sugar ice cream or even a dairy-free version. Use dark chocolate for less sugar overall.
Go wild: Add caramel drizzle, sprinkles, or crushed candy to the chocolate before it sets. The possibilities are genuinely endless.
Serving Ideas
These are perfect on their own, straight from the freezer. But here are some fun ways to serve them:
- On a hot summer evening with cold milk or iced coffee
- At a gathering where people love showing off homemade treats
- Wrapped individually as gifts (they freeze for weeks)
- With a drizzle of hot fudge or caramel on top
- Alongside fresh berries for a slightly lighter dessert
- As a special treat after a family dinner
Meal Prep and Storage
These bars freeze beautifully, which is honestly their best quality. Once they’re fully frozen and the chocolate is set, transfer them to an airtight container or wrap them individually in parchment paper and then plastic wrap. They’ll keep in the freezer for up to three weeks, though they rarely last that long in my house.
You can also make the ice cream layer days ahead of time, then add the peanut layer and dip when you’re ready. This makes them perfect for meal prep or planning ahead for a gathering.
If you somehow have leftovers (I know, unlikely), let them sit at room temperature for about five minutes before eating for the best texture.
Nutritional Breakdown
Keep in mind that this is an estimate based on standard ingredients. Your actual numbers will vary depending on your specific ice cream brand and chocolate choice.
Per bar (makes 4 bars):
- Calories: 420
- Protein: 9g
- Carbohydrates: 32g
- Fat: 31g
- Fiber: 2g
These are definitely a treat, not an everyday food, but that’s kind of the point. They’re meant to be enjoyed and savored, not eaten in guilt.
Final Thoughts
Making Dairy Queen Buster Bars at home has genuinely become one of my favorite things to do when I want to impress people or treat myself without leaving the house. There’s something really satisfying about taking a beloved childhood treat and recreating it in your own kitchen, with your own hands, exactly the way you want it.
These bars are forgiving, flexible, and genuinely delicious. They’re the kind of recipe that makes you feel like a better cook than you actually are, which is always a win in my book. So grab your ingredients, clear some freezer space, and get ready to make something that’ll transport you right back to those hot summer days.
And hey, if you make these, I’d love to hear about it. Come find me and tell me what variation you tried or what memory they brought back for you. That’s the real magic of food.
—
Recipe Card
**Homemade Dairy Queen Buster Bars**
Dairy Queen Buster Bars | Frozen Treats You'll Crave
Ingredients
Method
- Line an 8x8-inch baking pan with parchment paper. Spread softened ice cream evenly across the bottom and freeze for at least 2 hours or overnight.
- Spread a thin layer of softened ice cream on top of the frozen base. Press chopped peanuts into it, covering as much surface as possible. Freeze for at least 1 hour.
- Remove from freezer and let sit at room temperature for 1 minute. Cut into 4 or 6 bars using a sharp knife. Place on a parchment-lined baking sheet and freeze for at least 30 minutes.
- Combine chopped chocolate, coconut oil, and butter in a microwave-safe bowl. Microwave in 30-second intervals, stirring between each, until melted and smooth. Add salt and stir well. Let cool for 2 minutes.
- Working quickly, dip each frozen bar into the chocolate, coating all sides. Place back on the parchment-lined sheet. Freeze for at least 1 hour before serving.