No-Bake Strawberry Delight Recipe | Sweet & Simple
No-Bake Strawberry Delight Recipe | Sweet & Simple
No-Bake Strawberry Delight: A Summer Dessert That Actually Works
I created this No-Bake Strawberry Delight on a sweltering July afternoon when my air conditioning had decided to take an unscheduled vacation. My kitchen was already warm enough without turning on the oven, and honestly, I was craving something light, fruity, and absolutely no-fuss. I had fresh strawberries from the farmer’s market sitting on my counter, a tub of cream cheese in the fridge, and about thirty minutes before my sister was stopping by. That’s when it hit me: what if I stopped overthinking dessert and just layered the things I loved?
The result? This ridiculously easy, make-ahead friendly dessert that tastes like you spent hours in the kitchen when really, you just spent about fifteen minutes assembling layers. No oven, no complicated techniques, no stress. Just fresh strawberries, creamy filling, and a buttery graham cracker base that somehow feels both indulgent and light.
This recipe is for anyone who wants to impress without the headache. Whether you’re hosting a dinner party, bringing something to a potluck, or just want a pretty dessert chilling in your fridge for the week ahead, the No-Bake Strawberry Delight has your back. It’s forgiving, adaptable, and genuinely delicious. I’ve made it dozens of times now, and every single time someone asks for the recipe. If you’re looking for more easy dessert ideas, follow me on HaileeRecipes on Pinterest where I’m constantly sharing recipes that don’t require a culinary degree.
Why You’ll Love This Recipe
Let me be real with you: this dessert checks every box I care about. First, there’s zero baking involved. I’m not against turning on the oven, but when you can get restaurant-quality results without heating up your kitchen, why wouldn’t you? Second, it actually tastes good. The layers work together in a way that feels intentional and sophisticated, even though you’re basically just stacking things.
Third, and this matters to me as someone who meal preps constantly, it gets better as it sits. The flavors meld, the texture becomes creamier, and you can make it up to two days ahead. That means less stress on the day you’re serving it.
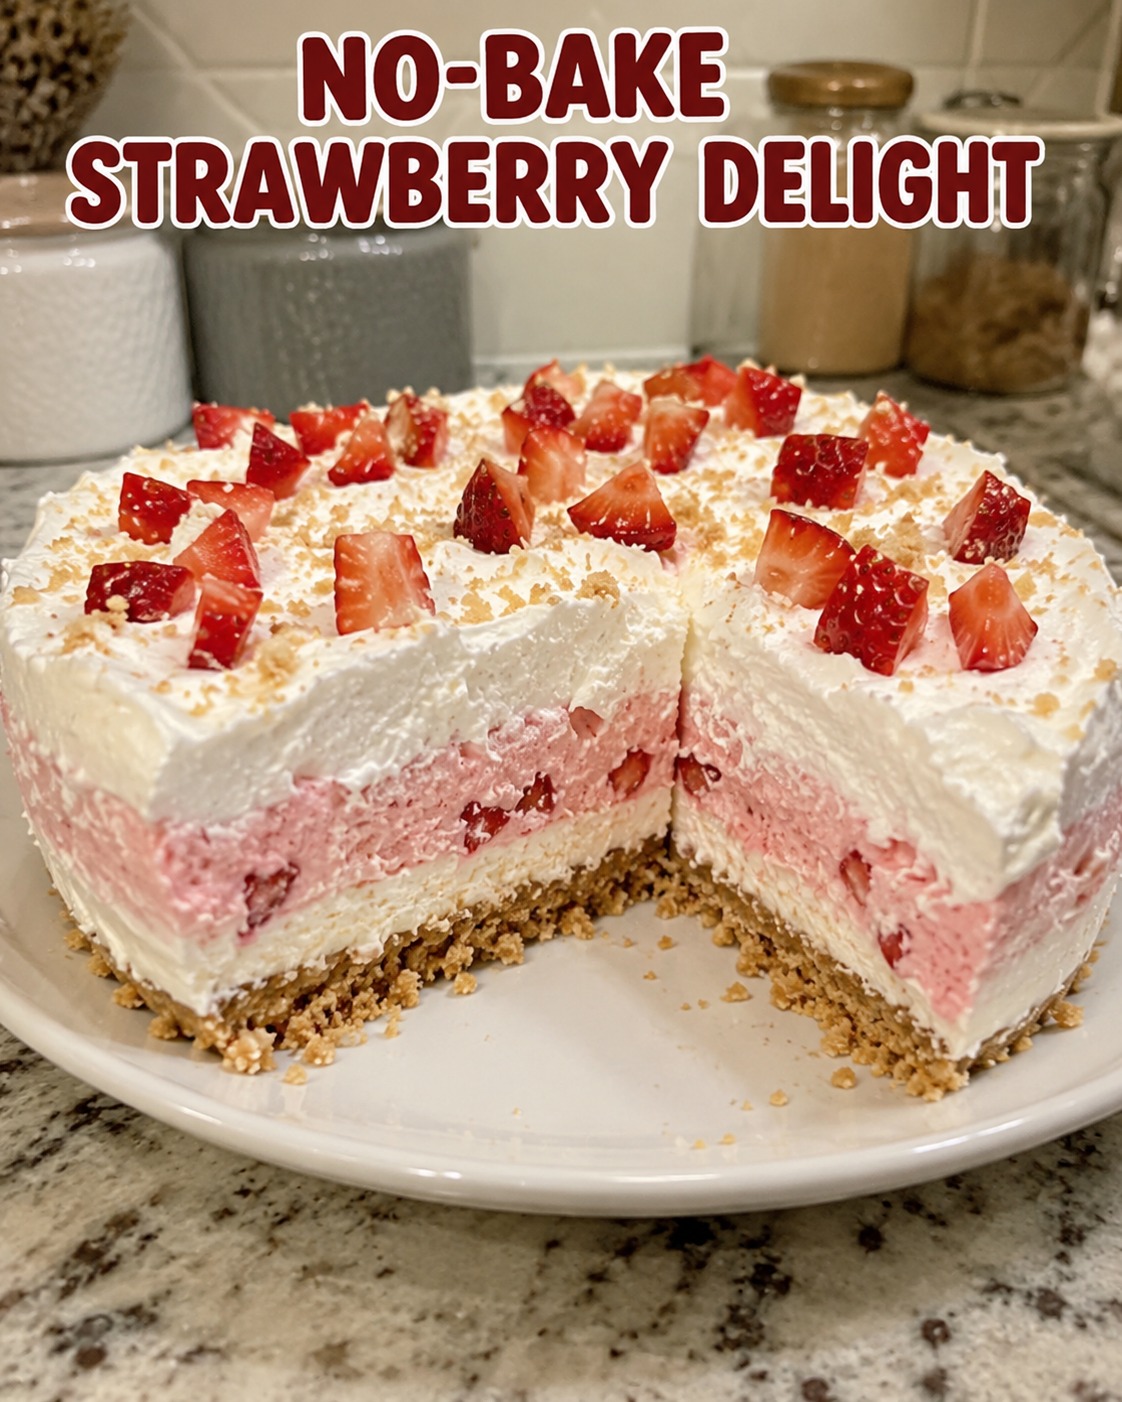
Fourth, it’s genuinely pretty. Those bright red strawberries against the creamy white filling and golden graham cracker base? That’s visual appeal without any fancy plating skills. People assume you’re way more talented than you actually are, and I’m here for that energy.
Ingredients
- 2 cups graham cracker crumbs (about 14-16 full crackers)
- 6 tablespoons melted butter
- 2 tablespoons sugar
- 8 ounces cream cheese, softened to room temperature
- 1/2 cup powdered sugar
- 1 teaspoon vanilla extract
- 1 cup heavy whipping cream, cold
- 2 pounds fresh strawberries, hulled and sliced
- 3 tablespoons granulated sugar (for the strawberry layer)
- 1 tablespoon fresh lemon juice
Hailee’s Tip: Room-temperature cream cheese is non-negotiable here. If it’s cold, you’ll end up with lumpy filling that won’t blend smoothly. Pull it out about thirty minutes before you start. Your future self will thank you.
Hailee’s Tip: Use full-fat heavy cream, not the whipped kind that already has stabilizers. You want to whip it yourself so you can control the texture and it stays fluffy longer.
Hailee’s Tip: Don’t skip the lemon juice in the strawberry layer. It brightens the flavor and keeps the berries from tasting one-dimensional. You won’t taste “lemon” specifically, but you’ll notice everything tastes more vibrant.
Optional Add-Ins and Variations
This is where I get to tell you that this recipe is genuinely flexible. The foundation is solid, but you can absolutely make it your own.
- Almond extract: Add a quarter teaspoon to the cream cheese filling for a subtle, sophisticated flavor. It pairs beautifully with strawberries.
- Mascarpone instead of cream cheese: Use half cream cheese and half mascarpone for an even creamier, richer filling. It’s more delicate, but absolutely worth trying.
- Honey drizzle: Drizzle a little raw honey over the strawberry layer before serving. It adds a floral sweetness that feels fancy.
- Mint: Fresh mint leaves between the strawberry and cream layers add a garden-fresh vibe. Plus, they look beautiful.
- Coconut in the base: Mix half a cup of shredded coconut into the graham cracker crust. It adds texture and a subtle tropical note.
- Different berries: Raspberries, blackberries, or a mix work beautifully if strawberries aren’t your thing.
Step-by-Step Method
Building Your Base
Step 1: Prepare your pan. Grab a 9-by-13-inch baking dish (or honestly, any similar-sized dish will work). Line it with parchment paper, leaving some overhang on the sides. This makes removal so much easier, and I learned this the hard way after scraping dried filling off a dish for ten minutes.
Step 2: Make the crust. Combine your graham cracker crumbs, melted butter, and sugar in a medium bowl. Stir until the mixture looks like wet sand. Press it firmly into the bottom of your prepared dish. I use the bottom of a measuring cup to get it really compact and even. This step matters because a flimsy crust will fall apart when you’re serving. You want something sturdy enough to hold the layers above it.
Hailee’s Confession: The first time I made this, I didn’t press the crust down hard enough and it basically crumbled when I tried to cut into it. Now I press like I mean it, and everything stays together beautifully.
Creating the Cream Cheese Layer
Step 3: Whip your cream cheese. In a large bowl, beat the softened cream cheese with an electric mixer on medium speed until it’s completely smooth and fluffy, about two to three minutes. This is important because lumpy filling looks homemade in a bad way. We’re going for silky and elegant.
Step 4: Add sweetness and vanilla. Gradually add the powdered sugar while mixing, then add the vanilla extract. Beat for another minute until everything is well combined and the mixture looks light and creamy. Taste it at this point. You want it sweet but not overly so, because the strawberries will add natural sweetness.
Step 5: Fold in the whipped cream. In a separate bowl, whip your cold heavy cream until stiff peaks form. This takes about three to four minutes with an electric mixer. Then, gently fold the whipped cream into the cream cheese mixture using a rubber spatula. Fold, don’t stir. You want to keep all those air bubbles intact so the filling stays light and airy. Fold just until combined; a few small streaks of white are fine.
Step 6: Spread the filling. Pour the cream cheese mixture over your crust and spread it evenly with an offset spatula or the back of a spoon. Make sure you get it all the way to the edges. This layer should be about an inch thick, give or take. It’ll support the strawberries beautifully.
Topping with Strawberries
Step 7: Prepare your strawberries. Toss your sliced strawberries with the granulated sugar and lemon juice in a medium bowl. Let them sit for about five minutes so they start releasing their juices. This creates a light glaze that keeps everything moist and connected.
Step 8: Layer the strawberries. Arrange the strawberries over the cream cheese layer. You can be artistic here if you want, or just scatter them casually. Both look good. Pour any accumulated juices from the strawberry bowl over the top. This is the magic that keeps everything moist and prevents the filling from drying out.
Hailee’s Confession: I once skipped this juice step because I thought it would make things too wet. Wrong. The dessert dried out in the fridge and became less delicious. Now I always make sure that juice gets distributed.
Chilling and Setting
Step 9: Refrigerate. Cover the dish with plastic wrap and refrigerate for at least four hours, but ideally overnight. The filling sets, the flavors meld, and everything becomes more cohesive. This isn’t a shortcut step; this is when the magic happens.
Common Mistakes to Avoid
Using cold cream cheese: I mentioned this already, but it’s worth repeating. Cold cream cheese won’t blend smoothly, and you’ll end up with a lumpy filling. Let it sit on the counter. Seriously.
Not pressing the crust firmly: A loose crust will crumble and fall apart when you cut into it. Press it down like you mean it. Your finished dessert will thank you.
Overmixing the whipped cream into the filling: If you stir instead of fold, you’ll deflate all those beautiful air bubbles and end up with a dense, heavy filling instead of something light and fluffy. Fold gently, and stop as soon as everything is combined.
Not chilling long enough: I know you’re excited, but four hours minimum. The filling needs time to set, and the flavors need time to get cozy with each other. Rushing this step results in a sloppy, less flavorful dessert.
Skipping the lemon juice: It seems like a small thing, but it makes a huge difference. The strawberries taste brighter, more alive. Don’t skip it.
My Tested Substitutions
I’ve made this recipe about fifty times, and I’ve experimented with substitutions constantly. Here’s what actually works.
Neufchâtel cheese instead of cream cheese: This is a lighter version of cream cheese with less fat. It works fine, though the filling will be slightly less rich. The texture is still creamy and delicious.
Greek yogurt mixed with cream cheese: Use half cream cheese and half Greek yogurt for a tangier, slightly lighter filling. It’s genuinely good, though a bit more delicate. Make sure your Greek yogurt is strained well so it’s not too watery.
Honey instead of powdered sugar: Use about a third of a cup of honey instead of the powdered sugar. It dissolves into the filling beautifully and adds a subtle floral sweetness. The texture is slightly less stiff, but still wonderful.
Coconut oil instead of butter: Works perfectly in the crust. Use the same amount, and the crust will have a slightly different flavor but will still be sturdy and delicious.
Almond flour in the crust: Replace half a cup of graham cracker crumbs with almond flour for a nuttier base. Increase the butter slightly to about seven tablespoons so it all holds together.
How to Customize
The beauty of this dessert is that it’s genuinely adaptable. Here are my favorite ways to make it your own.
Make it smaller: This recipe makes about twelve servings in a 9-by-13-inch dish. If you want individual portions, divide everything by four and make it in a six-inch springform pan. Everything else stays the same.
Add a chocolate layer: Melt four ounces of dark chocolate with a tablespoon of coconut oil, let it cool slightly, then spread it over the crust before adding the cream cheese layer. It adds richness and sophistication.
Make it gluten-free: Use gluten-free graham crackers in the crust. Everything else stays exactly the same.
Add texture: Sprinkle chopped pistachios or toasted almonds over the top just before serving. The crunch against the creamy filling is amazing.
Go mini: Make this in a muffin tin with cupcake liners for individual portions that are perfect for parties. Reduce chilling time to two to three hours since they’re smaller.
Serving Ideas
This dessert is beautiful on its own, but here are some ways I like to serve it depending on the occasion.
Simple and elegant: Cut into squares and serve on a pretty plate with a fork. The dessert speaks for itself.
With whipped cream: Top each serving with a dollop of fresh whipped cream and maybe a few extra strawberry slices. It’s a bit extra, but it’s also delicious.
With a berry coulis: Blend a cup of fresh raspberries with a tablespoon of sugar and a teaspoon of lemon juice, then strain through a fine-mesh sieve. Drizzle this over the top for color and extra flavor.
Deconstructed: Crumble the whole thing into a bowl, layer it with whipped cream and fresh berries, and serve it as a parfait. It’s less elegant, but somehow more fun.
At a picnic: Cut into squares, wrap individually in parchment paper, and pack in a cooler. It travels beautifully and is easy to eat with your hands.
Meal Prep and Storage
This is honestly one of my favorite things about this recipe. It’s genuinely make-ahead friendly.
In the refrigerator: Covered with plastic wrap, this keeps beautifully for up to three days. The filling stays creamy, the crust stays sturdy, and the strawberries stay fresh. After three days, the berries start to weep a bit too much and the whole thing becomes less structurally sound.
Make-ahead timeline: You can make the crust and filling layer up to two days ahead. Add the strawberries no more than eight hours before serving so they stay fresh and don’t get too soft.
Can you freeze it? Yes, but with caveats. The filling freezes beautifully, but the strawberries get mushy when thawed. If you want to freeze it, do so before adding the strawberries, then add fresh berries after thawing. It’s not ideal, but it works in a pinch.
Thawing: Move it to the refrigerator the night before serving. Don’t try to speed up the process at room temperature or it’ll get too soft.
Nutritional Breakdown
I’m not a nutritionist, and nutrition varies based on exact ingredients and portion size, but here’s a general breakdown per serving (assuming twelve servings):
- Calories: approximately 320
- Protein: 4 grams
- Carbohydrates: 32 grams
- Fat: 19 grams
- Fiber: 1 gram
- Sugar: 24 grams
The bulk of calories come from the cream cheese, butter, and whipped cream, which is why this is definitely an indulgent dessert. But it’s also a dessert where a little goes a long way. The flavors are rich and satisfying, so you don’t need a huge portion to feel happy.
Final Thoughts
I genuinely love this No-Bake Strawberry Delight because it represents everything I believe about cooking and baking: it doesn’t have to be complicated to be delicious, it doesn’t have to be stressful to be impressive, and sometimes the simplest ideas are the best ones.
This dessert has shown up at dinner parties, potlucks, family celebrations, and quiet Tuesday nights when I just wanted something pretty in my fridge. Every single time, it’s been exactly what I needed. It’s reliable, forgiving, and genuinely tasty. It makes people happy, and honestly, that’s what cooking is really about.
I hope you make this, and I hope you love it as much as I do. And if you do, I’d genuinely love to hear about it. Come find me and tell me your version, your tweaks, your story. That’s the best part of sharing recipes.
Happy cooking, friends. You’ve got this.
—
Recipe Card
**Ingredients**
* 2 cups graham cracker crumbs
* 6 tablespoons melted butter
* 2 tablespoons sugar
* 8 ounces cream cheese, softened to room temperature
* 1/2 cup powdered sugar
* 1 teaspoon vanilla