Delicious Icebox Cake Recipes
Delicious Icebox Cake Recipes
I’m so excited to share my favorite icebox cake recipes with you today! If you haven’t made an icebox cake before, you’re in for such a treat. These no-bake desserts are the perfect solution when you want something impressive but don’t want to turn on your oven. They’re also incredibly forgiving, which means even if you’re new to baking, you can absolutely nail these.
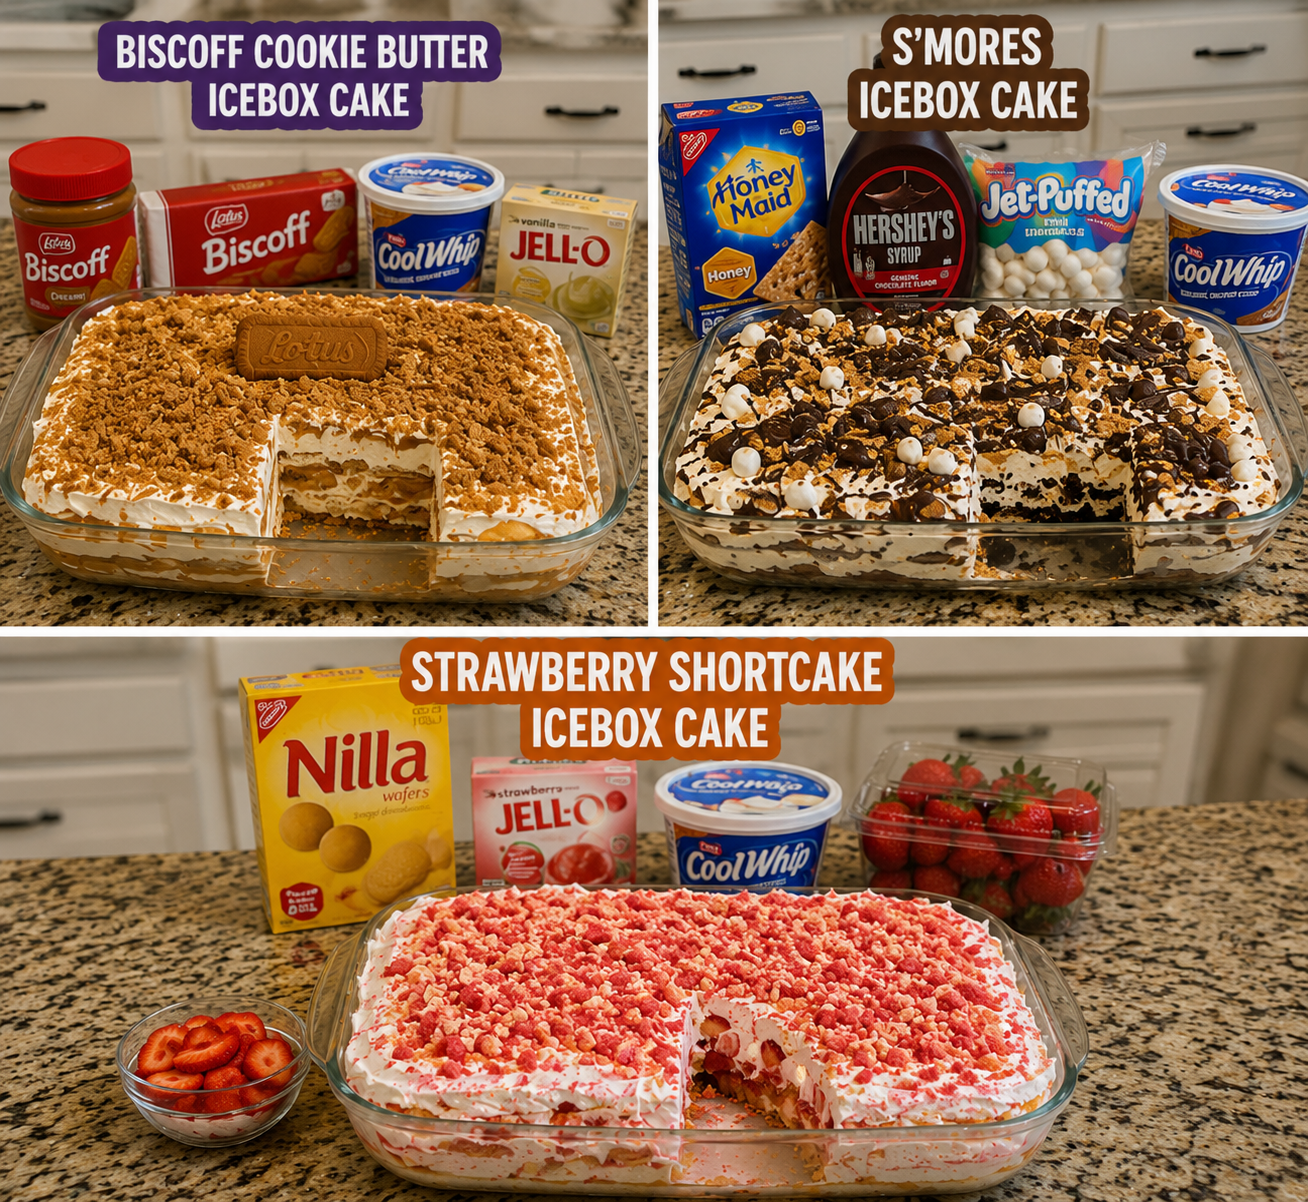
What I love most about icebox cakes is how they come together with simple ingredients and minimal effort, yet they look and taste like you spent hours in the kitchen. The best part? You can make them ahead of time and just pull them out of the fridge when you’re ready to serve. I’ve rounded up three of my absolute favorite versions—Biscoff Cookie Butter, S’mores, and Strawberry Shortcake—because I genuinely can’t pick a favorite and I think you’ll love having all three options to try.
These recipes are definitely worth saving to your collection, and I’d love for you to Follow me on HaileeRecipes on Pinterest so you can easily find them whenever you need an easy dessert idea. Let’s dive into these delicious no-bake cakes that are about to become your new go-to recipes.
1. Biscoff Cookie Butter Icebox Cake
This Biscoff Cookie Butter Icebox Cake combines layers of creamy cookie butter filling with crispy Biscoff cookies for a no-bake dessert that tastes like pure indulgence. The smooth, caramel-like flavor of Biscoff spread pairs beautifully with whipped cream and crushed cookies, creating a dessert with incredible texture contrast between soft and crunchy elements. Serve this elegant treat at dinner parties or casual gatherings, and watch it disappear. It’s perfect for warm weather when you want something cold and satisfying without heating up the kitchen, and it requires minimal baking skills.
Why You’ll Love It
- No baking required—just mix, layer, and chill for an impressive homemade dessert.
- The cookie butter adds sophisticated caramel flavor that feels fancy but comes from a jar.
- Naturally gluten-free when using certified gluten-free Biscoff cookies.
Ingredients
- 1 cup Biscoff cookie butter spread
- 2 cups heavy whipping cream
- 1/4 cup powdered sugar
- 1 teaspoon vanilla extract
- 24 Biscoff cookies, divided
- 2 tablespoons melted butter
- 1/4 teaspoon sea salt
- 2 tablespoons caramel sauce, optional
How To Make It
- Whip the heavy cream with powdered sugar and vanilla extract until stiff peaks form, about 3 minutes with an electric mixer.
- Gently fold the Biscoff cookie butter into the whipped cream until fully combined and no streaks remain.
- Crush 16 Biscoff cookies into coarse crumbs and toss with melted butter and sea salt in a small bowl.
- Spread a thin layer of the Biscoff cream mixture onto the bottom of a 9-inch round cake pan or loaf pan.
- Sprinkle half of the buttered cookie crumbs over the cream layer.
- Add another layer of Biscoff cream, then top with remaining cookie crumbs.
- Finish with a final layer of Biscoff cream, smoothing the top evenly.
- Refrigerate for at least 6 hours or overnight until firm, then top with whole Biscoff cookies and optional caramel drizzle before serving.
Variations And Substitutions
Substitute Biscoff spread with peanut butter, almond butter, or Nutella for different flavor profiles. Layer in individual mason jars or cups for elegant single servings. Add a thin layer of chocolate ganache between the cream and cookies for extra richness. If Biscoff cookies are unavailable, use gingersnaps, digestive biscuits, or vanilla wafers, adjusting the cookie butter to match your chosen cookie flavor.
Make-Ahead, Storage, And Serving Tips
Prepare this cake up to 2 days ahead, making it ideal for entertaining. Store covered in the refrigerator for up to 3 days. For best texture, remove from the refrigerator 10 minutes before serving to allow the filling to soften slightly. If the cake becomes too soft, return it to the freezer for 30 minutes. You can also freeze the finished cake for up to 1 month; thaw in the refrigerator overnight before serving.
2. S'mores Icebox Cake
This S’mores Icebox Cake brings campfire nostalgia to your dessert table with layers of graham cracker crumbs, chocolate pudding, and fluffy marshmallow whipped cream. The combination of rich chocolate, toasted marshmallow flavor, and buttery graham texture creates a sophisticated yet playful dessert that’s perfect for summer gatherings, potlucks, or when you’re craving something sweet without turning on the oven. The no-bake format makes it ideal for hot weather entertaining, and the flavors actually improve as the cake chills, allowing the graham crackers to soften into a cake-like texture while the marshmallow and chocolate flavors meld beautifully.
Why You’ll Love It
- Captures all the beloved s’mores flavors in an elegant, make-ahead dessert format.
- Requires no baking, making it perfect for hot summer days or busy schedules.
- Impresses guests with its sophisticated presentation while tasting like a fun childhood treat.
Ingredients
- 2 cups heavy whipping cream
- 1 cup marshmallow fluff
- 1 teaspoon vanilla extract
- 2 cups chocolate pudding (prepared or instant)
- 2 cups graham cracker crumbs
- 4 tablespoons unsalted butter, melted
- 2 tablespoons granulated sugar
- 1 tablespoon cocoa powder for dusting
- Toasted mini marshmallows for topping
How To Make It
- Combine graham cracker crumbs, melted butter, and granulated sugar in a bowl, stirring until the mixture resembles wet sand. Press half of this mixture firmly into the bottom of a 9-by-13-inch baking dish.
- Spread the prepared chocolate pudding evenly over the graham cracker base layer, smoothing the top with a spatula.
- In a large bowl, whip the heavy cream to stiff peaks using an electric mixer, then gently fold in the marshmallow fluff and vanilla extract until fully combined and fluffy.
- Spread the marshmallow whipped cream mixture evenly over the chocolate pudding layer, creating decorative peaks with the back of a spatula.
- Sprinkle the remaining graham cracker mixture over the top of the marshmallow layer, pressing gently so it adheres.
- Cover the dish with plastic wrap and refrigerate for at least 6 hours or overnight, allowing the layers to set and flavors to meld.
- Just before serving, dust the top lightly with cocoa powder and garnish with toasted mini marshmallows.
- Cut into squares and serve chilled, using a hot, wet knife for clean cuts.
Variations And Substitutions
For a deeper chocolate flavor, use chocolate pudding made with dark chocolate or add 2 tablespoons of chocolate syrup to the marshmallow cream. Replace regular marshmallow fluff with salted caramel marshmallow fluff for a sweet-and-salty twist. Toast the graham cracker crumbs in a dry skillet for 2-3 minutes before mixing with butter to enhance their flavor. For a more indulgent version, drizzle chocolate ganache between layers. If you prefer less sweetness, reduce the marshmallow fluff to three-quarters cup and increase the whipped cream slightly.
Make-Ahead, Storage, And Serving Tips
This dessert is ideal for making 1-2 days ahead, as the flavors deepen and the texture becomes more cake-like as it sits. Store covered in the refrigerator for up to 3 days. Do not freeze, as the whipped cream texture will suffer. For the best presentation, cut while the cake is very cold, dipping your knife in hot water and wiping it clean between cuts. If the marshmallow layer seems too soft when serving, let the entire cake chill for an additional 30 minutes. Leftovers can be covered and kept refrigerated, though they’re best enjoyed within 2 days.
3. Strawberry Shortcake Icebox Cake
This elegant Strawberry Shortcake Icebox Cake combines the classic flavors of summer’s favorite dessert into a no-bake masterpiece. Layers of soft ladyfinger cookies, whipped cream, and fresh strawberries create a light, refreshing cake with the perfect balance of sweetness and tartness. The longer it chills, the more the flavors meld together, making it an ideal make-ahead dessert for dinner parties or warm-weather gatherings. The texture transforms from distinct layers into a cohesive, almost mousse-like cake that tastes like strawberry shortcake reimagined.
Why You’ll Love It
- No baking required, making it perfect for hot summer days when you don’t want to turn on the oven.
- Tastes even better the next day as the ladyfingers absorb the strawberry and cream flavors.
- Impressive presentation that looks bakery-worthy but requires minimal effort.
Ingredients
- 2 pounds fresh strawberries, hulled and sliced
- 1/4 cup granulated sugar
- 2 tablespoons fresh lemon juice
- 2 cups heavy whipping cream
- 1/4 cup powdered sugar
- 1 teaspoon vanilla extract
- 40 ladyfinger cookies (about 14 ounces)
- 1/2 cup strawberry jam
- 3 tablespoons water
How To Make It
- Toss the sliced strawberries with granulated sugar and lemon juice in a bowl. Let sit for 15 minutes to release the juices, then drain, reserving the liquid.
- In a separate bowl, whip the heavy cream with powdered sugar and vanilla extract until stiff peaks form. Fold in half of the drained strawberries gently.
- Whisk together the strawberry jam and water until smooth and pourable.
- Quickly dip each ladyfinger into the reserved strawberry liquid for just one second on each side, then arrange in a single layer in a 9×13-inch dish.
- Spread half of the strawberry-whipped cream mixture over the ladyfinger layer.
- Dip the remaining ladyfingers in the strawberry liquid and create a second layer over the cream.
- Top with the remaining strawberry-whipped cream mixture, then arrange the reserved fresh strawberries and drizzle with jam mixture.
- Cover with plastic wrap and refrigerate for at least 8 hours or overnight before serving.
Variations And Substitutions
Swap fresh strawberries for raspberries, blueberries, or a mixed berry combination for different flavor profiles. Replace the jam with strawberry compote or fresh strawberry puree for a lighter option. Use mascarpone cream instead of whipped cream for a richer, more decadent texture. For a boozy version, add 2 tablespoons of liqueur like Chambord to the dipping liquid. Gluten-free eaters can substitute ladyfingers with gluten-free versions or thin sponge cake cut into strips.
Make-Ahead, Storage, And Serving Tips
This cake actually improves when made 1-2 days ahead, allowing the flavors to develop and the texture to set perfectly. Store covered in the refrigerator for up to 3 days. Do not freeze, as the whipped cream texture will suffer. For best results, keep it chilled until just before serving. If the cake becomes too soft, briefly return it to the freezer for 30 minutes. Serve cold directly from the refrigerator with fresh whipped cream on the side if desired.
Final Thoughts
Icebox cakes are the perfect dessert for anyone looking to impress without spending hours in the kitchen. Whether you prefer classic chocolate and vanilla layers, fruity variations, or creative flavor combinations, there’s a recipe here to match your mood and skill level. The beauty of these chilled treats is that they actually taste better after a day or two in the refrigerator, making them ideal for advance planning and stress-free entertaining.
We encourage you to pick one recipe that speaks to you and give it a try this week. Start with a flavor combination you already love, then feel free to experiment with your own variations once you’ve mastered the basics. Your friends and family will be delighted by your homemade creation, and you’ll discover that making an elegant dessert doesn’t have to be complicated.
Delicious Icebox Cake Recipes
Ingredients
Method
- Biscoff Cookie Butter Icebox Cake: Beat heavy cream and powdered sugar until stiff peaks form, then fold in softened cream cheese and Biscoff cookie butter until smooth.
- Biscoff Cookie Butter Icebox Cake: Layer crushed Biscoff cookies with the cream mixture in a 9x13 dish, ending with cream, then refrigerate for 4 hours.
- S'mores Icebox Cake: Whip heavy cream with powdered sugar and fold in softened cream cheese and chocolate spread until combined.
- S'mores Icebox Cake: Layer graham cracker crumbs with cream mixture in a 9x13 dish, sprinkle marshmallows between layers, refrigerate for 4 hours.
- Strawberry Shortcake Icebox Cake: Whip heavy cream with powdered sugar, then fold in softened cream cheese until fluffy.
- Strawberry Shortcake Icebox Cake: Layer vanilla wafers with cream mixture and sliced strawberries tossed with sugar in a 9x13 dish, refrigerate for 4 hours.
Notes
S'mores Icebox Cake Tips: Assemble up to 24 hours ahead. Keep refrigerated. Add marshmallows just before serving to prevent them from melting into the cream.
Strawberry Shortcake Icebox Cake Tips: Best made the day of serving to keep vanilla wafers crisp. Prepare components ahead and assemble 4 hours before eating. Store covered in refrigerator.