Easy Hamburger Quesadilla Recipe
Easy Hamburger Quesadilla Recipe
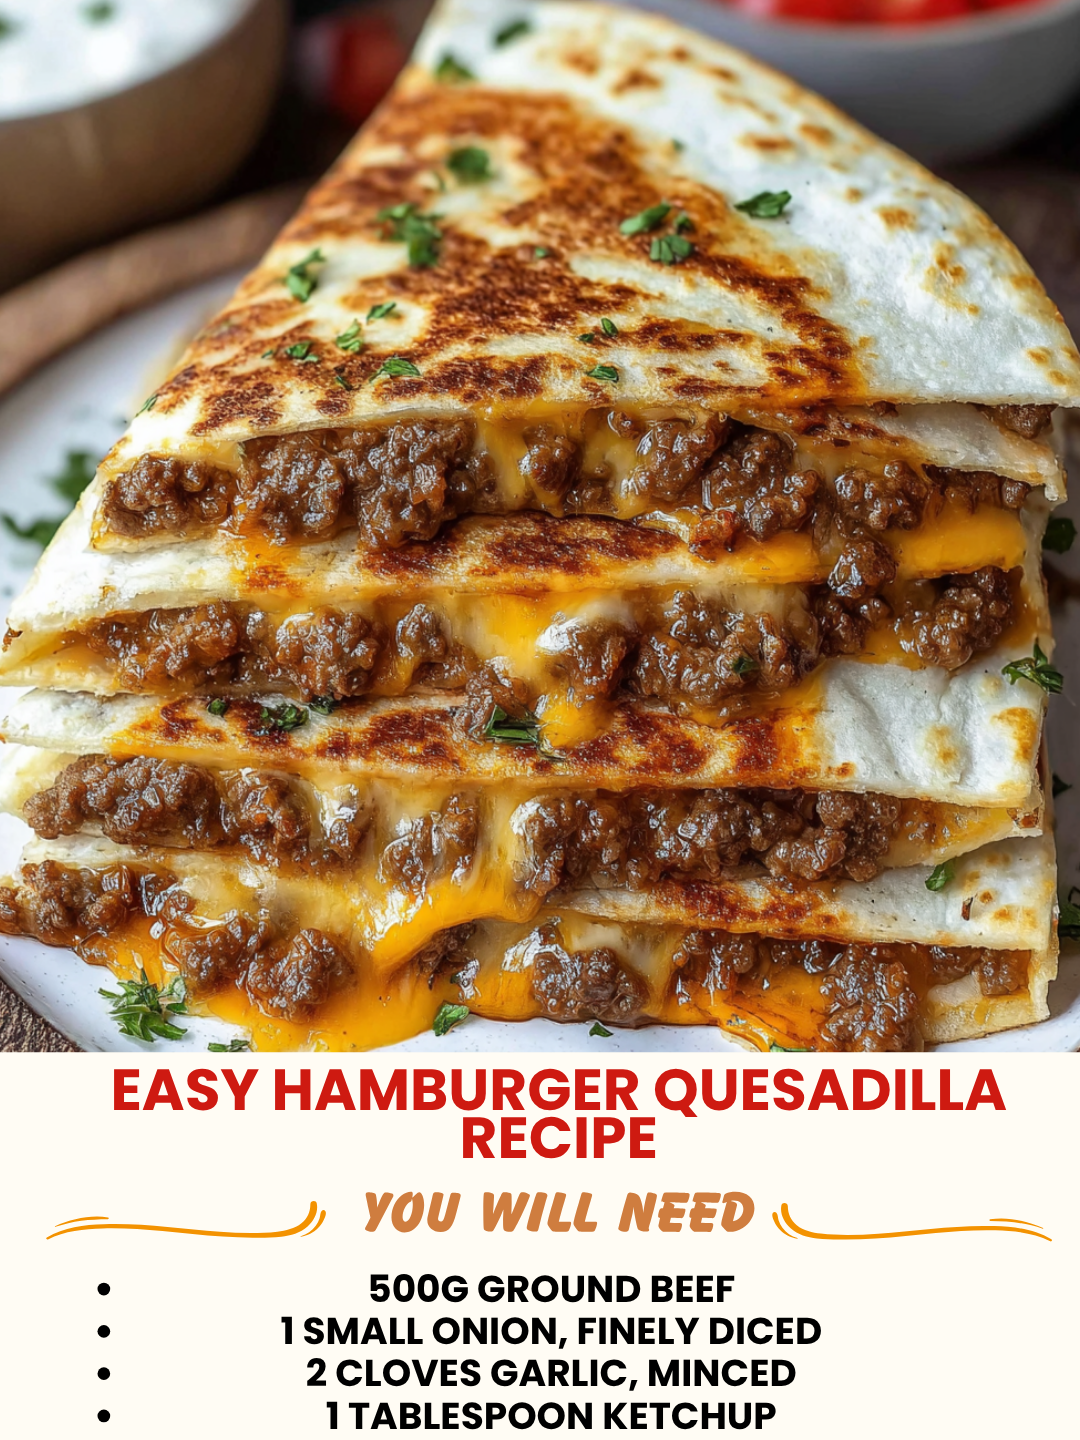
Easy Hamburger Quesadilla Recipe: A Weeknight Dinner That Actually Works
I’m going to be honest with you—last Tuesday night, I was standing in my kitchen at 6 PM with absolutely nothing planned for dinner. My partner was hungry, my fridge was looking a little sad, and I had about twenty minutes before we both started eating cereal straight from the box out of sheer desperation. That’s when I remembered I had ground beef thawing on the counter, some cheese, and flour tortillas. Twenty minutes later, we were biting into the most satisfying, crispy-on-the-outside, melty-on-the-inside hamburger quesadilla, and honestly, I haven’t stopped thinking about it since.
Here’s the thing about an easy hamburger quesadilla recipe: it’s not fancy, it doesn’t require a grocery list that makes you cry, and it genuinely tastes like you tried way harder than you actually did. This isn’t some complicated fusion situation—it’s just the best parts of a burger (seasoned ground beef, cheese, and all those good toppings) wrapped up in a crispy tortilla and pan-fried until it’s golden and gorgeous. It’s the kind of meal that works for busy weeknights, lazy Sundays, or when you’re feeding picky eaters who need something they’ll actually recognize.
Whether you’re a parent looking for something faster than takeout, someone living alone who wants actual flavor in their dinner, or just a person who loves handheld food that doesn’t require two hands and a napkin bib (okay, sometimes it does), this recipe is going to become your new go-to. I’ve made it probably fifty times now, and I’m still discovering new ways to customize it. If you want to follow along with more of my real-life kitchen adventures, follow me on HaileeRecipes on Pinterest—I share everything from weeknight dinners to the occasional baking disaster.
Why You’ll Love This Recipe
Let me break down exactly why this has become such a staple in my kitchen.
- It’s genuinely fast. We’re talking fifteen to twenty minutes from start to finish. No marinating, no complicated prep, just actual dinner on the table before you lose your mind.
- The ingredient list is short and probably already in your pantry. Ground beef, tortillas, cheese, and whatever toppings sound good to you. Nothing weird, nothing you have to hunt down at a specialty store.
- It’s endlessly customizable. Want to add jalapeños? Do it. Prefer crispy bacon? Absolutely. Keeping it simple with just cheese and beef? That works too. This recipe bends to your preferences, not the other way around.
- It actually tastes good, which matters. I’m not going to pretend something is delicious when it’s just okay. These are genuinely satisfying, crispy, and flavorful enough that you won’t feel like you’re eating “weeknight compromise food.”
- Kids tend to eat them without a fuss. There’s something about handheld food that makes it more appealing, even to the pickiest eaters. Plus, they can see what’s inside, which helps if you’re dealing with texture sensitivities.
- It scales up or down easily. Making dinner for two? One quesadilla each. Feeding a crowd? Double the batch and keep them warm in the oven while you cook more.
Ingredients
- 1 pound ground beef (80/20 blend works perfectly)
- 2 tablespoons butter or oil, divided
- 1 small onion, finely diced
- 2 cloves garlic, minced
- 1 teaspoon ground cumin
- 1 teaspoon chili powder
- 1/2 teaspoon smoked paprika
- Salt and black pepper to taste
- 1/2 cup beef broth (or water in a pinch)
- 4 large flour tortillas (burrito-size works great)
- 2 cups shredded cheddar cheese (or a mix of cheddar and Monterey Jack)
- Optional toppings: diced tomatoes, jalapeños, crispy bacon, lettuce, avocado, sour cream, salsa
Hailee’s Tip: I always use a slightly higher-fat ground beef for this because it stays juicier and more flavorful. If you only have super lean beef on hand, don’t panic—just add an extra tablespoon of butter to the pan when you’re cooking the meat.
Hailee’s Tip: Toast your tortillas lightly in a dry skillet before assembling. It makes them sturdier and less likely to tear when you’re flipping the quesadilla. Trust me on this.
Hailee’s Tip: Don’t skip the spices just because you’re in a hurry. Those two minutes of measuring cumin and paprika make the difference between “fine” and “actually delicious.”
Optional Add-Ins and Variations
This is where your easy hamburger quesadilla recipe becomes YOUR recipe. Here are some of my favorite additions that keep things interesting:
- Crispy bacon: Cook a few strips until they’re super crispy, crumble them, and add to the beef mixture. Game changer.
- Caramelized onions: If you have an extra ten minutes, cook your onions low and slow until they’re golden and sweet. Fancy without trying.
- Jalapeños: Fresh or pickled, they add a nice kick. I usually add about three or four slices per quesadilla.
- Crispy fried onions: Those crunchy things from the green bean casserole? Sprinkle them on top of the cheese for extra texture.
- Barbecue sauce: Mix a tablespoon into the cooked beef for a slightly different flavor profile.
- Mushrooms: Dice them small and cook them with the onions. Adds earthiness and moisture.
- Black beans: Drain and rinse a can, then mix it into the beef. Makes it heartier and adds fiber.
Step-by-Step Method
Step 1: Brown the beef and build flavor
Heat one tablespoon of butter or oil in a large skillet over medium-high heat. Once it’s hot, add your ground beef and break it up with a wooden spoon. You want it crumbly and browned, not clumpy. This takes about five to six minutes. Don’t skip the browning step just to go faster—that’s where all the flavor happens. Once it’s cooked through, drain off any excess fat if there’s a lot pooling in the pan. (I usually leave a little bit because it keeps things juicy.)
Hailee’s Mistake Moment: The first time I made this, I didn’t brown the beef long enough, and it ended up being kind of gray and sad. Now I let it sit in the pan for a good minute or two without stirring so it actually gets a nice sear. Better flavor, better texture, better life.
Step 2: Add aromatics and spices
Push the cooked beef to the side of the pan and add your diced onion to the empty space. Let it cook for about two minutes until it starts to soften, then add your minced garlic and cook for another thirty seconds. You want to smell that garlic—that’s how you know it’s ready. Now add your cumin, chili powder, smoked paprika, and a good pinch of salt and pepper. Stir everything together and let it cook for about one minute. The spices will bloom and smell absolutely incredible.
Step 3: Add broth and simmer
Pour in your beef broth (or water) and let everything simmer for about three to four minutes. You want the liquid to reduce down so the mixture is flavorful but not soupy. This is important because you don’t want wet quesadillas—trust me, they fall apart. Once it’s reduced, taste it and adjust your seasonings. Does it need more salt? More spice? This is your moment to make it exactly how you like it.
Step 4: Prepare your tortillas
While that’s simmering, take your tortillas and lightly toast them in a separate dry skillet over medium heat. Just about thirty seconds to a minute on each side. They should be warm and slightly pliable but not crispy yet. Set them aside on a plate.
Step 5: Assemble your quesadillas
Here’s where it gets fun. Take one tortilla and place it flat on a cutting board or clean counter. Spread about half a cup of your cooked beef mixture on one half of the tortilla, leaving about a half-inch border. Top it with about a quarter cup of shredded cheese. If you’re using any additional toppings (tomatoes, jalapeños, bacon, whatever), add them now. Don’t overstuff—I learned this the hard way when everything exploded out the sides while I was flipping it. Fold the tortilla in half so it looks like a half-moon.
Step 6: Cook until crispy and melty
Heat the remaining tablespoon of butter or oil in your skillet over medium heat. Once it’s melted and the pan is hot, carefully place your quesadilla in the pan. Cook it for about two to three minutes on the first side until it’s golden brown and crispy. You should hear a nice sizzle when it hits the pan. Then, using a spatula (and maybe a little prayer), flip it carefully and cook the other side for another two to three minutes until it’s equally golden and the cheese is completely melted inside.
Hailee’s Mistake Moment: I once tried to flip a quesadilla too early, and it completely fell apart in the pan. Now I wait until the bottom is really golden and crispy before I even think about flipping. Patience, my friend. It’s worth it.
Step 7: Rest and serve
Transfer your finished quesadilla to a cutting board and let it rest for a minute or two. This helps everything set up inside so it doesn’t immediately fall apart when you cut into it. Slice it into triangles (because triangles are objectively better than other shapes) and serve immediately with your favorite toppings on the side—sour cream, salsa, guacamole, whatever makes you happy.
Common Mistakes to Avoid
Overstuffing the quesadilla
I get it—you want maximum flavor in every bite. But too much filling makes it impossible to flip without everything escaping. Less is actually more here. You want enough filling to taste good, not enough to cause a structural crisis.
Not letting the pan get hot enough
If your pan isn’t hot enough, the tortilla will just get soggy instead of crispy. You want a good sizzle when the quesadilla hits the pan. That sizzle is your friend.
Cooking on too high heat
Okay, so this is the opposite problem, but it’s equally frustrating. If your heat is too high, the outside burns before the inside gets a chance to melt. Medium heat is genuinely your sweet spot here.
Not draining the beef properly
If your beef mixture is too wet, your quesadilla becomes a soggy mess. Make sure you’re letting that liquid reduce down to almost nothing before you assemble.
Flipping too early
Give the first side enough time to get properly golden and crispy. I usually wait until I can see the color change creeping up the sides of the tortilla before I flip.
My Tested Substitutions
Ground turkey instead of beef
This works great if you’re looking for something lighter. Use the same amount and follow the same cooking method. You might want to add an extra tablespoon of butter to the pan since turkey is leaner.
Corn tortillas instead of flour
Corn tortillas are more delicate, so handle them gently. I’d recommend warming them first and maybe using slightly less filling. They won’t get quite as crispy as flour tortillas, but they’re still delicious.
Different cheeses
Monterey Jack, pepper jack, or even a sharp cheddar all work beautifully. Avoid fresh cheeses like mozzarella or feta because they don’t melt the same way. You want something that gets melty and gooey.
Vegetarian version
Substitute the beef with crumbled firm tofu or extra mushrooms and black beans. Use the same spices and cooking method. It’s genuinely good—I’m not just saying that to be nice.
No beef broth? Use water.
It won’t be quite as flavorful, but it’ll still work. Or use chicken broth, or even a splash of Worcestershire sauce mixed with water. You’re just trying to add moisture and let the spices bloom.
How to Customize
Here’s the beautiful thing about this recipe: it’s a template, not a rule book. Want to make it more Tex-Mex? Add cumin and cilantro. Want it more like a classic burger? Skip the spices and add ketchup, mustard, and pickles. Want it spicy? Load up on jalapeños and use pepper jack cheese. The beef mixture is your base, and everything else is up to you.
I’ve made these with everything from leftover taco meat to ground lamb to ground chicken, and they’ve all been good. The key is just making sure your filling is flavorful and not too wet, whatever you decide to put in there.
Serving Ideas
These quesadillas are perfect on their own, but they’re even better with the right sides:
- Sour cream and salsa: The classic combo. I usually set out a few different kinds of salsa so people can choose their own adventure.
- Guacamole: If you want to feel fancy. Or just mashed avocado with salt and lime juice if you’re keeping it simple.
- A simple side salad: Something crisp and cool balances out the richness of the quesadilla.
- Refried beans: For a more substantial meal. I usually warm a can with a little butter and garlic.
- Mexican street corn: If you’re feeling ambitious. Or just regular corn with butter and salt.
- Lime wedges: Squeeze them over everything. Lime makes everything better.
Meal Prep and Storage
Making these ahead
You can make the beef mixture up to three days ahead and store it in an airtight container in the fridge. When you’re ready to eat, just reheat it gently in a skillet, then assemble and cook your quesadillas as usual. This is actually my favorite way to do it on busy weeknights—I make the filling the night before and everything comes together in about five minutes.
Storing leftovers
Cooked quesadillas don’t reheat beautifully, so I’d recommend storing the beef mixture separately and making fresh quesadillas when you want them. But if you do have leftover cooked quesadillas, wrap them in foil and reheat them in a 350-degree oven for about five minutes. They won’t be quite as crispy as fresh, but they’re still perfectly edible.
Freezing the beef mixture
This freezes really well for up to three months. Let it cool completely, then transfer it to a freezer bag or container. Thaw it overnight in the fridge before reheating and assembling.
Nutritional Breakdown
Here’s the nutritional information per quesadilla (one serving, assuming four quesadillas total with the amounts listed):
- Calories: approximately 520
- Protein: 28g
- Carbohydrates: 35g
- Fat: 28g
- Fiber: 2g
Keep in mind that this varies depending on your specific ingredients and how much filling you use. If you add extra toppings or use different cheese, the numbers will shift. This is just a ballpark estimate based on standard ingredients.
Final Thoughts
I genuinely love this easy hamburger quesadilla recipe because it proves that good food doesn’t have to be complicated. It doesn’t have to take hours or require a shopping trip to a fancy grocery store. Sometimes the best meals are the ones that come together in your regular kitchen with ingredients you already have, and they taste like you actually tried even though you didn’t really.
More than that, though, I love it because it’s flexible. It bends to