Pineapple Lush Dessert Recipe with Nilla Wafers
Pineapple Lush Dessert Recipe with Nilla Wafers
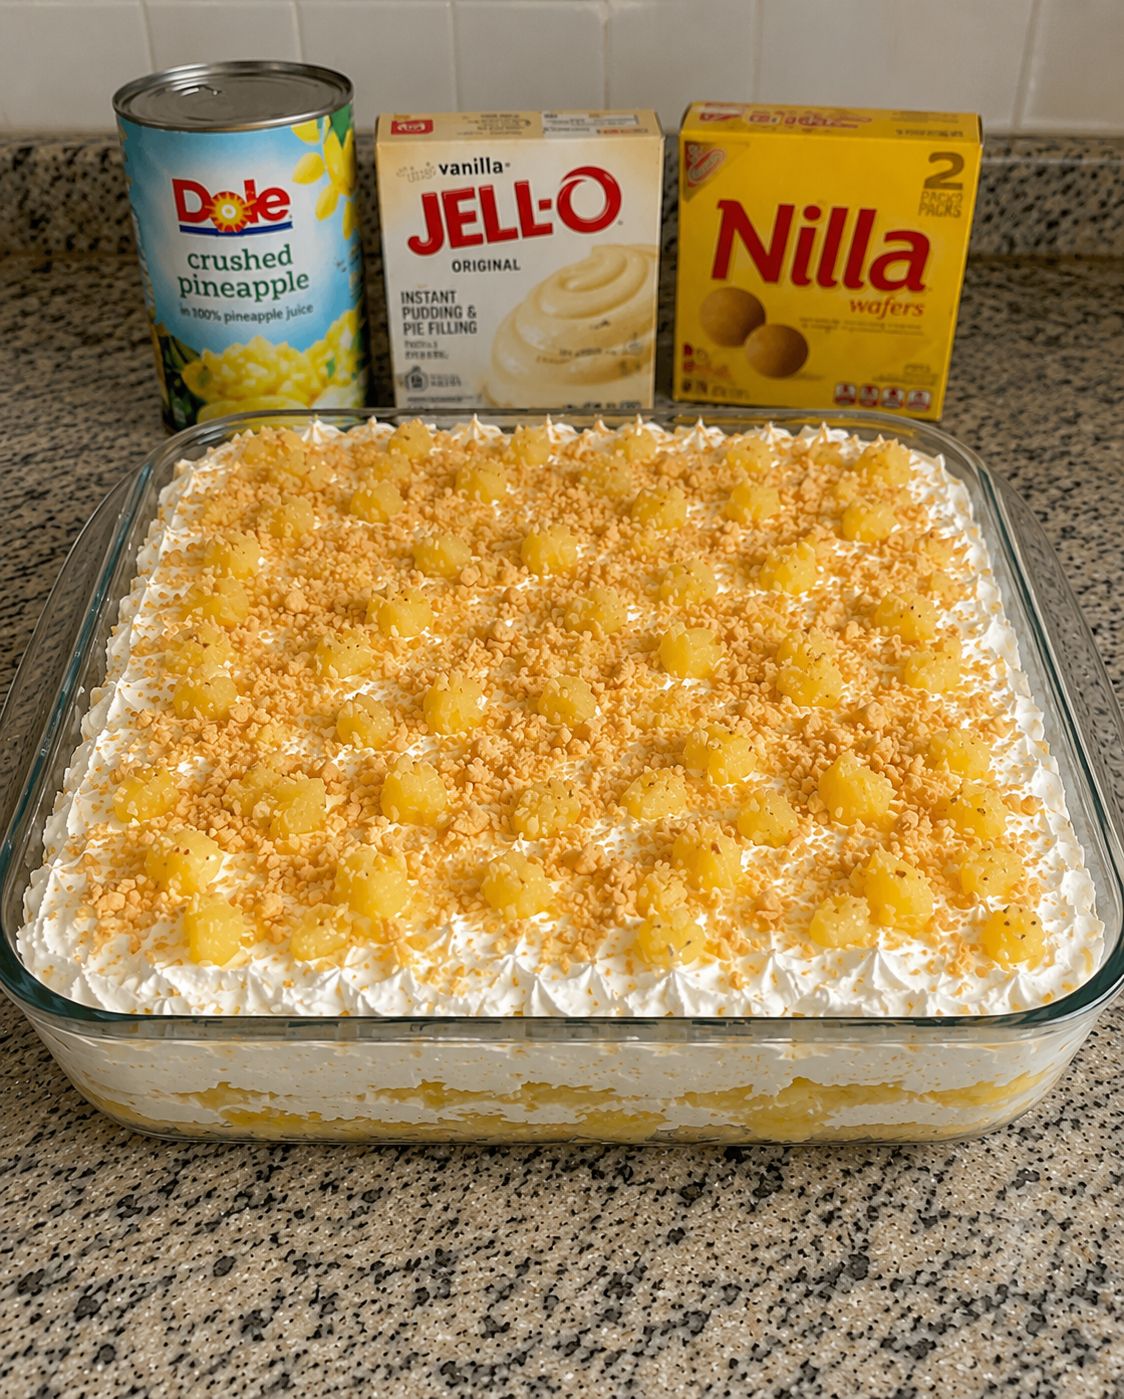
Pineapple Lush Dessert with Nilla Wafers: A No-Bake Dream That Tastes Like Summer
I first made this pineapple lush dessert with Nilla wafers on a Tuesday night when my mom called asking what I was bringing to a family potluck. I had nothing planned, my fridge was half-empty, and I was honestly considering just buying something from the bakery section. But then I remembered this dessert my grandmother used to make—this perfect, dreamy layered thing that looked fancy but required exactly zero baking skills and about fifteen minutes of actual work.
So I threw it together. And honestly? It was the first thing gone from the dessert table. People were asking me for the recipe before they’d even finished their first bite. That’s when I knew I had to perfect it and share it with you all.
Here’s the thing about a pineapple lush dessert with Nilla wafers: it’s one of those recipes that feels like you’re cheating because it’s so easy. It’s got that perfect balance of creamy, fruity, and crunchy. The Nilla wafers soften just enough to become part of the texture without getting mushy. The pineapple keeps everything bright and not-too-heavy. And the whipped cream layer? That’s where the magic happens. This is the kind of dessert that works for potlucks, summer barbecues, or honestly just a random Thursday when you want something that tastes like you spent way more time on it than you actually did.
If you’re someone who gets intimidated by desserts with multiple steps, or if you’re just tired of turning on the oven when it’s hot outside, this recipe is for you. It’s forgiving, it’s flexible, and it genuinely tastes incredible. Follow me on HaileeRecipes on Pinterest for more no-bake desserts that’ll make you look like a kitchen wizard.
Why You’ll Love This Recipe
Let me be real with you: life gets busy. Sometimes you need a dessert that doesn’t require heating up your kitchen or standing around watching something bake. This pineapple lush checks every single box.
- No baking required. Seriously, your oven stays off. This is all about assembly and chilling.
- Takes about 15 minutes of hands-on time. Most of that is just stirring and layering. A kid could help you do this.
- Feeds a crowd. This recipe serves 12 to 15 people, depending on how generous you’re feeling. Perfect for potlucks or feeding your extended family.
- Makes people think you’re fancy. The layers look restaurant-quality, but you know the truth: it’s basically pudding and whipped cream.
- Naturally tropical and refreshing. The pineapple keeps it from feeling heavy, even though it’s definitely indulgent.
- Super affordable. You’re probably spending less than ten dollars on this entire dessert.
- Can be made ahead. Throw it together the night before, and you’re golden.
Ingredients
- 1 box vanilla instant pudding mix (the 3.4-ounce size)
- 1 can crushed pineapple with juice (20 ounces)
- 1 cup cold milk
- 1 cup sour cream
- 2 cups heavy whipping cream
- 3 tablespoons powdered sugar
- 1 teaspoon vanilla extract
- 1 box Nilla wafers (about 40 to 50 wafers)
- 2 tablespoons melted butter
- Pinch of salt
Hailee’s Tip: Don’t skip the sour cream. I know it sounds weird in a dessert, but it adds this subtle tang that makes the sweetness feel balanced and keeps the whole thing from being cloying. Trust me on this.
Hailee’s Tip: Make sure your heavy cream is actually cold. Seriously. If it’s been sitting out, stick it back in the fridge for a few minutes before whipping. Cold cream whips up faster and fluffier.
Hailee’s Tip: Use a 9-by-13-inch baking dish. Yes, even though you’re not baking. It’s the perfect size for this recipe and makes serving super easy.
Optional Add-Ins and Variations
This is where you can make this recipe your own. Here are some things I’ve thrown in over the years:
- Toasted coconut flakes: Sprinkle some between the layers or on top. It adds this nutty, tropical vibe.
- A splash of rum or coconut rum: Add about 2 tablespoons to the pudding mixture if you want to get fancy. (Obviously keep this away from kids.)
- Mini marshmallows: Layer some in with the pudding. They soften slightly and add this sweet, pillowy texture.
- Crushed pineapple chunks: If you want more texture, use fresh pineapple chunks mixed into the pudding layer instead of just the canned juice.
- Graham cracker crumbs: Use these instead of Nilla wafers if that’s what you have on hand. The texture is slightly different but equally delicious.
- A drizzle of caramel sauce: Swirl some on top before serving. It sounds random, but pineapple and caramel are actually a great pair.
Step-by-Step Method
Layer 1: The Nilla Wafer Crust
First things first, grab your 9-by-13-inch dish and get ready to make the base. I’m going to give you two methods here because honestly, both work great.
Method One (The Easy Way): Crush your Nilla wafers. I do this by putting them in a zip-top bag and going at them with a rolling pin or the bottom of a heavy glass. You want them broken into crumbs, but not pulverized into dust. A few slightly bigger pieces are actually nice for texture. Mix those crumbs with 2 tablespoons of melted butter and a tiny pinch of salt. Press this mixture firmly into the bottom of your baking dish. Done.
Method Two (The Fancy Way): Arrange whole Nilla wafers in a single layer on the bottom of your dish, overlapping them slightly. Then brush them very lightly with melted butter. This gives you this gorgeous, intentional look. Honestly, both methods taste identical, so do whatever makes you happiest.
What I Messed Up: The first time I made this, I didn’t press the crumbs down firmly enough, and the whole thing kind of separated when I was serving it. Now I really press that crust layer down. It should feel solid.
Layer 2: The Pudding and Pineapple
In a medium bowl, whisk together your vanilla pudding mix, cold milk, sour cream, and the entire can of crushed pineapple (juice and all). Whisk it for about a minute until it’s smooth and starts to thicken. This happens faster than you’d think, so don’t walk away.
Once it’s thickened, pour this mixture over your Nilla wafer layer and spread it out evenly. Use an offset spatula or the back of a spoon. Get it into the corners and make it nice and level.
Hailee’s Tip: If your pudding starts to set up too much before you can spread it, just whisk it for a few more seconds and it’ll loosen back up. Pudding is forgiving like that.
Layer 3: The Whipped Cream Cloud
This is my favorite part because it’s where everything comes together. In a separate bowl (make sure it’s clean and dry), pour your cold heavy cream. Add the powdered sugar and vanilla extract. Using an electric mixer or a whisk, beat this until stiff peaks form. This takes about 2 to 3 minutes with an electric mixer, or honestly about 5 to 7 minutes if you’re doing it by hand (and yes, I’ve done it by hand before).
Spread this whipped cream layer over the pudding layer. I like to make it a little textured on top with the back of a spoon, but you can make it smooth if that’s your style. Either way, it looks beautiful.
What I Messed Up: I once tried to make this the morning of serving, and the whipped cream started to separate and get a little weepy by evening. Now I either make the whole thing the night before (without the whipped cream layer) and add that layer a few hours before serving, or I make it fresh a few hours before people arrive. The whipped cream stays perfect that way.
Optional Topping
You could stop here, and it would be perfect. But if you want to get fancy, crush up a few more Nilla wafers and sprinkle them on top, or add some toasted coconut, or even a light drizzle of caramel. It’s totally optional, but it does look extra nice.
The Final Step: Chill
Cover your dish with plastic wrap and refrigerate for at least 2 hours before serving. Honestly, overnight is even better because all the flavors settle together and the wafers soften just the right amount. When you cut into it, you’ll see these beautiful, distinct layers. That’s how you know you did it right.
Common Mistakes to Avoid
I’ve made this dessert probably a hundred times at this point, and I’ve learned a few things the hard way.
Using warm pudding mix: Make sure your milk is cold. Warm milk will mess with how the pudding sets, and you’ll end up with something that’s too thin. Cold milk is your friend here.
Over-whipping the cream: If you whip it too long, you’ll end up with butter. I know that sounds dramatic, but it happens. Stop when you see stiff peaks. You’ll know it when you see it.
Not pressing the crust down: I mentioned this before, but it’s worth repeating. A loose crust will shift around when you’re serving. Press it down firmly.
Skipping the sour cream: I get it, it sounds weird. But don’t skip it. It’s what makes this taste balanced and not overly sweet.
Trying to serve it right away: This dessert needs time to chill and set. If you try to serve it warm or even room temperature, it’ll be a sloppy mess. Give it time.
My Tested Substitutions
Sometimes you work with what you have. Here’s what I’ve actually swapped in and what worked:
Greek yogurt instead of sour cream: This works, but use a little less because Greek yogurt is thicker. Use about 3/4 cup instead of a full cup. The flavor is slightly different—a little less tangy—but still delicious.
Instant vanilla pudding with coconut cream pudding: Honestly, this is amazing. It makes the whole thing feel more tropical. Go for it.
Whipped cream from a can: Look, I’m not going to judge you if you use the canned stuff. It’s not quite the same texture as homemade, but it works in a pinch. Just use a little less because it’s already sweetened.
Fresh pineapple instead of canned: I’ve done this, and it’s gorgeous. Use about 1.5 cups of fresh pineapple chunks and mix them into the pudding layer. The flavor is brighter, but you lose that pineapple juice that helps keep everything moist. So I’d add about 1/4 cup of pineapple juice (from a can or bottle) to make up for it.
Crushed vanilla cookies: If you can’t find Nilla wafers, use crushed vanilla sandwich cookies (without the filling) or even plain digestive biscuits. The texture is slightly different, but it works.
How to Customize
Here’s what I love about this recipe: it’s a template. Once you understand the basic structure, you can make it your own.
Make it tropical: Use coconut pudding instead of vanilla, and add a sprinkle of toasted coconut flakes. Maybe throw in some crushed macadamia nuts.
Make it boozy: Add 2 to 3 tablespoons of rum or coconut rum to the pudding layer. This is for the adults only, obviously.
Make it extra creamy: Use heavy cream in place of the milk in the pudding mixture. It makes everything richer and more decadent.
Make it less sweet: Use less powdered sugar in the whipped cream layer, or skip it entirely and just use a tiny bit of vanilla. Some people find the pudding layer sweet enough on its own.
Make it individual servings: Layer everything in mason jars or small cups instead of one big dish. It’s perfect for meal prep or if you’re serving a smaller group.
Serving Ideas
This dessert is perfect as-is, but here are some ways I like to serve it:
- At a potluck: Transport it in the dish, covered with plastic wrap. Bring a serving spoon. It travels beautifully.
- For a summer dinner party: Serve it in individual bowls with a small spoon. It feels more elegant that way.
- For a casual family dinner: Just eat it straight from the dish with a spoon. No judgment here.
- With fresh whipped cream on the side: Some people like extra whipped cream. I get it.
- With a sprinkle of toasted coconut on top: This adds a little texture and makes it feel special.
- With a small dollop of caramel or chocolate sauce: For people who want a little extra something.
Meal Prep and Storage
This is honestly one of the best things about this dessert: it actually gets better with time.
Make-ahead: You can make this up to 2 days ahead. Just assemble everything except the whipped cream layer, cover it with plastic wrap, and refrigerate. Add the whipped cream layer a few hours before serving so it stays fresh and fluffy.
Storage: Keep it covered in the refrigerator for up to 3 days. After that, the Nilla wafers start to get a little too soft and the whole thing gets a bit watery. Three days is really the sweet spot.
Freezing: Honestly, I don’t recommend freezing this. The whipped cream doesn’t freeze well, and the texture gets weird. Make it fresh or make it a day or two ahead.
Transporting: If you need to take this somewhere, just cover the dish tightly with plastic wrap and drive carefully. The layers stay put as long as you’re not jostling it around too much.
Nutritional Breakdown
Here’s the nutritional info per serving (based on 12 servings):
- Calories: 285
- Protein: 3g
- Carbohydrates: 32g
- Fat: 16g
- Fiber: 0g
- Sugar: 24g
Keep in mind this is an estimate and can vary based on the specific brands you use. This is definitely an indulgent dessert, but it’s meant to be shared, so the portions are reasonable.
Final Thoughts
Making this pineapple lush dessert with Nilla wafers has genuinely become one of my favorite things to do in the kitchen. It’s proof that you don’t need complicated techniques or expensive ingredients to make something that tastes incredible and makes people happy.
Every time I make this, I’m reminded that the best recipes are the ones that work with your life, not against it. This is no-fuss, forgiving, and delicious. It’s the kind of dessert you can make on a Tuesday night without stress, or prep the day before a big event. It’s the kind of thing that makes people ask for your recipe, which honestly never gets old.
I hope you make this soon. I hope it becomes your go-to dessert the way it’s become mine. And I hope someone in your life gets to experience that moment when they take a bite and realize it tastes way better than it looks, and it looks pretty darn good.
Happy cooking, friends. You’ve got this.
—
Recipe Card
**Pineapple Lush Dessert with Nilla Wafers**
**Ingredients**
*