How to Make Classic Frito Chili Pie
How to Make Classic Frito Chili Pie
How to Make Classic Frito Chili Pie: A Cozy Comfort Food That Never Disappoints
I have a very specific memory tied to Frito chili pie. I was about eight years old, sitting at my grandmother’s kitchen table on a random Tuesday afternoon, and she pulled out a bag of Fritos, a can of chili, and some shredded cheese. I remember thinking it seemed almost too simple to be real food—like she was making a shortcut or something. But then she assembled it right there in front of me, heated it up, and I took one bite and was absolutely sold. It wasn’t fancy. It wasn’t complicated. It was just… perfect.
That’s the thing about Frito chili pie. It doesn’t pretend to be anything other than what it is: a no-fuss, deeply satisfying comfort dish that tastes like a hug feels. It’s the kind of meal you make when you want something warm and filling without spending hours in the kitchen. It’s what you serve to friends who drop by unexpectedly. It’s what you crave on cold evenings when the world feels a little too much.
If you’ve never made this before, I promise you it’s going to feel almost embarrassingly easy. That’s not a bad thing—that’s the whole point. This recipe works because it respects simplicity while still delivering on flavor. Whether you’re feeding a crowd, meal prepping for the week, or just trying to get dinner on the table without losing your mind, how to make classic Frito chili pie is genuinely one of the most useful skills in my kitchen rotation.
The beauty here is that this dish is forgiving, customizable, and honestly kind of therapeutic to assemble. I love making it when I need to decompress, and I love eating it even more. If you want more cozy recipes like this one, follow me on HaileeRecipes on Pinterest for ideas that feel like home.
Why You’ll Love This Recipe
Let me be real with you: this isn’t a recipe that’s going to impress anyone looking for fine dining. But that’s not what it’s designed to do. What it will do is deliver comfort, satisfaction, and honestly, pure joy on a plate.
First, the time factor. You can have this ready to eat in about 15 minutes. No long ingredient lists. No complicated techniques. Just assembly and heat.
Second, the flavor combination actually works in a way that feels almost magical. The salty crunch of the Fritos, the savory richness of the chili, the melted cheese, the slight coolness of sour cream—it all comes together into something that tastes way better than the sum of its parts.
Third, this is genuinely budget-friendly. A bag of Fritos, a can or two of chili, cheese, and maybe some toppings. You can make this for less than five dollars and feed four people. That’s the kind of math I love.
And finally, it’s infinitely adaptable. You can make it vegetarian. You can load it with extra toppings. You can adjust the spice level. You can make it fancy or keep it simple. It bends to what you need it to be.
Ingredients
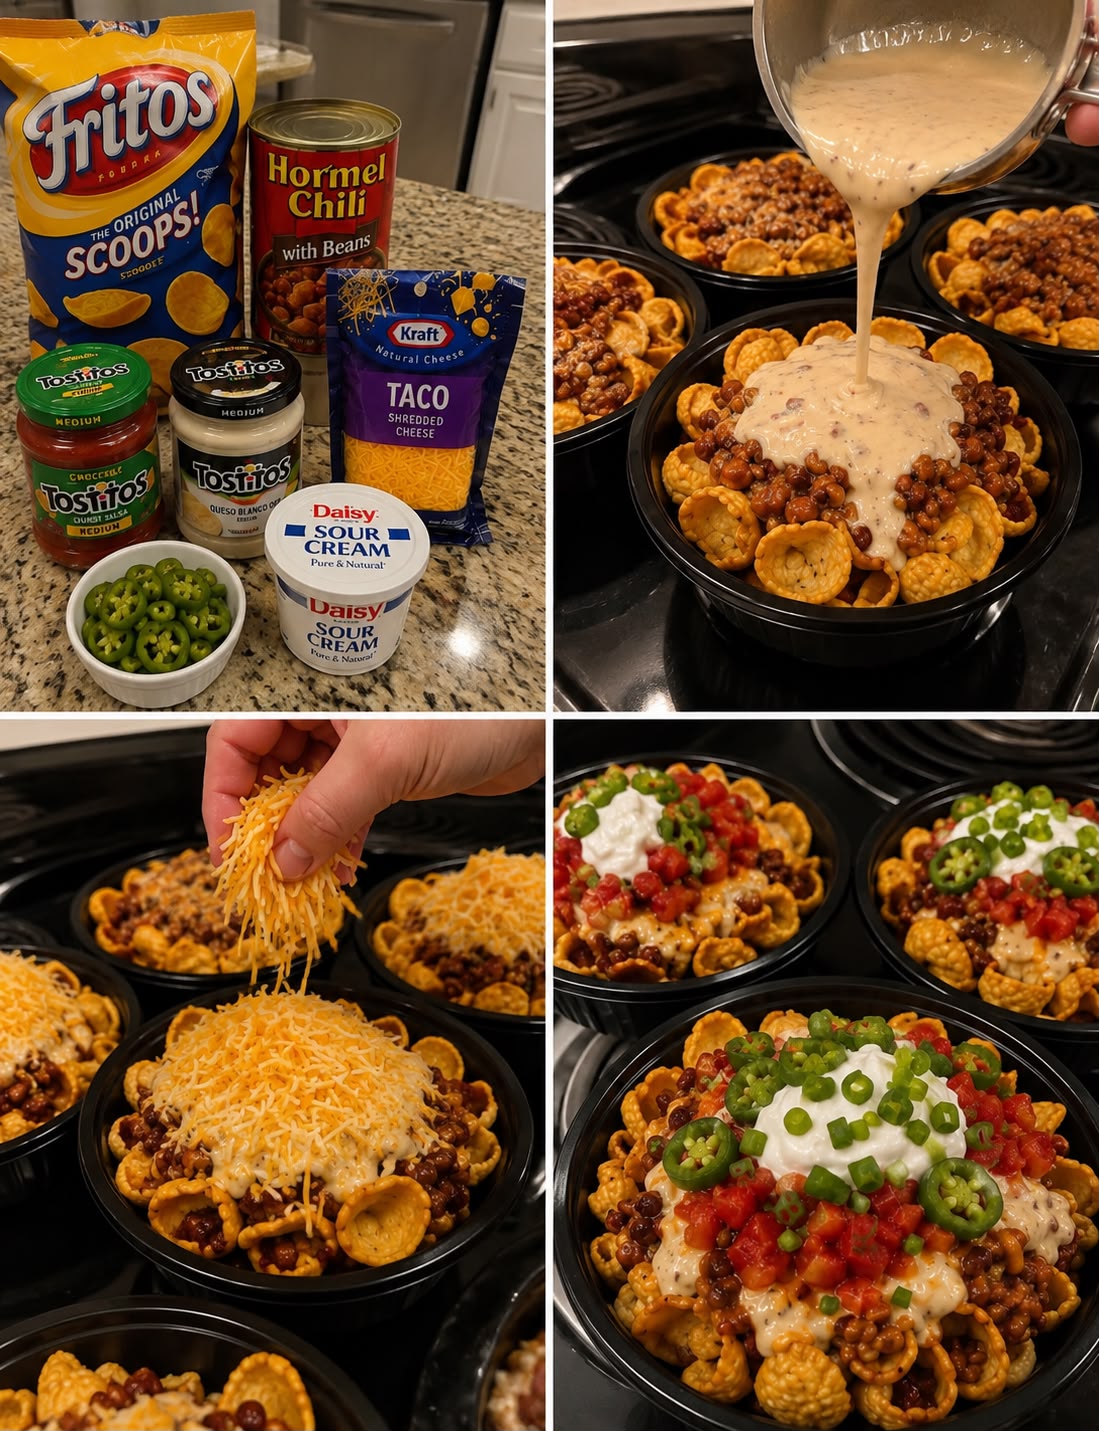
- One 10.5-ounce bag of Fritos corn chips (the original kind, not the scoops—though honestly, use what you have)
- Two 15-ounce cans of chili (I use a simple beef chili, but any kind works), or about 3 cups of homemade chili
- 1.5 cups shredded cheddar cheese (I prefer sharp, but mild works too)
- Half cup sour cream
- One small yellow onion, diced (optional but recommended)
- One jalapeño, sliced thin (optional, for heat)
- Salt and black pepper to taste
- One teaspoon chili powder (if your canned chili is mild and you want more depth)
Hailee’s Tip: Don’t open that bag of Fritos until you’re ready to assemble. They get stale fast, and you want that crunch factor intact.
Hailee’s Tip: If you’re using canned chili, taste it first. Some brands are spicier than others. Adjust your heat level accordingly before you build the pie.
Hailee’s Tip: I buy pre-shredded cheese for this because life is short and I’m not judging myself. If you want to shred your own block cheese, it will melt slightly better, but honestly, the difference is minimal.
Optional Add-Ins and Variations
This is where you get to make this recipe yours. Here are some additions I love:
- Diced fresh tomatoes for brightness
- Sliced black olives for richness
- Diced bell peppers (red or green) for crunch
- Crispy bacon bits for smokiness
- Fresh cilantro for a pop of freshness
- A drizzle of hot sauce for extra kick
- Corn kernels for sweetness
- Sliced green onions for oniony flavor without the raw bite
- A dollop of guacamole on top for creaminess
The key is not to overthink it. Pick one or two things that sound good to you and go with it. This dish doesn’t need a ton of extra stuff to shine.
Step-by-Step Method
Step 1: Warm Your Chili
Pour your chili into a pot and heat it over medium heat, stirring occasionally. You want it warm and slightly bubbly around the edges, but not boiling aggressively. This usually takes about 5 minutes if it’s coming from room temperature. If you’re using homemade chili from the fridge, give it a little longer. Taste it and add salt, pepper, or chili powder if needed. This is your moment to adjust the flavor before everything comes together.
What I Messed Up: The first time I made this, I added the chili while it was still cold, and it cooled down the whole dish. Now I always warm it first. It makes a difference.
Step 2: Prep Your Toppings
While the chili is warming, dice your onion, slice your jalapeño if you’re using one, and have your cheese and sour cream within arm’s reach. I know this sounds obvious, but having everything ready before you start assembling is genuinely helpful. You’re moving fast at this point, and you don’t want to scramble.
Step 3: Choose Your Vessel
You can make individual servings in bowls or mugs, or you can assemble this in a larger shallow baking dish if you’re feeding a group. I usually do individual bowls because it feels more intentional and everyone gets exactly what they want. But there’s no wrong choice here. Use what makes sense for your situation.
Step 4: Build Your Base
Open that bag of Fritos and add a generous handful to the bottom of your bowl or dish. Don’t be shy. This is the foundation, and you want enough chips to create a solid base layer. If you’re making this in a larger dish, spread them out so they cover the bottom evenly.
Step 5: Add the Chili
Pour your warm chili over the Fritos. I use about three-quarters to one cup of chili per serving, depending on how chili-forward I’m feeling that day. The chili will start to soften the chips slightly, which is exactly what you want. You’re creating a texture situation here—some crunch, some softness, all satisfaction.
Step 6: Add the Cheese
Sprinkle your shredded cheese generously over the chili. This is not the time to hold back. The cheese will melt slightly from the heat of the chili, and that melting is essential to the whole vibe. Use about one-quarter to one-third cup per serving.
Step 7: Optional Heat**
Here’s where I diverge from my grandmother’s method. She always ate it cold or at room temperature. I like to pop mine under the broiler for about 2-3 minutes just to get the cheese melted and slightly bubbly. It’s optional, but it elevates the whole thing. If you’re doing this, watch it carefully so the chips don’t burn.
What I Messed Up: I once left it under the broiler for too long and the top layer of chips got crispy-burnt. Now I set a timer and actually stay in the kitchen.
Step 8: Top It Off
Remove from the broiler (if you used one) and immediately add a generous dollop of sour cream on top. Add your diced onion, jalapeño slices, or any other toppings you’re using. The sour cream will start to melt slightly into the warm chili, and it’s absolutely heavenly.
Step 9: Eat It While It’s Warm
Seriously, don’t wait. The magic of this dish is partially in the temperature contrast and texture variation. Grab a spoon and dive in.
Common Mistakes to Avoid
Using Stale Chips
Once you open that bag of Fritos, they start losing their crunch. If your chips are already soft before you start, your whole dish suffers. Keep them sealed until you’re ready to use them, or buy a fresh bag if you’re not sure how old yours is.
Cold Chili
I mentioned this already, but it’s worth repeating. Cold chili will cool down your chips and make the whole thing feel less satisfying. Warm it up first.
Not Enough Seasoning**
Canned chili can sometimes be a little bland on its own. Taste it before you assemble and add salt, pepper, or chili powder if needed. This is your one chance to adjust the flavor profile.
Skipping the Sour Cream
I know sour cream isn’t everyone’s thing, but it really does complete this dish. It adds creaminess and a slight tang that balances the richness of the chili and cheese. If you genuinely can’t do sour cream, use Greek yogurt or even a dollop of mayo mixed with lime juice.
Overcomplicating It
This is supposed to be simple. If you find yourself adding eight different toppings and making it a whole production, you’re missing the point. Keep it straightforward and let the core flavors shine.
My Tested Substitutions
For the Chips: You can use tortilla chips, but they’re softer and won’t give you the same crunch. You can also use Fritos scoops if that’s what you have on hand. They actually work great because they hold the chili better.
For the Chili: If you don’t eat meat, use a vegetarian chili or even a bean-based chili. Black beans, pinto beans, or a mix work beautifully. If you want to make your own chili instead of using canned, go for it—you’ll need about 3 cups of finished chili.
For the Cheese: Sharp cheddar is my preference, but you can use mild cheddar, Monterey Jack, or even a Mexican blend. Avoid soft cheeses like brie or fresh mozzarella—they don’t melt the same way.
For the Sour Cream: Greek yogurt works in a pinch. So does crema if you can find it. Mayo mixed with a little lime juice is actually surprisingly good too.
How to Customize
Make It Spicy: Add fresh jalapeños, use a spicy chili, or drizzle hot sauce over the top. You can also add cayenne pepper to the chili while it’s warming.
Make It Hearty: Add cooked ground beef or shredded chicken to your chili before assembling. You can also mix in black beans or corn for more substance.
Make It Fresh: Load it with diced tomatoes, fresh cilantro, diced red onion, and a squeeze of lime juice. This version feels lighter and brighter.
Make It Loaded: Think of this like a nacho situation. Add crispy bacon, sliced jalapeños, diced tomatoes, black olives, green onions, and extra cheese. Go wild.
Make It Vegetarian: Use a vegetarian chili or make your own with beans and vegetables. Everything else stays the same.
Serving Ideas
Frito chili pie is honestly perfect on its own, but here’s how I like to serve it:
- With a simple green salad on the side to balance the richness
- With cornbread or jalapeño cornbread for dipping
- With a cold drink—iced tea, lemonade, or honestly, a cold beer
- As part of a casual dinner spread with other easy sides
- In mugs as a handheld option for game day or movie night
This is the kind of dish that works for lunch, dinner, or even a casual gathering. It’s unpretentious and satisfying, which means it fits into almost any situation.
Meal Prep and Storage
Making It Ahead: You can prepare the chili the day before and store it in the fridge. Just warm it up before assembling. Don’t assemble the whole dish ahead of time because the chips will get soggy.
Storing Leftovers: If you have leftover assembled Frito chili pie, store it in an airtight container in the fridge for up to 2 days. The chips will soften over time, but it’s still delicious. You can reheat it gently in the microwave or oven.
Freezing: The chili itself freezes beautifully for up to 3 months. Just thaw it in the fridge overnight and warm it up when you’re ready to make the pie. Don’t freeze the assembled dish—the texture gets weird.
Batch Cooking: If you’re meal prepping, make a big batch of chili and portion it out. You can assemble individual Frito chili pies throughout the week for quick lunches or dinners.
Nutritional Breakdown
Keep in mind this varies depending on the specific brands and amounts you use, but here’s a rough estimate per serving (assuming 4 servings):
- Calories: 380-420
- Protein: 14g
- Carbohydrates: 32g
- Fat: 22g
- Fiber: 5g
- Sodium: 1100mg
This is definitely a comfort food, not a light meal. But it’s also not something you need to feel guilty about eating. It’s whole food ingredients coming together in a satisfying way, and that matters.
Final Thoughts
I think the reason I love Frito chili pie so much is because it represents something important to me about cooking: it doesn’t have to be complicated to be good. It doesn’t have to take hours. It doesn’t have to require fancy ingredients or specialized techniques. Sometimes the best meals are the simplest ones, made with care and served with genuine affection.
My grandmother taught me that lesson without even meaning to, just by pulling out a bag of chips and a can of chili on a random Tuesday afternoon. She wasn’t trying to impress anyone. She was just making something that tasted good and that we could enjoy together.
That’s what this recipe is. It’s practical. It’s delicious. It’s something you can make on a weeknight when you’re tired. It’s something you can serve to friends without stress. It’s something that tastes like comfort and feels like home.
So grab your Fritos, warm up your chili, and give this a try. I promise you won’t regret it. And if you do make it, I’d love to hear how it turned out. Cooking is always better when we’re doing it together, even if we’re doing it in our own kitchens miles apart.
—
How to Make Classic Frito Chili Pie
Ingredients
Method
- I have a very specific memory tied to Frito chili pie. I was about eight years old, sitting at my grandmother's kitchen table on a random Tuesday afternoon, and she pulled out a bag of Fritos, a can of chili, and some shredded cheese. I remember thinking it seemed almost too simple to be real food—like she was making a shortcut or something. But then she assembled it right there in front of me, heated it up, and I took one bite and was absolutely sold. It wasn't fancy. It wasn't complicated. It was just… perfect. That's the thing about Frito chili pie. It doesn't pretend to be anything other than what it is: a no-fuss, deeply satisfying comfort dish that tastes like a hug feels. It's the kind of meal you make when you want something warm and filling without spending hours in the kitchen. It's what you serve to friends who drop by unexpectedly. It's what you crave on cold evenings when the world feels a little too much. If you've never made this before, I promise you it's going to feel almost embarrassingly easy. That's not a bad thing—that's the whole point. This recipe works because it respects simplicity while still delivering on flavor. Whether you're feeding a crowd, meal prepping for the week, or just trying to get dinner on the table without losing your mind, how to make classic Frito chili pie is genuinely one of the most useful skills in my kitchen rotation. The beauty here is that this dish is forgiving, customizable, and honestly kind of therapeutic to assemble. I love making it when I need to decompress, and I love eating it even more. If you want more cozy recipes like this one, follow me on HaileeRecipes on Pinterest for ideas that feel like home.