Layered Fruit Slushie Recipe | Refreshing & Colorful
Layered Fruit Slushie Recipe | Refreshing & Colorful
Layered Fruit Slushie: A Cool, Colorful Drink That Feels Like Summer in a Glass
I invented this recipe on a sweltering July afternoon when my air conditioning decided to take an unplanned vacation. I was standing in my kitchen, staring at a pile of fruit I’d bought at the farmers market with way too much optimism, when my neighbor stopped by with that look—you know, the one that says “please tell me you have something cold.” Instead of reaching for boring store-bought juice, I started layering frozen fruit, a little honey, and sparkling water into glasses, and honestly? It was magic. My kids actually asked for seconds without me bribing them, and that’s when I knew I’d stumbled onto something special.
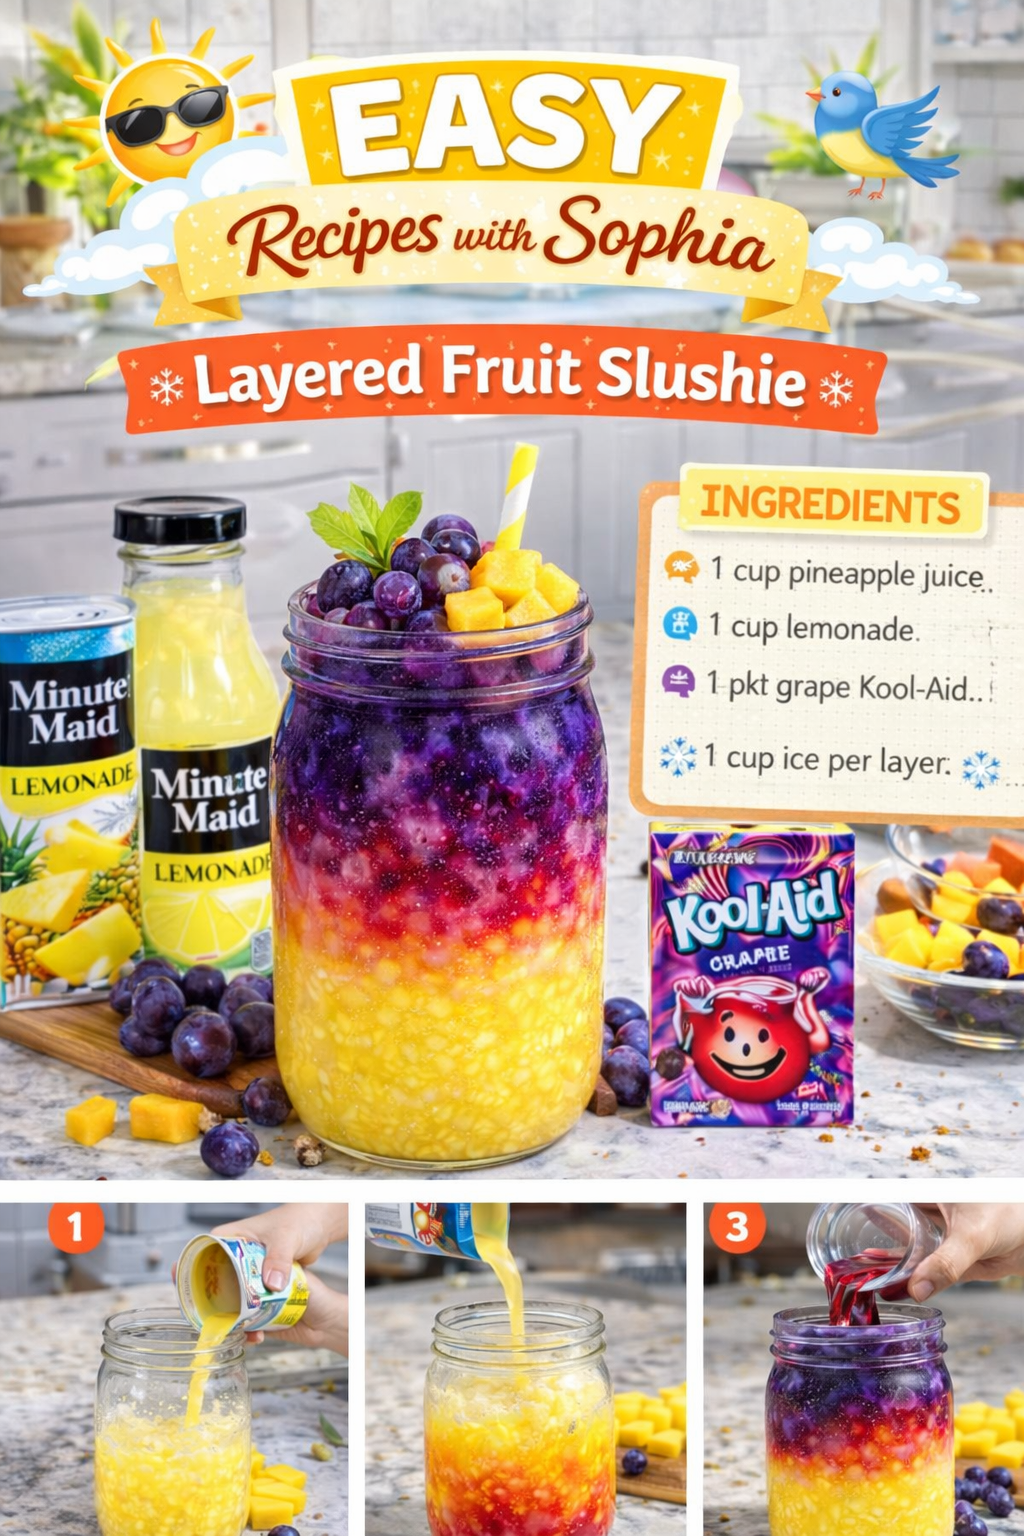
The layered fruit slushie is exactly what it sounds like: a gorgeous, Instagram-worthy drink that tastes like you spent way more effort than you actually did. You’re basically freezing fruit, blending it with a touch of sweetener, and stacking the colors in a glass. It’s refreshing, naturally sweet, and honestly one of the easiest “fancy” things you can make at home. Whether you’re hosting a backyard gathering, need a quick breakfast smoothie alternative, or just want something cold that doesn’t taste like regret, this one’s for you.
I love this recipe because it works for literally everyone. Kids love the colors and the fun of drinking something that looks like it came from a juice bar. Adults appreciate that you can spike it if you want to (more on that later). People with dietary restrictions can adjust the sweetener or skip it entirely. It’s naturally vegan, gluten-free, and dairy-free without any weird substitutions. Plus, if you’re like me and you always have frozen fruit hanging around, you can make this in about five minutes flat.
If you love easy, feel-good recipes that don’t require a culinary degree, I’d love for you to follow me on HaileeRecipes on Pinterest where I share tons of simple, real-life recipes just like this one.
Why You’ll Love This Recipe
First, let’s talk about how ridiculously customizable this is. You can use whatever fruit you have on hand—berries, mango, pineapple, watermelon, stone fruits, you name it. You’re not locked into a specific combination, which means you can make this year-round with whatever’s in season or hiding in your freezer.
Second, it’s genuinely better for you than most store-bought slushies or smoothie chain drinks. You control the sugar. You know exactly what’s going in. There’s no weird syrup or artificial flavoring lurking in there. Just fruit, maybe a touch of honey, and sparkling water if you want that fizzy kick.
Third, it’s fast. I’m talking five to ten minutes from “I’m hot and thirsty” to “I’m sipping something delicious.” No complicated equipment needed, no waiting around.
And honestly? It’s just pretty. There’s something about those jewel-toned layers that makes you feel fancy while you’re drinking it. Your brain gets a little hit of joy just from looking at it, and that matters more than people realize.
Ingredients
- 2 cups frozen strawberries (or your favorite red/pink fruit)
- 1.5 cups frozen blueberries (or purple fruit of choice)
- 1.5 cups frozen mango or pineapple (or yellow/orange fruit)
- 2 to 3 tablespoons raw honey or agave nectar (divided, plus more to taste)
- 3 to 4 tablespoons fresh lemon juice or lime juice
- 1 to 2 cups sparkling water or still water (cold)
- Pinch of sea salt (optional but really nice)
- Ice cubes (optional, for extra chill)
Hailee’s Tip: The beauty of this recipe is that you don’t need exact amounts. If you have more blueberries than strawberries, that’s fine. The ratio I’m giving you is just a starting point. The important thing is that you have at least three different colors of frozen fruit so the layering actually shows up.
Hailee’s Tip: Frozen fruit works better than fresh here because it blends into that perfect slushie texture and keeps your drink cold without watering it down with melting ice. I always keep a stash in my freezer for exactly this reason.
Hailee’s Tip: If you’re using very tart fruit like raspberries or blackberries, you might want to add a touch more honey. Taste as you go—it only takes a second.
Optional Add-Ins and Variations
This is where you get to play around. Here are some of my favorite tweaks:
- Coconut water instead of regular water for extra electrolytes and a subtle tropical vibe
- A splash of vanilla extract blended into one of the fruit layers
- Fresh mint leaves blended with the berry layer for something herbaceous and bright
- A tablespoon of chia seeds stirred into each layer for texture and nutrition
- Almond butter or tahini (about a tablespoon) blended into the middle layer for creaminess
- A shot of rum or vodka for the adults (about an ounce per drink)
- Ginger powder for a subtle spice that plays really nicely with mango and pineapple
- Edible flowers or citrus slices frozen into ice cubes for a fancy garnish
Step-by-Step Method
Step 1: Prep Your Fruit
Take your frozen strawberries out of the freezer and let them sit for about two minutes. You don’t want them to thaw completely, but you want them just soft enough to blend smoothly. This matters more than you’d think—if they’re rock-solid, your blender will struggle, and you’ll end up with chunky bits instead of that gorgeous slushie texture.
What I Messed Up: The first time I made this, I tried to blend fruit straight from the freezer without any softening time, and I nearly broke my blender. Don’t be me. Two minutes makes all the difference.
Step 2: Blend the First Layer
Add your softened strawberries to your blender along with about one tablespoon of honey, one tablespoon of lemon juice, and a splash of cold water (maybe a quarter cup). Blend until you get a smooth, slushie-like consistency. It should look like a thick smoothie, not a juice. Taste it. Does it need more sweetness? Add a bit more honey. Too tart? A pinch more honey or a touch more water.
Step 3: Pour the First Layer
Divide the strawberry mixture evenly among your glasses, filling them about a third of the way. This is where the pretty part starts. Grab a tall glass and watch that gorgeous pink slushie settle at the bottom.
Step 4: Blend the Second Layer
Rinse out your blender quickly (or just give it a good shake with some water), then repeat with your blueberries. Use the same ratio: frozen fruit, a tablespoon of honey, a tablespoon of lemon juice, and just enough cold water to blend smoothly. The blueberry layer will be thicker and more intensely flavored than the strawberry, so taste as you go.
Step 5: Layer the Second Color
Here’s the trick to keeping your layers distinct: pour slowly and carefully over the back of a spoon. Hold the spoon just above the strawberry layer and pour the blueberry slushie over it. It won’t be a perfect line, but you’ll get that beautiful ombre effect. If the layers blend together a bit, don’t stress—it still looks gorgeous.
Step 6: Blend and Layer the Third Color
Repeat with your mango or pineapple. This layer tends to be the sweetest naturally, so you might need less honey. Blend it up, pour it slowly over the spoon, and watch the magic happen.
Step 7: Top It Off
Once all three layers are in, top each glass with a splash of sparkling water (or still water, depending on what you’re going for). This adds a little lightness and fizz without drowning out the fruit flavor. Stir gently if you want to combine the flavors, or leave it layered if you want the visual moment to last longer.
Step 8: Taste and Adjust
Take a sip. Too sweet? Add more water or a squeeze of fresh lemon. Not sweet enough? A drizzle of honey does the trick. This is your drink—make it exactly how you like it.
Common Mistakes to Avoid
Using fruit that’s too frozen: I mentioned this earlier, but it’s worth repeating. If your fruit is rock-solid, it won’t blend smoothly. Let it soften for a couple of minutes first.
Adding too much water: This is the quickest way to end up with a watery drink instead of a slushie. Start with less water than you think you need, and add more if necessary. You can always thin it out, but you can’t thicken it back up.
Skipping the lemon juice: A tiny bit of acid really brightens up the fruit and keeps it from tasting flat or one-dimensional. Don’t skip it.
Pouring the layers too quickly: I know you’re excited to see the colors, but patience pays off here. Pour slowly over the back of a spoon to keep the layers from mixing too much.
Using the same glass for every layer without rinsing: If you’re making multiple drinks, rinse your blender between layers. Blueberry residue in your strawberry layer will muddy up your beautiful colors.
My Tested Substitutions
For the honey: Maple syrup works beautifully and adds a subtle earthiness. Agave is lighter and more neutral. Coconut sugar is grainier but works if that’s what you have. You can also use a couple of dates blended in, or just skip sweetener entirely if your fruit is naturally sweet enough.
For the lemon juice: Lime is my second choice—it’s slightly more floral and works especially well with tropical fruits. Orange juice works too, though it’s less acidic, so you might need a bit more.
For the sparkling water: Still water is fine if you don’t have sparkling on hand. Coconut water adds a tropical vibe. Even a splash of your favorite herbal tea (cooled) is lovely.
For the fruit: This is where you really get creative. Raspberries, blackberries, watermelon, papaya, peaches, nectarines—whatever you love. The only thing I’d avoid is anything super watery like plain watermelon on its own, because it tends to get a bit thin. But mixed with other fruits? Perfect.
How to Customize
Want to make this your own? Here are some fun directions you can take it:
The Tropical Version: Use mango, pineapple, and passion fruit. Skip the lemon and use lime instead. Add a touch of coconut extract if you have it.
The Berry Lover’s Version: Go all berries—strawberries, blueberries, raspberries, blackberries. Use four different colors if you can find them.
The Green Smoothie Version: Blend spinach or kale into one of your layers (the blueberry layer hides green really well). Add a touch of vanilla extract for sweetness.
The Creamy Version: Blend a splash of coconut milk or almond milk into one of the layers. The strawberry layer works especially well for this.
The Spiced Version: Add a pinch of cinnamon, ginger, or cardamom to one of the layers. It sounds weird, but it’s genuinely delicious.
Serving Ideas
Serve these at a summer brunch alongside some pastries and scrambled eggs. They’re light enough to not feel heavy but interesting enough to be a conversation starter.
Make a batch for a kids’ birthday party. They’ll think it’s the coolest thing ever, and you’ll know they’re getting actual fruit instead of artificial flavoring.
Bring them to a picnic or beach day in a cooler. They stay cold for hours, and they’re way more refreshing than soda.
Serve them as a palate cleanser between courses at a dinner party. Your guests will be impressed.
Make one for yourself on a hot afternoon when you need a five-minute pick-me-up that actually tastes good.
Meal Prep and Storage
Here’s the thing about layered fruit slushies: they’re best enjoyed fresh, right after you make them. The layers stay distinct for about thirty minutes to an hour before they start to blend together. That said, they still taste delicious even after they’ve mixed—it’s just less visually dramatic.
If you want to prep ahead, freeze your fruit layers separately in containers. Then blend them fresh when you’re ready to drink. This way, you can have a slushie ready in literally five minutes.
You can also make the blended fruit mixture (before adding water) and store it in the freezer for up to two weeks. When you want a drink, just thaw it slightly and blend with cold water and sparkling water.
Don’t store the finished drink for more than a few hours—the texture gets a bit weird and watery as the ice melts.
Nutritional Breakdown
One serving of this layered fruit slushie (makes about two servings) contains approximately:
- Calories: 120 to 150 (depending on honey amount)
- Protein: 1 to 2 grams
- Carbohydrates: 30 to 35 grams
- Fat: Less than 1 gram
- Fiber: 3 to 4 grams
- Sugar: 22 to 28 grams (mostly from the fruit and honey)
This is a naturally sweet, fruit-based drink with no added chemicals or artificial anything. The fiber from the whole fruit keeps it from being a pure sugar spike, and the lemon juice adds a nice dose of vitamin C.
Final Thoughts
I love this recipe because it’s proof that you don’t need to be complicated to be good. Some of my favorite things in the kitchen are the simplest ones—the ones that come together in five minutes but taste like you actually tried. The layered fruit slushie is exactly that.
Make this when you want something cold and refreshing. Make it when you want to impress someone without actually working that hard. Make it when you have fruit in your freezer and no idea what to do with it. Make it for yourself on a Tuesday afternoon just because.
And if you do make it, I’d love to hear how it goes. What fruit combo did you use? Did you add anything fun? Did your kids actually drink it without complaining? Drop me a line—I genuinely love hearing from people who try my recipes.
Happy sipping, friends.
Recipe Card
Layered Fruit Slushie Recipe | Refreshing & Colorful
Ingredients
Method
- Let frozen strawberries sit for two minutes to soften slightly. Add to blender with one tablespoon honey, one tablespoon lemon juice, and one quarter cup cold water. Blend until smooth and slushie-like. Pour into glasses filling them one third of the way.
- Rinse blender. Repeat with frozen blueberries, one tablespoon honey, one tablespoon lemon juice, and one quarter cup cold water. Pour slowly over the back of a spoon into each glass to create a second layer.
- Rinse blender. Repeat with frozen mango or pineapple, one tablespoon honey, one tablespoon lemon juice, and one quarter cup cold water. Layer carefully over the blueberry layer.