Pumpkin DOG TREATS
Pumpkin DOG TREATS
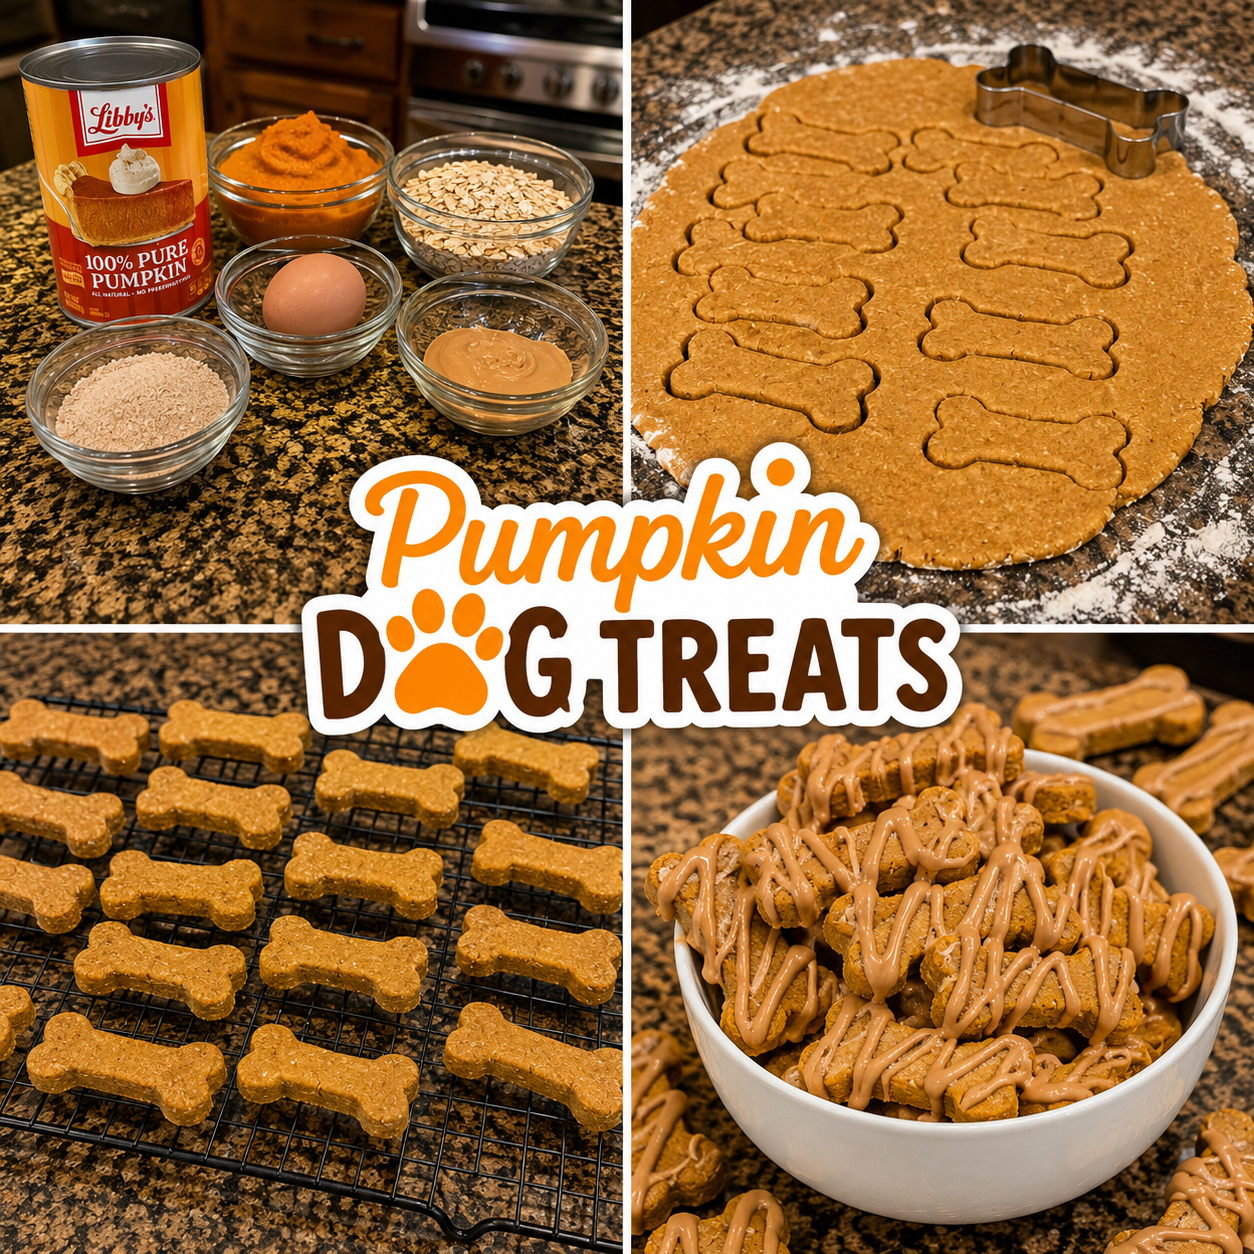
Pumpkin DOG TREATS are a wholesome, homemade snack designed to delight your canine companion with a soft, chewy texture and the natural sweetness of pure pumpkin. These treats offer a perfect balance of fiber from oats and protein from peanut butter, making them an ideal reward for training sessions or a gentle digestive aid on lazy afternoons. Unlike store-bought options that often contain artificial preservatives and fillers, this recipe relies on simple, recognizable ingredients like Libby’s 100% Pure Pumpkin to ensure your pet gets only what is good for them. The resulting cookies are golden-brown on the outside while remaining tender inside, shaped into classic bone forms that dogs find irresistible. Whether you are looking to manage your dog’s weight by using low-calorie ingredients or simply want to bond over baking time, these treats provide a safe and nutritious way to show affection.
For more creative ideas and visual inspiration for your kitchen projects, Follow Hailee Recipes on Pinterest.
Why This Recipe Works
The success of this recipe lies in the specific synergy between its core components. Pumpkin is not merely a flavoring agent here; it acts as a natural binder that holds the dough together without the need for excessive flour, which can sometimes be hard for dogs to digest. The high fiber content in the pumpkin aids in regularity, while the oats provide a satisfying chewiness that mimics the texture of commercial jerky treats but with better nutritional value. Peanut butter adds essential fats and a rich aroma that triggers a strong positive response in most dogs, provided they are not allergic to nuts. By avoiding refined sugars and artificial dyes, this formulation ensures that every bite supports overall health rather than just offering a temporary taste sensation. The baking process at a moderate temperature allows the moisture to evaporate slowly, creating a treat that stays fresh longer without becoming rock-hard.
Ingredients
To make a batch of these treats that yields approximately 30 medium-sized bones, you will need a few pantry staples. It is crucial to use the specific type of pumpkin indicated in the source material to maintain the correct moisture balance. Do not use pumpkin pie filling, as it contains added sugars and spices that can be harmful to dogs.
- Libby’s 100% Pure Pumpkin: 1 cup (This is the primary wet ingredient and binder)
- All-Natural Peanut Butter: ½ cup (Ensure it is xylitol-free, as this sweetener is toxic to dogs)
- Whole Wheat Flour: 2 cups (Provides structure; all-purpose flour works as a substitute)
- Oats: ½ cup (Rolled or quick oats add fiber and texture)
- Egg: 1 large (Acts as an additional binder and adds protein)
- Coconut Flakes: ¼ cup (Optional, unsweetened flakes add a tropical scent and crunch)
How To Make Pumpkin DOG TREATS
- Preheat and Prepare: Begin by preheating your oven to 350°F (175°C). Line two large baking sheets with parchment paper or silicone baking mats. This step is essential to prevent sticking and ensures easy cleanup. If you do not have a cookie cutter, you can roll the dough out and cut shapes with a knife, though a bone-shaped cutter will give the most authentic look.
- Combine Wet Ingredients: In a large mixing bowl, add the 1 cup of Libby’s 100% Pure Pumpkin and the ½ cup of all-natural peanut butter. Crack in the single large egg. Using a sturdy whisk or a hand mixer on low speed, blend these ingredients until they form a smooth, uniform mixture. There should be no visible streaks of peanut butter remaining.
- Incorporate Dry Ingredients: Add the 2 cups of whole wheat flour and the ½ cup of oats directly into the wet mixture. Switch to a wooden spoon or your hands to mix. The dough will become thick and slightly sticky. If you are adding the coconut flakes, fold them in now. Knead gently for about one minute until the flour is fully incorporated and the dough holds together when pinched.
- Shape the Treats: Turn the dough out onto a lightly floured surface. Roll the dough out to a thickness of about ¼ inch. Use a bone-shaped cookie cutter to cut out individual treats. If the dough sticks to the cutter, dip it briefly in flour before each press. Gather the scraps, re-roll, and cut again until all the dough is used. Place the shaped treats on the prepared baking sheets, spacing them about one inch apart to allow for slight expansion.
- Bake Thoroughly: Place the baking sheets in the center of the preheated oven. Bake for 20 to 25 minutes. The exact time depends on the size of your cuts and the humidity of your kitchen. You are looking for the edges to turn a light golden brown. For a harder, longer-lasting treat suitable for aggressive chewers, you may extend the baking time by 5 to 10 minutes, but watch closely to avoid burning.
Doneness And Troubleshooting
Determining when the treats are done requires observing both color and texture. The treats should be firm to the touch and pull away easily from the parchment paper. If the centers feel soft or gummy after the initial 20 minutes, they need more time. Undercooked treats can spoil quickly because the moisture content remains too high. Conversely, if the edges are dark brown before the centers are set, lower the oven temperature to 325°F (160°C) and bake for a longer duration to ensure even cooking through the center.
If your dough is too crumbly and falls apart when rolling, it likely needs a bit more liquid. Add water or a teaspoon of extra pumpkin puree, one teaspoon at a time, until the dough becomes pliable. If the dough is too sticky to handle, sprinkle a small amount of flour on the surface and your hands, but avoid adding too much, as this will make the final product tough and dry.
Substitutions And Variations
This recipe is flexible enough to accommodate different dietary needs or ingredient availability. If you prefer a lighter texture, you can substitute half of the whole wheat flour with oat flour. For dogs with grain sensitivities, you can replace the wheat flour with almond flour or coconut flour, though you will need to adjust the liquid ratios significantly as these flours absorb moisture differently. Always consult your veterinarian before introducing new ingredients to a dog with known allergies.
You can also enhance the flavor profile by adding a pinch of cinnamon, which is generally safe for dogs in small amounts and offers a warm aroma. However, avoid nutmeg, garlic powder, onion powder, or any other seasonings that are toxic to canines. For a dental health boost, you can incorporate a tablespoon of dried parsley into the dry ingredients, which helps freshen breath naturally.
Serving Suggestions
Once the treats have cooled completely, they are ready to serve. Break them into smaller pieces for puppies or small breeds, and keep them whole for larger dogs. These treats make excellent rewards during obedience training due to their appealing smell and manageable size. You can also hide a treat inside a puzzle toy to encourage mental stimulation and slow down eating. Because they are made with natural ingredients, they lack the intense saltiness of commercial snacks, making them a great option for dogs on sodium-restricted diets.
Storage And Reheating
Proper storage is key to maintaining freshness and preventing mold. Allow the treats to cool completely on a wire rack before storing them; trapping heat in a container will create condensation and lead to spoilage. Store the treats in an airtight container at room temperature for up to one week. For longer shelf life, place them in the refrigerator where they will stay fresh for up to two weeks. You can also freeze the treats for up to three months. To freeze, layer them between sheets of parchment paper in a freezer-safe bag. When ready to serve, thaw them at room temperature or microwave a single treat for 10 seconds to soften it slightly.
Always inspect your homemade treats before serving. If you notice any signs of mold, off-odors, or discoloration, discard them immediately. Homemade treats do not contain preservatives, so their lifespan is shorter than commercial products. Enjoy the process of baking for your furry friend, knowing exactly what goes into their snack.
Pumpkin DOG TREATS
Ingredients
Method
- Preheat oven to 350°F (175°C) and line baking sheets with parchment paper.
- Mix pumpkin, peanut butter, and egg in a large bowl until smooth.
- Stir in flour, oats, and coconut flakes until a thick dough forms.
- Roll dough to ¼ inch thickness and cut into bone shapes.
- Bake for 20-25 minutes until golden brown and firm.