Strawberry Banana Cheesecake Trifle Recipe
Strawberry Banana Cheesecake Trifle Recipe
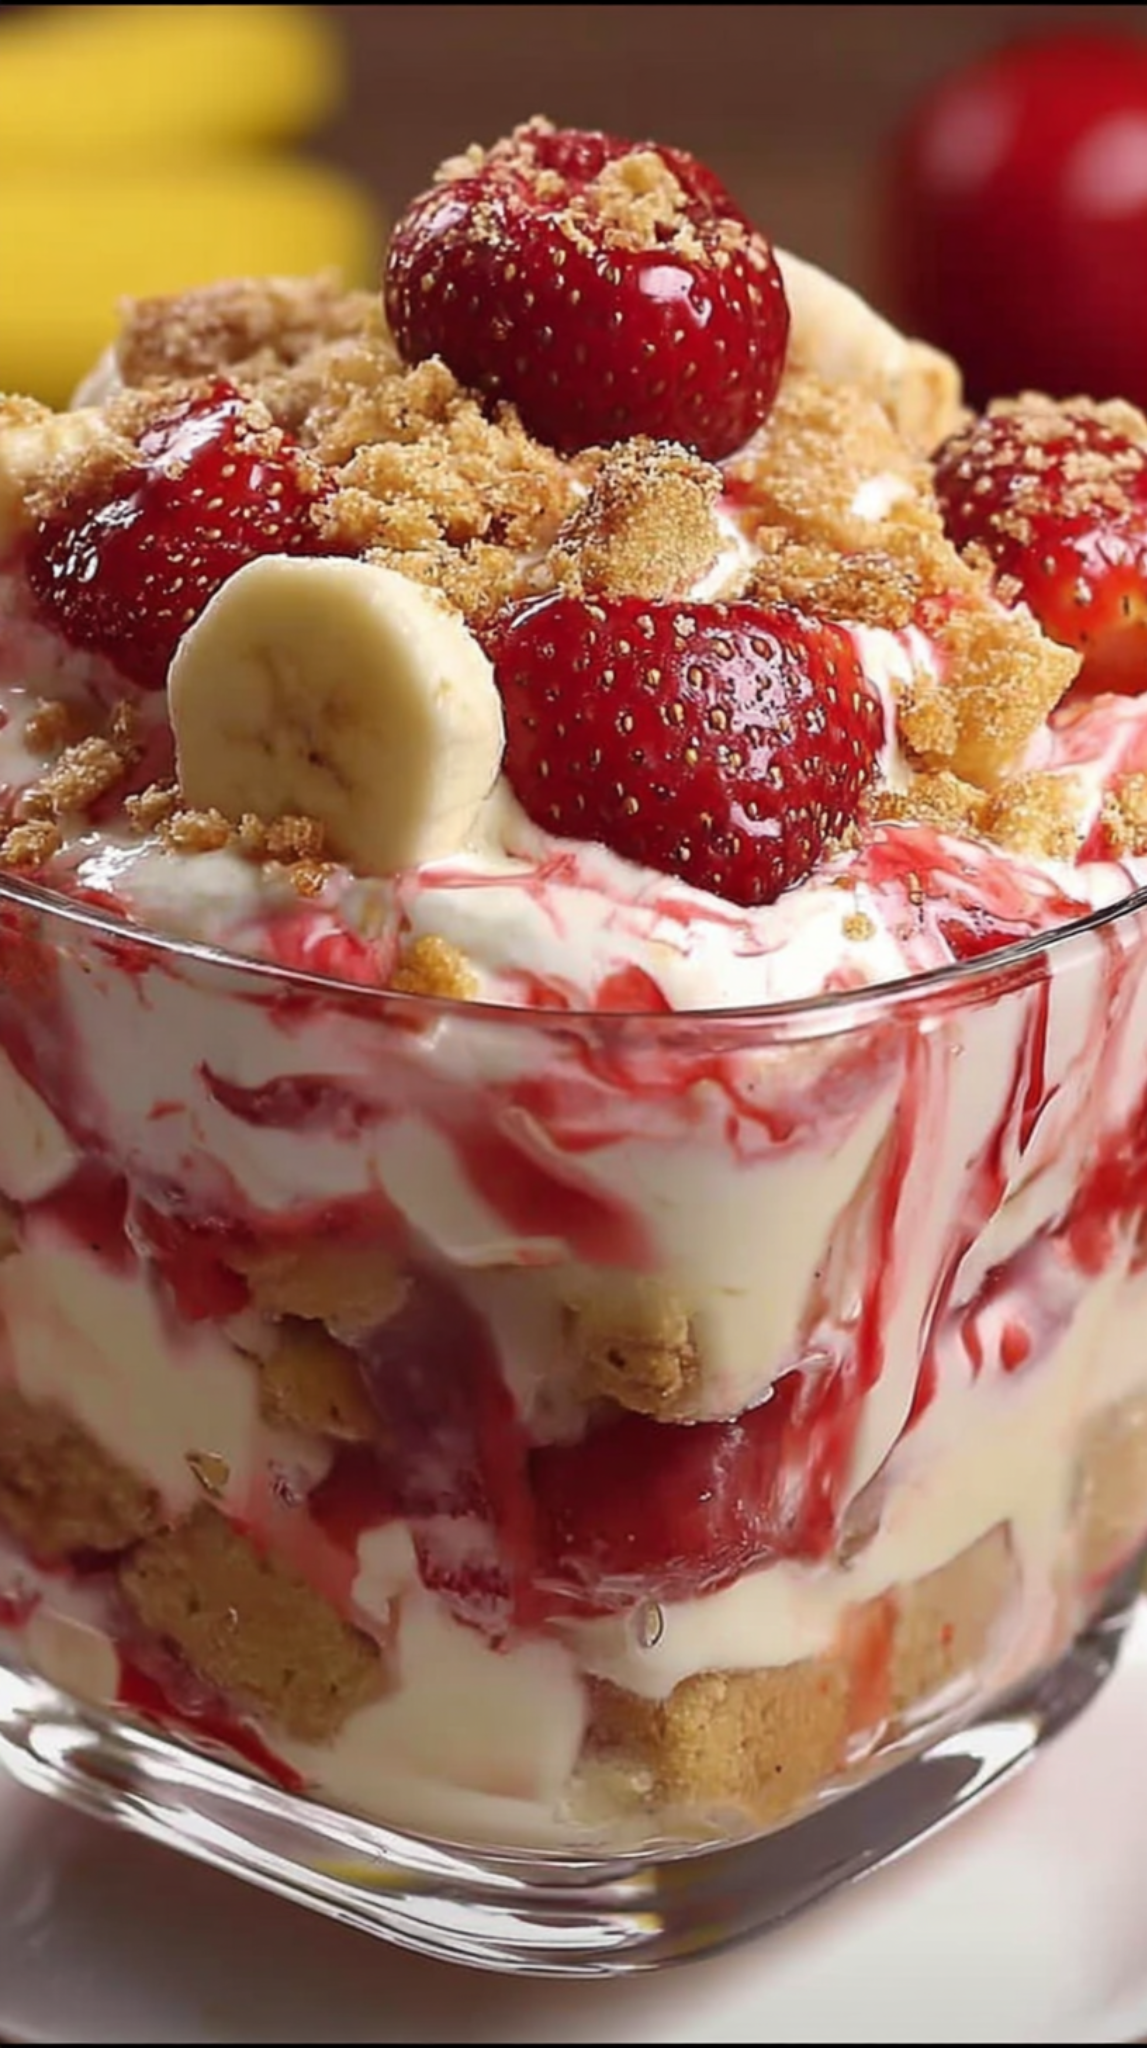
Strawberry Banana Cheesecake Trifle: My Favorite Make-Ahead Dessert
I created this Strawberry Banana Cheesecake Trifle on a Tuesday night when my fridge was half-empty and my brain was fully exhausted. I had cream cheese that needed using, some bananas getting a little too ripe, and a flat of strawberries from the farmers market. My partner was coming home in an hour, and I wanted something that felt special but didn’t require me to actually turn on the oven. So I started layering.
What I discovered that night changed how I think about desserts. This trifle is honestly one of those recipes that feels like you’ve done something fancy, but it’s genuinely simple. There’s no baking, no stress, no wondering if your cake is done. You just layer soft, creamy, fruity goodness into a bowl, chill it, and watch people’s faces light up when they see it.
I’ve made this trifle for dinner parties, potlucks, and lazy Sunday nights when I just want something that tastes like celebration. It’s become the dessert I reach for when I want to impress without the pressure. The best part? You can make it a full day ahead, which means you’re actually relaxing before your guests arrive instead of frantically whipping cream.
This recipe is for anyone who loves cheesecake but doesn’t want to spend three hours baking and cooling. It’s for people who have fresh fruit on hand and want to use it. It’s for those nights when you want something that tastes indulgent but doesn’t require a culinary degree. If you’re looking for a dessert that’s both elegant and genuinely doable, this is it.
If you love recipes like this, follow me on HaileeRecipes on Pinterest for more easy, real-life desserts that actually work.
Why You’ll Love This Recipe
Let me be honest about what makes this trifle special. First, there’s zero baking involved. You’re not standing in front of an oven, you’re not cooling anything for hours, you’re not stressed about whether your layers are even. You’re just assembling beautiful layers of creamy, fruity, cake-like goodness.
Second, it actually tastes like cheesecake. Not some watered-down version, not a pretend dessert. Real, tangy, rich cheesecake flavor mixed with fresh fruit. The texture is incredible too—you get soft cake or cookie layers, creamy cheesecake filling, and bright fruit all in one spoonful.
Third, it’s genuinely make-ahead friendly. I’m not just saying that to sound convenient. You can make this the day before, cover it, and it gets better as it sits. The flavors meld, the textures soften slightly, and everything becomes more cohesive. This is the opposite of a dessert that falls apart if you’re not eating it immediately.
And honestly? It’s pretty. There’s something about layered desserts in a clear bowl that just looks intentional and special. People assume you spent way more time on this than you actually did.
Ingredients
- For the Cake Layer: 1 store-bought pound cake or 2 cups crushed vanilla wafers (I use pound cake because it’s easier and honestly tastes better)
- For the Cheesecake Filling: 16 oz cream cheese, softened to room temperature
- For the Cheesecake Filling: 1/2 cup powdered sugar
- For the Cheesecake Filling: 1 teaspoon vanilla extract
- For the Cheesecake Filling: 1/2 cup heavy whipping cream
- For the Fruit Layer: 1 lb fresh strawberries, hulled and sliced
- For the Fruit Layer: 2 ripe but firm bananas, sliced
- For the Fruit Layer: 2 tablespoons honey or sugar (optional, for the fruit)
- For Assembly: 1/4 cup graham cracker crumbs for topping
- For Assembly: Fresh mint leaves for garnish (optional but pretty)
Hailee’s Tip: Don’t skip softening your cream cheese. I know it’s tempting to just throw it in cold, but you’ll end up with lumps. Set it on the counter for about 30 minutes. Your future self will thank you.
Hailee’s Tip: Buy a whole pound cake from the bakery section instead of the individually wrapped ones. It’s cheaper, fresher, and you can cut it to the size you need.
Hailee’s Tip: Slice your bananas right before assembling. They brown quickly and nobody wants brown banana layers. If you’re making this ahead, slice them when you’re ready to serve or add them to the trifle right before serving.
Optional Add-Ins and Variations
Here’s where you get to make this recipe your own. I love the classic strawberry-banana combo, but I’ve played with this trifle in so many ways.
- Add a lemon twist: Mix the zest of one lemon into the cheesecake filling. It brightens everything up and makes the fruit taste even fresher.
- Go chocolate: Layer in some chocolate pudding or crushed chocolate cookies. Nobody will complain.
- Make it boozy: Add a tablespoon of rum or Cointreau to the cheesecake filling. It’s subtle but sophisticated.
- Use different fruit: Raspberries, blueberries, peaches, or even mango work beautifully. Mix and match whatever looks good.
- Add crunch: Layer in some crushed pistachios or toasted almonds for texture contrast.
- Make it tangier: Replace half the heavy cream with Greek yogurt for a more tangy filling.
Step-by-Step Method
Step 1: Prepare Your Cake Layer
Cut your pound cake into bite-sized cubes. You want them small enough to layer easily but big enough that they don’t disappear. I usually aim for about 1-inch pieces. If you’re using vanilla wafers, just crush them into chunks—not powder, but not whole either. You want some texture.
What I messed up: The first time I made this, I cut the cake too small and it basically dissolved into the cheesecake. Now I cut bigger pieces and it’s perfect.
Step 2: Make the Cheesecake Filling
In a large bowl, beat your softened cream cheese with powdered sugar until it’s completely smooth and creamy. This usually takes about 2-3 minutes with an electric mixer. Scrape down the sides because there’s always some cream cheese clinging to the bowl that you’ll miss otherwise.
Add vanilla extract and mix it in. Now here’s the important part: in a separate bowl, whip your heavy cream until stiff peaks form. This takes about 3-4 minutes. Then gently fold that whipped cream into your cream cheese mixture. Don’t overmix. You want to keep it light and fluffy.
What I messed up: I used to skip the whipped cream folding step and just use cream cheese and sugar. It was fine but dense. Adding whipped cream makes it actually taste like cheesecake mousse, which is what we’re going for here.
Step 3: Prepare Your Fruit
Hull your strawberries and slice them. If they’re really big, cut them into quarters. Slice your bananas right before assembly (seriously, do this last or they’ll brown). If you want to add sweetness to your fruit, toss them gently with honey or sugar and let them sit for 5 minutes. This brings out their juice and creates a little syrup at the bottom, which is honestly delicious.
Step 4: Layer Your Trifle
Use a large clear bowl or even individual glasses if you’re feeling fancy. Start with a layer of cake cubes on the bottom—about 1 inch thick. Then add a layer of cheesecake filling, then fruit. Repeat until your bowl is full, finishing with fruit on top so it looks pretty.
I usually do about three layers total, depending on the size of my bowl. The beauty of a trifle is that it doesn’t have to be perfect. Slightly crooked layers actually look more homemade and charming.
Step 5: Chill and Finish
Cover your trifle and refrigerate for at least 2 hours, but ideally overnight. Right before serving, sprinkle the graham cracker crumbs on top and add fresh mint if you’re using it. This keeps the crumbs from getting soggy.
Common Mistakes to Avoid
Using cold cream cheese: I mentioned this already, but it’s so important. Cold cream cheese will be lumpy and won’t mix smoothly. Set it out 30 minutes before you start.
Overmixing the whipped cream: Once you fold in that whipped cream, stop. Overmixing deflates it and you lose the light, fluffy texture that makes this special.
Slicing bananas too early: They brown. It happens. Slice them right before you assemble or right before you serve.
Skipping the chill time: I know you want to eat it now. I get it. But those 2 hours (or overnight) are when the magic happens. The layers set up, the flavors meld, and everything becomes cohesive. Trust me on this.
Making the layers too thick: You want distinct layers that you can see and taste separately. If your cheesecake layer is an inch thick, it’s too much. Aim for thin, elegant layers.
My Tested Substitutions
Can’t find good strawberries? Frozen strawberries work fine. Thaw them and drain off excess liquid. They’re actually great in winter when fresh ones are mealy.
Don’t have heavy cream? Use Greek yogurt or sour cream. The filling won’t be quite as light, but it’ll be tangier and honestly still delicious.
Out of pound cake? Crushed vanilla wafers, ladyfingers, or even store-bought angel food cake work. I’ve even used crushed graham crackers in a pinch.
Can’t do dairy? Use dairy-free cream cheese and coconut whipping cream. I’ve made this for friends with dairy allergies and it’s been genuinely good.
Want it less sweet? Use less powdered sugar in the filling. Start with 1/4 cup and taste as you go. You can always add more, but you can’t take it out.
How to Customize
The beauty of this trifle is that it’s incredibly flexible. Here are some directions you can take it:
Make it fancy: Use individual glass cups instead of one big bowl. Serve with a small spoon and maybe a tiny dollop of whipped cream on top. Suddenly it’s restaurant-quality.
Make it seasonal: Use whatever fruit is in season. Spring calls for strawberries and rhubarb. Summer is all berries. Fall could be peaches and blackberries. Winter is when you use frozen fruit and maybe add some spiced elements.
Make it boozy: Add a splash of liqueur to the cheesecake filling. Cointreau, rum, or even a berry liqueur would be amazing.
Make it chocolate-forward: Layer in chocolate pudding or mousse. Use chocolate cookies for the cake layer. Top with chocolate shavings.
Make it healthier: Use Greek yogurt instead of some of the cream cheese. Use whole grain cookies. Skip the sugar in the fruit layer. It’s still delicious, just a little lighter.
Serving Ideas
I serve this trifle in so many different ways depending on the occasion. For a casual dinner party, I make it in one big bowl and let people serve themselves. It’s less formal and people love the abundance of it.
For something more elegant, I layer it in individual glasses or small bowls. This is perfect for dinner parties where you want everything plated and ready.
For a brunch, I make a smaller version in a trifle dish and serve it alongside other desserts. It’s light enough that people can have a small portion without feeling too full.
I’ve also made mini versions in mason jars for picnics. They’re portable, pretty, and you eat right out of the jar with a spoon.
Serve it cold, straight from the fridge. Maybe add a small dollop of whipped cream on top or a sprinkle of fresh mint. A crispy cookie on the side is nice too—something like a biscotti or shortbread to add crunch.
Meal Prep and Storage
This is where this trifle really shines for me. You can make it up to 24 hours ahead, which means you’re actually relaxed when people arrive.
Store it covered in the refrigerator. I use plastic wrap or a container with a lid. It keeps perfectly for up to 3 days, though the cake layer will gradually absorb moisture from the cheesecake and fruit, which honestly makes it taste even better.
Don’t freeze this. The texture of the fruit and the whipped cream filling doesn’t hold up well to freezing and thawing.
If you’re making it ahead and worried about the bananas browning, either slice them right before serving or add them to the trifle just a few hours before you serve it.
The graham cracker crumb topping should go on right before serving so it stays crispy.
Nutritional Breakdown
This trifle is definitely a dessert, not a health food, but here’s what you’re looking at per serving (assuming 8 servings):
- Calories: approximately 320
- Protein: 5g
- Carbohydrates: 38g
- Fat: 16g
- Fiber: 1g
Keep in mind that this varies depending on what pound cake you use and how generously you layer things. If you use Greek yogurt instead of some of the cream, you’ll add protein and reduce fat slightly. If you add chocolate, you’ll add calories. This is just a baseline.
Final Thoughts
I love this trifle because it represents everything I believe about cooking and baking. It doesn’t have to be complicated to be special. You don’t need fancy equipment or advanced skills. You just need good ingredients, a little time, and the willingness to layer things beautifully.
Every time I make this, I’m reminded that the best desserts are the ones that bring people together and taste genuinely good. This trifle does both. It’s impressive enough for a dinner party but easy enough for a Tuesday night. It’s elegant but not fussy. It tastes indulgent but isn’t difficult to make.
I hope you make this soon. I hope you slice into it and see those beautiful layers and feel proud of yourself. And I hope the people you serve it to tell you it’s the best thing they’ve eaten in weeks. Because honestly, it probably will be.
Happy trifle making, friends. You’ve got this.
—
Recipe Card
**Strawberry Banana Cheesecake Trifle**
Strawberry Banana Cheesecake Trifle Recipe
Ingredients
Method
- Cut pound cake into bite-sized 1-inch cubes and set aside.
- In a large bowl, beat softened cream cheese and powdered sugar together until smooth and creamy, about 2-3 minutes.
- Add vanilla extract and mix until combined.
- In a separate bowl, whip heavy cream until stiff peaks form, about 3-4 minutes.
- Gently fold whipped cream into cream cheese mixture until combined. Do not overmix.
- Hull and slice strawberries. If desired, toss with honey and let sit 5 minutes.
- Slice bananas right before assembly.
- In a