Cheesy Stuffed Meatloaf Bites
Cheesy Stuffed Meatloaf Bites
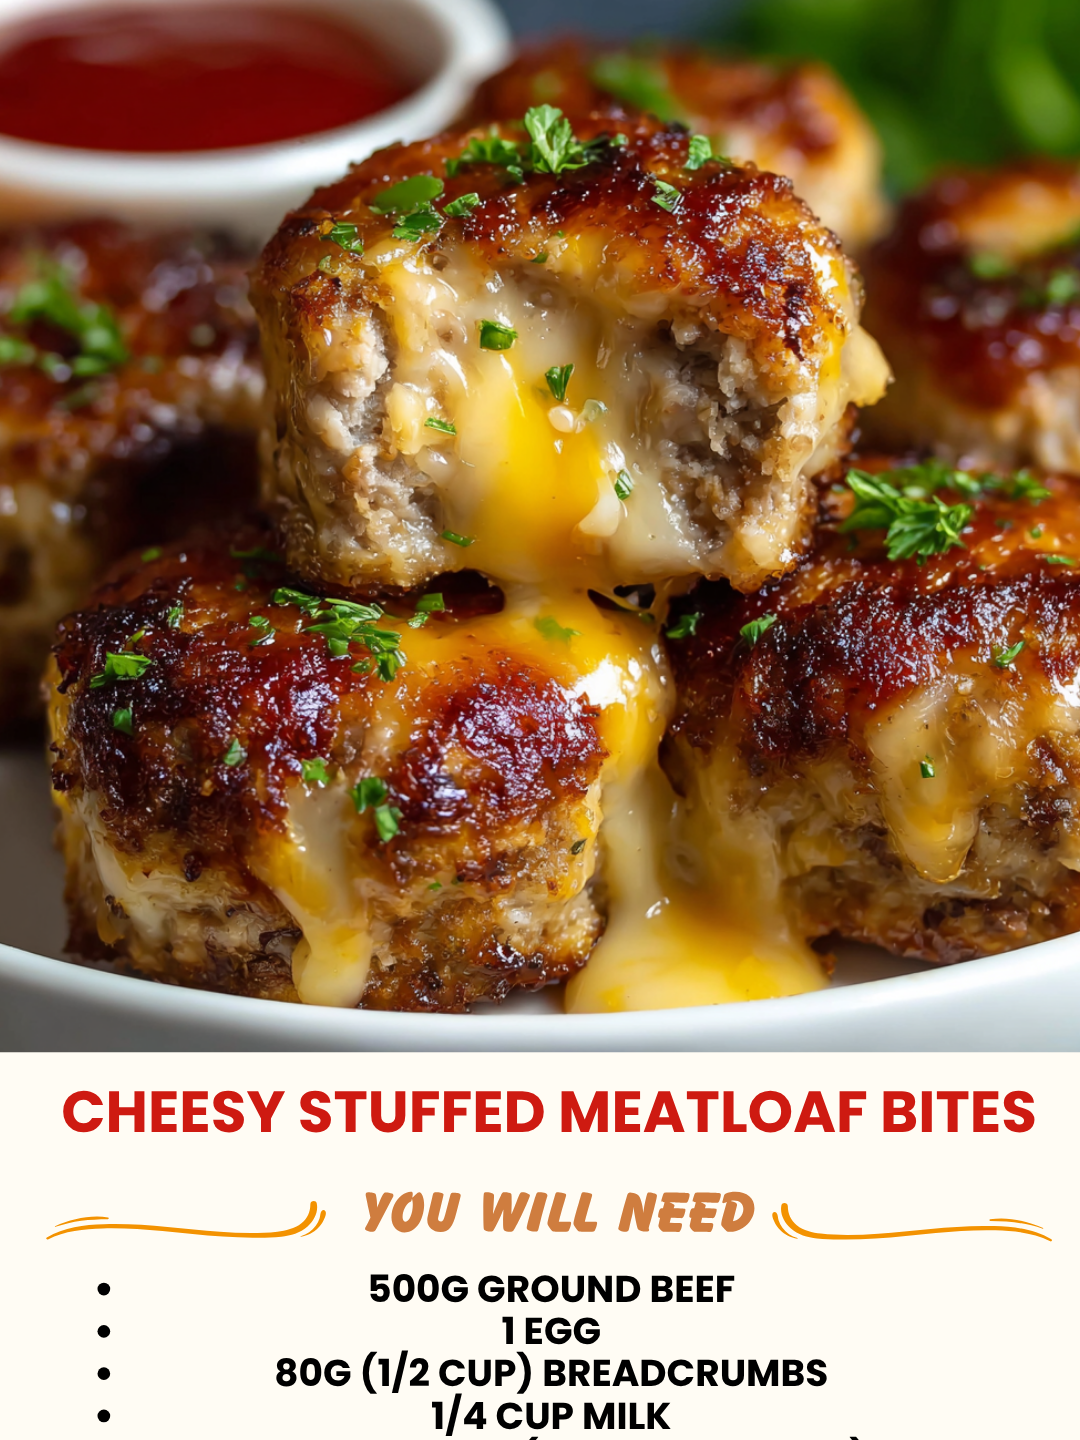
Cheesy Stuffed Meatloaf Bites: A Cozy, Comforting Weeknight Winner
You know that feeling when you’re standing in front of your fridge at 5 p.m., completely uninspired, and you need dinner on the table in less than an hour? That’s exactly where I was last Tuesday when my partner texted asking what was for dinner. I had ground beef thawing, some cheddar that needed using, and honestly, I was tired of regular meatloaf. So I thought: what if I made meatloaf bites instead? And what if I stuffed them with melted cheese?
That’s how Cheesy Stuffed Meatloaf Bites became my new favorite weeknight solution. These little guys are basically everything you love about meatloaf—that savory, comforting, nostalgic vibe—but in bite-sized form with a gooey cheese surprise in the middle. They’re crispy on the outside, tender inside, and honestly? They’re kind of fun to make. Your kids will love them, your partner will ask for seconds, and you’ll feel like you actually cooked something impressive even though it took you thirty minutes.
I’m calling these a weeknight winner because they’re forgiving, customizable, and they make excellent leftovers. You can prep them ahead, freeze them raw, or bake a batch and reheat them throughout the week. They’re not fancy—they’re just really, really good comfort food that happens to feel a little bit special because of that cheese center.
If you’re looking for more easy weeknight recipes like this, follow me on HaileeRecipes on Pinterest where I share all my go-to shortcuts and family favorites.
Why You’ll Love This Recipe
They’re genuinely quick. From prepping to pulling them out of the oven takes about forty-five minutes start to finish. That’s faster than most takeout, and way cheaper.
The cheese factor is real. There’s something deeply satisfying about biting into a meatloaf and hitting that melted cheese pocket. It’s like a little surprise every single time, and honestly, it makes them feel fancier than they are.
They’re portion-controlled without feeling restrictive. You’re not staring down a huge slab of meatloaf. You grab a bite or two (or five), and you’re done. This is great if you’re trying to be mindful about portions but don’t want to feel deprived.
Leftovers are actually better the next day. The flavors meld, the cheese sets up differently, and they reheat beautifully. I’ve eaten these cold straight from the fridge, and I’m not ashamed to admit it.
They’re endlessly customizable. Swap the cheese, add bacon, throw in different herbs—this recipe is a template, not a rule book. I’ll give you all the flexibility you need.
Ingredients
- 1 pound ground beef (80/20 blend works best—you want a little fat for moisture)
- 1/2 cup panko breadcrumbs (keeps them tender, not dense)
- 1/4 cup whole milk (soaked into the breadcrumbs)
- 1 large egg
- 1/2 cup sharp cheddar cheese, shredded (for stuffing, plus extra for topping)
- 1/4 cup grated Parmesan cheese
- 1/2 teaspoon garlic powder
- 1/2 teaspoon onion powder
- 1/4 teaspoon black pepper
- 3/4 teaspoon kosher salt (adjust to taste)
- 2 tablespoons fresh parsley, finely chopped (optional but nice)
- 2 tablespoons ketchup (for topping)
- 1 tablespoon butter or oil (for the baking sheet)
Hailee’s Tip: Don’t skip the milk-soaked breadcrumbs step. This is what keeps the meatloaf bites from turning into little hockey pucks. The breadcrumbs absorb the milk and keep everything moist as it cooks.
Hailee’s Tip: Use sharp cheddar if you can. It has more flavor than mild, so you actually taste the cheese inside instead of just a vague creamy sensation.
Hailee’s Tip: If your beef is really lean, add an extra tablespoon of milk to the mixture. Lean beef can get dry, and we’re not having that.
Optional Add-Ins and Variations
This is where you make this recipe yours. Here are my favorite tweaks:
- Crispy bacon lover: Crumble 3 slices of cooked bacon into the meat mixture and add a little bacon into the cheese stuffing too. Your life will change.
- Jalapeño situation: Dice up one jalapeño (seeds removed if you don’t want heat) and mix it into the meat. Pair with pepper jack cheese inside instead of cheddar.
- Mushroom magic: Finely chop 1/2 cup mushrooms and sauté them quickly before mixing into the meat. Adds earthiness and moisture.
- Italian vibes: Use Italian seasoning instead of garlic and onion powder, mix in fresh basil, and use mozzarella for stuffing instead of cheddar.
- Worcestershire punch: Add 1 tablespoon Worcestershire sauce to the meat mixture for deeper, more complex flavor.
Step-by-Step Method
Step 1: Get your mise en place ready. I’m serious about this. Chop your parsley, shred your cheese, crack your egg into a bowl. This makes the actual assembly way less chaotic. Preheat your oven to 375°F and line a baking sheet with foil or parchment. Rub it lightly with butter or oil so nothing sticks.
Step 2: Make the breadcrumb mixture. Pour the milk over the panko in a small bowl and let it sit for about two minutes. It’ll absorb the milk and become this soft, paste-like texture. This is exactly what you want.
Step 3: Combine everything gently. Put the ground beef in a large bowl. Add the milk-soaked breadcrumbs, egg, Parmesan, garlic powder, onion powder, salt, pepper, and parsley. Here’s the important part: don’t overwork it. Use your hands and mix just until everything is combined. Overworking the meat makes it tough and dense. You want it to feel like you’re being gentle with it.
Step 4: Portion and stuff. This is the fun part. Wet your hands slightly (this prevents sticking), and grab about 2 tablespoons of the meat mixture. Roll it into a ball in your palm. Using your thumb, poke a little hole in the center—not all the way through, just a pocket. Stuff about a teaspoon of shredded cheddar into that pocket, then gently seal it up by rolling it in your palm again. The cheese should be enclosed inside.
What I messed up the first time: I tried to stuff them without wetting my hands, and the meat stuck to everything. I also overstuffed them, and the cheese leaked everywhere. Start conservative with the cheese amount. You can always add more next time.
Step 5: Arrange and top. Place each stuffed meatball on your prepared baking sheet, spacing them about an inch apart. Mix the ketchup with a tiny splash of water to thin it slightly, then brush a little on top of each bite. Sprinkle with a tiny bit of extra cheddar if you’re feeling generous (I always am).
Step 6: Bake. Pop them in the oven for 18 to 22 minutes. They’re done when they’re browned on the outside and cooked through inside. A meat thermometer should read 160°F in the center. If you don’t have a thermometer, cut one open to check—they should have no pink inside.
Step 7: Rest for five minutes. I know you want to eat them immediately. Wait five minutes anyway. This lets the cheese set up slightly and makes them less likely to fall apart when you pick them up.
Common Mistakes to Avoid
Using ground beef that’s too lean. Lean beef is healthier on paper but drier in reality. The 80/20 blend is your sweet spot. The fat keeps everything moist and flavorful.
Skipping the milk-soaked breadcrumbs. I know I mentioned this already, but it’s that important. Dry breadcrumbs won’t absorb moisture, and your bites will be dense and sad.
Overmixing the meat. This develops the gluten in the breadcrumbs and makes everything tough. Mix until just combined, then stop. Your hands will thank you.
Making them too big. These are bites, not meatballs. If you make them huge, they take forever to cook and the outside gets done before the inside is ready. Stick with about 2 tablespoons of meat per bite.
Forgetting to wet your hands. Seriously. This makes the whole stuffing process about a thousand times easier.
Overstuffing with cheese. The cheese will leak out during cooking and burn on your pan. A teaspoon per bite is plenty.
My Tested Substitutions
Ground turkey: You can absolutely use ground turkey instead of beef. It’s leaner, so add an extra tablespoon of milk to the breadcrumb mixture and maybe an extra egg yolk for richness. The cooking time stays the same.
Ground pork: This is actually amazing. Ground pork is naturally a little more tender than beef, so these come out incredibly moist. Use the same proportions.
Cheese options: I’ve tested sharp cheddar, pepper jack, mozzarella, and even a mix of cheddar and cream cheese. They all work. Avoid soft cheeses like brie—they’ll leak everywhere.
Breadcrumbs: Panko is my first choice, but regular breadcrumbs work too. You might need slightly less milk since they’re finer. Crushed crackers (like saltines) also work in a pinch.
Egg: If you’re out of eggs, use 3 tablespoons of milk mixed with 1 tablespoon of cornstarch. It acts as a binder and works surprisingly well.
How to Customize
The beauty of this recipe is that it’s basically a template. Here’s how to make it completely your own:
For a Mediterranean vibe: Add dried oregano and basil to the meat mixture, use feta cheese for stuffing, and top with sun-dried tomatoes instead of ketchup.
For a smoky flavor: Add 1/2 teaspoon smoked paprika to the meat, use smoked cheddar for stuffing, and brush with a mix of ketchup and barbecue sauce.
For a veggie boost: Finely mince mushrooms, zucchini, or bell peppers and sauté them first, then mix into the meat. This adds moisture and nutrition without changing the flavor too much.
For spice lovers: Add cayenne pepper to the meat mixture, use pepper jack or jalapeño cheddar for stuffing, and top with sriracha instead of ketchup.
Serving Ideas
These little bites are versatile. Here’s how I serve them:
- Classic weeknight dinner: Serve with mashed potatoes and roasted green beans. Feels like home.
- Quick lunch: Pair with a simple salad and some crusty bread for dipping into any pan juices.
- Appetizer situation: Make them slightly smaller and serve with a dipping sauce (ketchup, barbecue sauce, or even a creamy ranch).
- Grain bowl: Serve over rice or cauliflower rice with roasted veggies and a drizzle of your favorite sauce.
- Sandwich: Slice them open and serve on a toasted bun with melted cheese and pickles. Basically a gourmet slider.
Meal Prep and Storage
Make-ahead: You can assemble these up to 24 hours ahead. Cover them with plastic wrap and refrigerate. Add 2 to 3 minutes to the baking time if cooking from cold.
Freezing raw: Freeze them on a baking sheet for 2 hours, then transfer to a freezer bag. They’ll keep for up to 3 months. Bake from frozen, adding 5 to 8 minutes to the cooking time.
Freezing cooked: Let them cool completely, then freeze in a single layer before transferring to a freezer bag. They’ll keep for up to 3 months. Reheat in a 350°F oven for 8 to 10 minutes.
Refrigerator storage: Cooked bites keep for up to 4 days in an airtight container. Reheat gently in a 325°F oven so the cheese doesn’t get weepy.
Pro tip: These are honestly fine cold, straight from the fridge. I’ve eaten them as a snack standing over the sink, and I regret nothing.
Nutritional Breakdown
Here’s what you’re looking at per serving (assuming 12 bites total):
- Calories: 145
- Protein: 12g
- Carbs: 4g
- Fat: 8g
- Fiber: 0g
- Sodium: 280mg
Note: These numbers are estimates based on standard ingredients. They’ll vary depending on your specific brands and how much cheese you stuff inside.
Final Thoughts
Cheesy Stuffed Meatloaf Bites have genuinely become my go-to when I need dinner fast but don’t want to sacrifice flavor or effort. They’re the kind of recipe that feels like you’re doing something special even though you’re really just using ingredients you probably already have on hand.
What I love most is that they work for literally any night of the week. Busy Tuesday? Make these. Picky eaters at the table? Make these. Trying to impress someone? Make these. They’re forgiving, they freeze beautifully, and they taste even better as leftovers.
I’d love to hear how you make them yours. Do you add bacon? Swap the cheese? Serve them with something unexpected? Drop me a comment or reach out—I read every single message, and I genuinely love hearing what you’re cooking in your kitchen.
Until next time, keep it cozy, keep it real, and keep cooking things that make you happy.
Hailee
Recipe Card
Cheesy Stuffed Meatloaf Bites
You know that feeling when you're standing in front of your fridge at 5 p.m., completely uninspired, and you need dinner on the table in less than an hour? That's exactly where I was last Tuesday when my partner texted asking what was for dinner. I had ground beef thawing, some cheddar that needed using, and honestly, I was tired of regular meatloaf. So I thought: what if I made meatloaf bites instead? And what if I stuffed them with melted cheesIngredients
Method