Crispy Parmesan Zucchini Chips
Crispy Parmesan Zucchini Chips
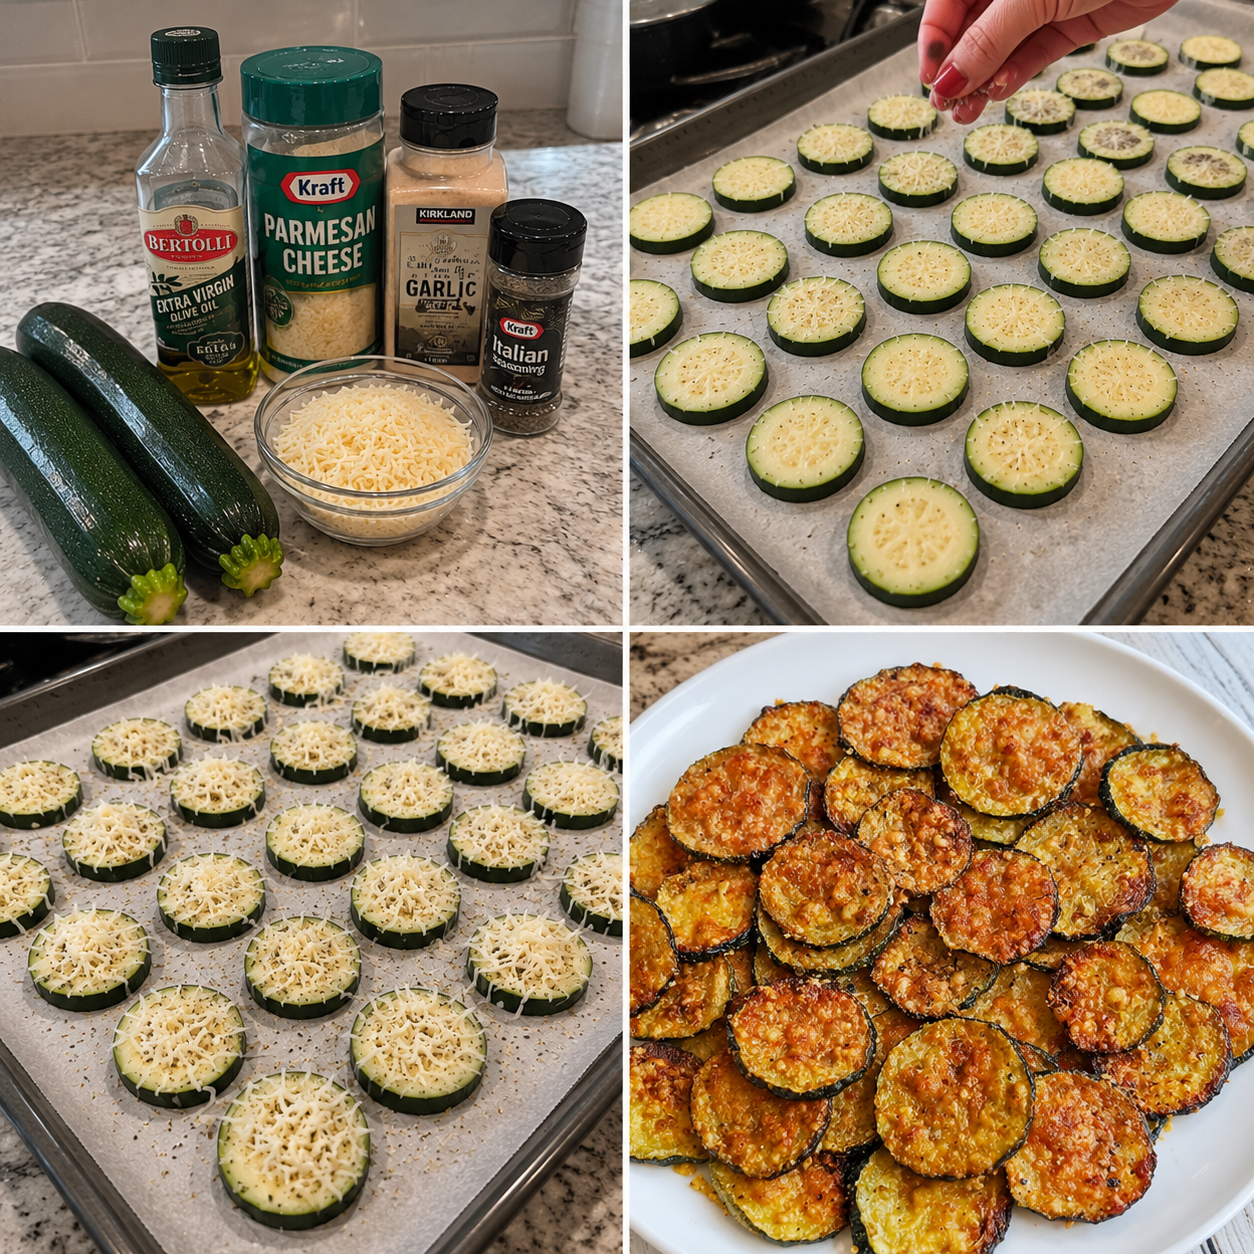
Crispy Parmesan Zucchini Chips: A Cozy Snack That Actually Tastes Good
I’m going to be honest with you right from the start: I invented this recipe on a Tuesday night when I had exactly three zucchinis sitting on my counter and absolutely zero motivation to make a proper dinner. My partner was working late, I’d had a long day, and I was craving something crispy and indulgent without the guilt of reaching for a bag of chips. So I did what I always do when I’m stuck—I raided my pantry and got creative.
What came out of my oven twenty minutes later changed my life in the most delightfully simple way. These Crispy Parmesan Zucchini Chips are crunchy on the outside, tender on the inside, and absolutely addictive. They’re the kind of snack that disappears before you realize you’ve eaten half the batch. And here’s the best part: they’re actually good for you. I know, I know—we’ve all heard the “healthy snack” pitch before, usually followed by something that tastes like cardboard. This isn’t that.
I’ve made these chips at least a hundred times now, for everything from casual weeknight snacking to impressing guests at dinner parties. They work for people doing keto, people just trying to eat more vegetables, people with kids who need something fun to dip, and honestly, people who just really love fried food but want to feel a little less guilty about it. If you’ve ever wondered how to make zucchini actually exciting, this is your answer.
This recipe is foolproof, takes minimal ingredients, and requires almost no special skills. If you can slice a zucchini and turn on your oven, you can make these. And if you want to follow along with more of my cozy, real-life recipes, follow me on HaileeRecipes on Pinterest—I share new ideas constantly.
Why You’ll Love This Recipe
Let me break down what makes these chips so special, because I think it matters to understand the “why” before you dive into the “how.”
They’re genuinely crispy. I’m not talking about that limp, soggy texture you get from most baked zucchini recipes. These are crispy on the outside in a way that makes you feel like you’re eating something indulgent. The secret is in the breading technique and the oven temperature—both of which I’ll walk you through.
The flavor is balanced. Parmesan brings this nutty, salty depth that makes you forget you’re eating a vegetable. Garlic powder, paprika, and a pinch of black pepper round everything out. Nothing tastes boring or one-dimensional.
They come together in minutes. Seriously. From zucchini to plate takes about thirty minutes total, and most of that is hands-off oven time. This is not a complicated recipe.
They’re endlessly customizable. Want to add cayenne for heat? Go for it. Prefer Italian seasoning? Perfect. Want to swap the coating entirely? I’ve got substitution ideas below. This recipe is a starting point, not a rigid rule.
They satisfy multiple dietary needs. Gluten-free, keto-friendly, vegetarian, low-carb—this recipe works for so many different ways of eating. It’s one of those rare dishes that doesn’t feel like a compromise.
Ingredients
- 3 medium zucchini (about 1 pound total), sliced lengthwise into quarter-inch thick strips
- 1 cup grated Parmesan cheese (freshly grated works best, but pre-shredded is fine)
- 1/2 cup panko breadcrumbs (or almond flour for gluten-free)
- 1/2 teaspoon garlic powder
- 1/2 teaspoon paprika (smoked or regular, your choice)
- 1/4 teaspoon black pepper
- 1/4 teaspoon sea salt (adjust to taste)
- 2 large eggs, beaten in a shallow bowl
- 2 tablespoons olive oil or avocado oil
- Optional: 1/4 teaspoon cayenne pepper for a little heat
Hailee’s Tip: Use medium zucchini, not the massive ones. The big ones tend to have more seeds and water, which means they’ll be less crispy. Also, if your zucchini is particularly watery (which happens in summer), pat the slices dry with paper towels before breading. This step is honestly the difference between crispy and soggy.
Hailee’s Tip: Freshly grated Parmesan makes a noticeable difference here. Pre-shredded cheese has anti-caking agents that can make your coating a little less cohesive. If you only have pre-shredded, it’ll still work—just know that fresh is slightly better.
Hailee’s Tip: Don’t skip the oil. I know it seems counterintuitive when you’re trying to make something “healthy,” but a light coating of oil in the pan is what creates that crispy exterior. Trust me on this.
Optional Add-Ins and Variations
This is where you can make this recipe your own. Here are some of my favorite tweaks:
- Italian seasoning: Replace the garlic powder and paprika with one teaspoon of Italian seasoning. It gives the chips a more herbaceous vibe.
- Lemon zest: Add the zest of one lemon to your breading mixture. It brings brightness and cuts through the richness of the Parmesan.
- Everything bagel seasoning: Use this instead of the garlic powder and paprika for a fun, trendy twist. It adds sesame seeds and poppy seeds for extra texture.
- Spicy kick: Add 1/4 teaspoon cayenne pepper or a pinch of red pepper flakes to the breading.
- Ranch vibes: Mix in 1/2 teaspoon dried dill, 1/4 teaspoon onion powder, and a tiny pinch of dried chives.
- Parmesan and truffle: Add 1/2 teaspoon truffle oil to your beaten eggs for a fancy-pants version.
Step-by-Step Method
Step 1: Prep your zucchini. Wash your zucchini and slice them lengthwise into quarter-inch thick strips. I use a mandoline for this because it’s faster and more consistent, but a sharp knife works too (just go slowly and be careful—mandolines are efficient but also unforgiving). If your zucchini slices are particularly wet, pat them dry with paper towels. This is genuinely important for crispiness.
Step 2: Set up your breading station. You’re going to need three shallow bowls or plates. In the first, beat your two eggs together. In the second, combine your Parmesan, panko, garlic powder, paprika, black pepper, and salt. Whisk it all together so the seasonings are evenly distributed. Leave the third bowl empty for now—that’s where you’ll place your breaded zucchini before baking.
Step 3: Bread your zucchini. This is the fun part. Take one zucchini slice, dip it into the egg, let the excess drip off, then press it into your Parmesan mixture, coating both sides. Place it on your empty bowl or a plate. Repeat until all your zucchini is coated. Don’t worry if the coating isn’t perfectly thick—it’ll crisp up beautifully in the oven.
What I messed up the first time: I didn’t let enough egg drip off before pressing into the Parmesan, which made the coating too wet and gloppy. Now I hold each slice over the egg bowl for a second and let gravity do its thing.
Step 4: Arrange on your baking sheet. Line a large baking sheet with parchment paper. Arrange your breaded zucchini slices in a single layer, leaving a tiny bit of space between each one. Drizzle lightly with olive oil—just a thin coating on top. This is what creates the crispy exterior.
Step 5: Bake. Pop your sheet into a preheated 400-degree Fahrenheit oven for 18 to 22 minutes, until the edges are golden brown and the coating is crispy. The exact time depends on your oven, so start checking around the 18-minute mark. You want them golden, not burnt, but definitely not pale.
What I messed up the second time: I didn’t preheat my oven and tried to bake at 375 degrees. The result was soft and disappointing. High heat and a preheated oven are non-negotiable here.
Step 6: Cool slightly and serve. Let your chips cool for about five minutes on the baking sheet—they’ll continue to crisp up as they cool. Then transfer them to a plate and serve with your favorite dipping sauce. They’re best eaten within a few hours of baking, while they’re still crispy.
Common Mistakes to Avoid
Using watery zucchini without patting dry. Moisture is the enemy of crispiness. Always pat your slices dry with paper towels before breading.
Not preheating your oven. I can’t stress this enough. A preheated oven is essential for getting that crispy exterior. Give it at least fifteen minutes to come up to temperature.
Crowding your baking sheet. If you stack your zucchini chips or place them too close together, they’ll steam instead of bake. Give them breathing room.
Skipping the oil drizzle. I know it seems like it defeats the purpose of making something “healthier,” but that light coating of oil is what creates the crispy texture. Without it, you get more of a baked chip texture, which is fine but not quite as satisfying.
Overbaking. Watch your chips closely toward the end of the baking time. They go from golden to burnt faster than you’d think. Set a timer and check around the 18-minute mark.
Using old Parmesan. If your Parmesan has been sitting in your fridge for six months, it’s lost some of its flavor and can taste a little off. Fresh is better here.
My Tested Substitutions
For the breadcrumb: Almond flour creates a slightly different texture—less crispy, more tender—but it works beautifully and is gluten-free. Use the same amount. You can also use crushed pork rinds for a keto version, though the flavor will be slightly different.
For the Parmesan: Asiago cheese is a great substitute and gives a slightly different flavor profile. Pecorino Romano is sharper and more intense. I’d stick with one of these two if you’re not using Parmesan.
For the egg: If you’re vegan, use aquafaba (the liquid from a can of chickpeas) or a plant-based egg replacer. It won’t bind quite as well, but it’ll still work.
For the oil: Any neutral oil works here—avocado oil, grapeseed oil, even vegetable oil. I prefer avocado oil because it has a higher smoke point, but it’s really about what you have on hand.
For the panko: Regular breadcrumbs work, but they won’t be quite as crispy. Crushed cornflakes are surprisingly good if you want a different texture. Crushed pork rinds work for keto.
How to Customize
Here’s the thing I love about this recipe: it’s a template, not a prescription. Once you understand the basic technique—bread, bake, crisp—you can play around with flavors endlessly.
Want it spicy? Add cayenne, red pepper flakes, or even a tiny bit of hot sauce to your egg mixture. Want it herbaceous? Swap in Italian seasoning or add fresh herbs like basil or oregano to your breading. Want it fancy? Add truffle oil or a pinch of smoked paprika. Want it fun? Use everything bagel seasoning or furikake for an Asian-inspired twist.
The ratio of Parmesan to panko is pretty flexible too. If you like a cheesier chip, increase the Parmesan to 1.25 cups and reduce the panko slightly. If you prefer more breadcrumb texture, do the opposite.
The only thing I wouldn’t mess with is the basic baking technique—the temperature, the oil, and the drying step. Those are what make this work.
Serving Ideas
These chips are amazing on their own, but they’re even better with something to dip into. Here are my favorite pairings:
- Marinara sauce: The classic pairing. Warm it up or keep it at room temperature.
- Garlic aioli: Mix mayo with minced garlic, lemon juice, and a pinch of salt. It’s indulgent and delicious.
- Tzatziki: Cool, creamy, and herbaceous. Perfect for summer.
- Ranch dressing: I know, I know, but it works. Use a good quality one or make your own.
- Lemon aioli: Mayo, lemon juice, and garlic. It’s bright and cuts through the richness of the Parmesan.
- Sriracha mayo: For people who like a little heat.
- Pesto: If you have homemade pesto on hand, it’s incredible with these chips.
- Hummus: Keeps things lighter and adds protein.
Honestly, these chips work with almost any dipping sauce, so don’t feel limited by this list.
Meal Prep and Storage
These chips are best eaten fresh and warm, straight from the oven. That said, here’s how to make them work with your real life:
Storing leftovers: Keep any leftover chips in an airtight container in the fridge for up to three days. They’ll lose some crispiness as they sit, but they’re still delicious cold or reheated.
Reheating: Pop them back in a 350-degree oven for five to ten minutes to re-crisp them. Don’t use the microwave—it’ll make them soggy.
Making ahead: You can bread your zucchini up to eight hours ahead of time and store it in the fridge on a parchment-lined plate. Just bake when you’re ready to serve.
Freezing: You can freeze unbaked, breaded zucchini slices for up to three months. Bake directly from frozen, adding a few extra minutes to the baking time. They won’t be quite as crispy as fresh, but they’re still good.
Batch cooking: This recipe doubles easily. Make a big batch on Sunday and enjoy them throughout the week as a snack or side dish.
Nutritional Breakdown
These chips are surprisingly balanced. Here’s what you’re looking at per serving (assuming four servings from one batch):
- Calories: approximately 180
- Protein: 12 grams
- Carbohydrates: 8 grams
- Fat: 12 grams
- Fiber: 1.5 grams
The protein comes from the Parmesan and the egg, which makes these surprisingly satisfying as a snack. They’re low in carbs, which makes them keto-friendly, and the fat content is mostly from the oil and cheese—the good kind.
If you’re tracking macros, these fit nicely into most diets. They’re not a “free” food, but they’re a solid choice when you’re craving something crispy and indulgent.
Final Thoughts
I genuinely believe that good food doesn’t have to be complicated or time-consuming. These Crispy Parmesan Zucchini Chips are proof of that. They’re simple, they’re delicious, and they prove that eating your vegetables doesn’t have to feel like a sacrifice.
I’ve served these to people who claim they don’t like zucchini, and they’ve converted them. I’ve made them for dinner parties where they disappeared before the main course. I’ve eaten them straight from the oven at midnight when I couldn’t sleep. They’re that kind of recipe—the kind that works in almost any situation.
My hope is that you’ll make these, fall in love with them the way I have, and then make them again and again until they become part of your regular rotation. Maybe you’ll customize them with your own flavors. Maybe you’ll find a dipping sauce combination that becomes your signature. That’s the whole point—to give you