Cute Bear-Shaped Mini Pizzas
Cute Bear-Shaped Mini Pizzas
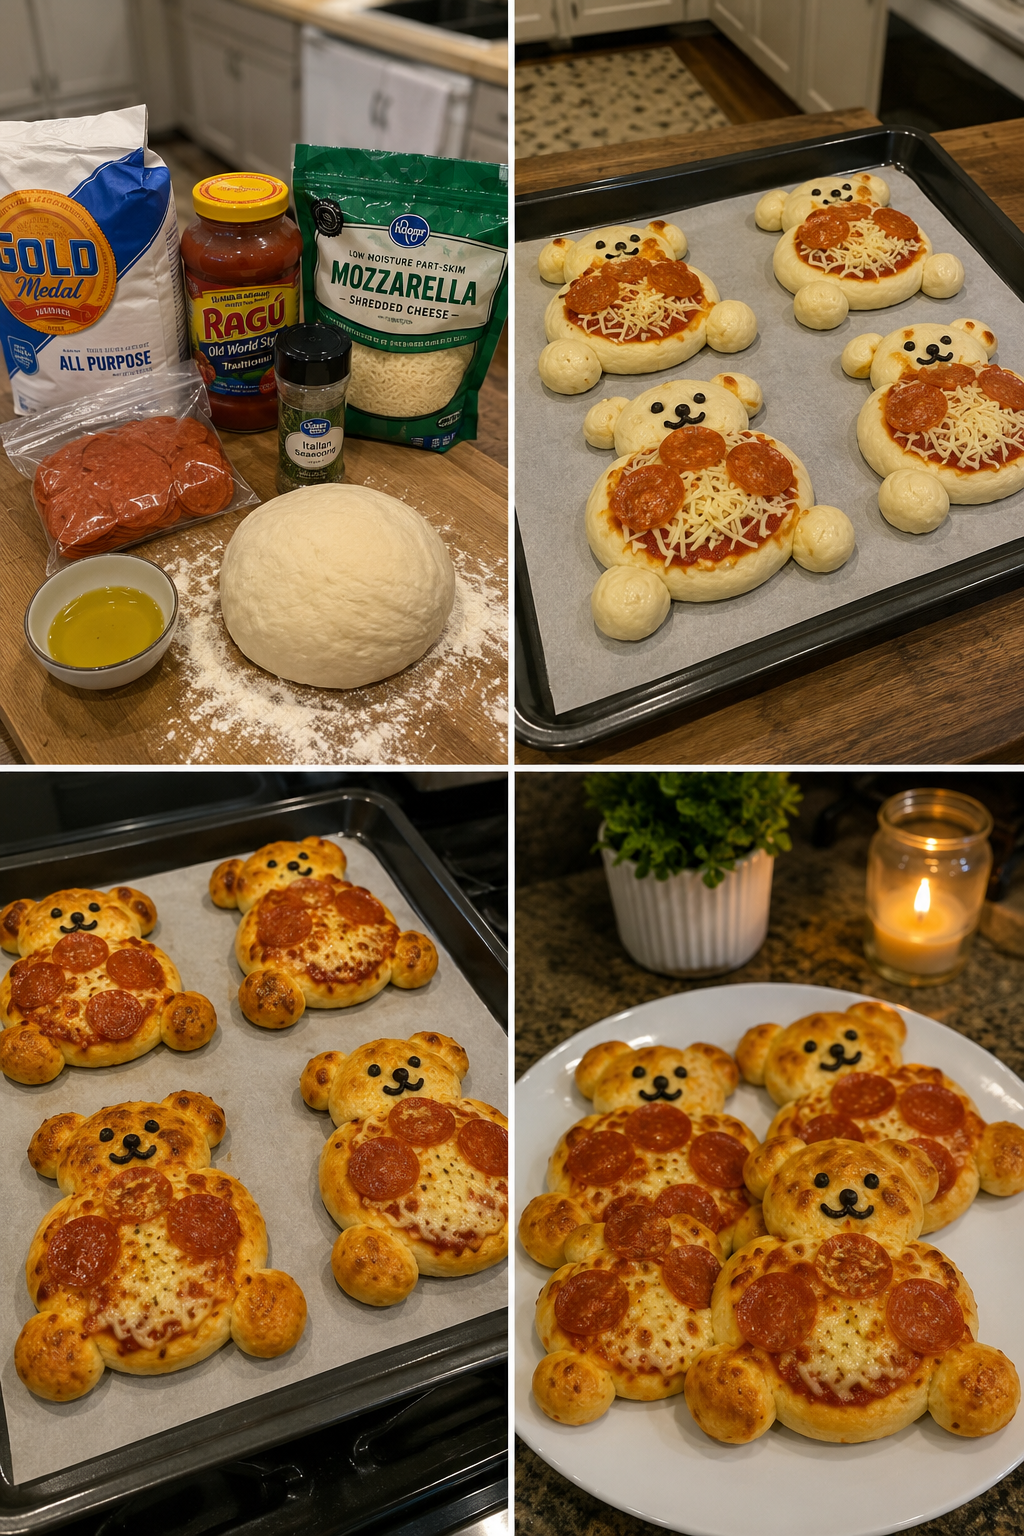
Cute Bear-Shaped Mini Pizzas: A Recipe That Brings Joy to Dinner
I’ll be honest—I created these cute bear-shaped mini pizzas on a random Tuesday night when I was feeling a little burnt out. You know that feeling? When you’re tired of the same old routine, and even cooking feels like a chore instead of a joy? I was standing in my kitchen staring at a ball of pizza dough I’d made earlier that week, and I thought, “What if I just… made it fun?”
My niece was coming over for dinner, and I remember thinking about how she always lights up when food looks playful. So I grabbed some cookie cutters, rolled out that dough, and started experimenting. Within ten minutes, I had these adorable little bear faces staring back at me from the baking sheet. And honestly? It completely changed the energy of that evening. My niece was so excited she helped me add the toppings, and my brother couldn’t stop taking photos for his Instagram.
That’s when I realized something: cute bear-shaped mini pizzas aren’t just about making dinner look Instagram-worthy (though they absolutely do). They’re about bringing a little intentional joy back into something as simple as feeding the people you love. They’re also incredibly practical—perfect for picky eaters, fun for meal prep, and honestly just more enjoyable to eat than a regular slice.
These mini pizzas come together faster than you’d think, require zero fancy equipment, and taste just as good as any pizza you’d order. Whether you’re feeding kids, hosting a casual dinner party, or just want to make a Tuesday night feel special, this recipe is going to become your new favorite. Follow me on HaileeRecipes on Pinterest for more recipes that make everyday cooking feel like an adventure.
Why You’ll Love This Recipe
First, let’s talk about why this actually works beyond just being cute. The individual portions mean everyone gets the perfect ratio of crust to toppings—no more fighting over the crispy edge or the center bite. They bake faster than a full-size pizza, which means less time standing around your kitchen waiting for dinner.
The bear shape is also surprisingly forgiving. I’m not a pastry chef, and neither are you probably, but cookie cutters do most of the work for you. You get a professional-looking result without any actual skill required. It’s the kind of recipe that makes you look like you spent way more effort than you actually did.
And here’s my favorite part: they freeze beautifully. I often make a double batch and freeze half the unbaked bears. Then on a hectic Wednesday, I can have homemade pizza on the table in about 20 minutes. That’s genuinely life-changing if you’re juggling a busy schedule.
Ingredients
- 1 pound pizza dough (store-bought or homemade—I won’t judge either way)
- 1/2 cup pizza sauce or marinara (your favorite brand is perfect)
- 1 1/2 cups shredded mozzarella cheese (low-moisture works best)
- 2 tablespoons olive oil (for brushing the pan and dough)
- 1 teaspoon Italian seasoning (dried oregano, basil, thyme blend)
- 1/4 teaspoon garlic powder
- Salt and pepper to taste
- Toppings of your choice (pepperoni, fresh basil, sliced bell peppers, mushrooms—whatever you like)
Hailee’s Tip: If you’re using store-bought dough, let it sit on the counter for about 15 minutes before rolling. It’s so much easier to work with when it’s not ice-cold straight from the fridge.
Hailee’s Tip: I always use low-moisture mozzarella for mini pizzas because it melts more evenly and doesn’t make the dough soggy. Fresh mozzarella is delicious, but save that for a fancier pizza night.
Hailee’s Tip: Don’t skip the Italian seasoning on the crust. It’s such a small thing, but it makes these taste like they came from an actual pizzeria instead of your home kitchen.
Optional Add-Ins and Variations
The beauty of mini pizzas is that you can customize them completely. Here’s what I love to play with:
- Proteins: Pepperoni (the classic), cooked sausage crumbles, diced ham, or crumbled bacon
- Veggies: Sliced mushrooms, diced bell peppers, red onion, fresh spinach, or sun-dried tomatoes
- Cheese upgrades: A sprinkle of parmesan on top, or a little ricotta dolloped before baking
- Sauce swaps: Pesto, white sauce (béchamel), or even BBQ sauce if you’re feeling adventurous
- Fresh finishes: Fresh basil or arugula added right after they come out of the oven
The key is not to overload them. I learned this the hard way when I got overzealous with toppings and ended up with soggy bears. A light hand is your friend here.
Step-by-Step Method
Step 1: Prep Your Workspace
Preheat your oven to 425°F. Line a large baking sheet with parchment paper and brush it lightly with olive oil. This prevents sticking and gives you crispy bottoms. Trust me on this.
Step 2: Roll Out Your Dough
Dust your work surface with a little flour and roll out your pizza dough to about 1/4 inch thickness. It doesn’t need to be perfect—pizza dough is forgiving. If it springs back, let it rest for a minute and try again.
Step 3: Cut Your Bears
Here’s where the magic happens. Using a round cookie cutter (I use a 3-inch one, but anywhere from 2.5 to 3.5 inches works), cut out circles for the bear heads. Then use a smaller cutter (about 1.5 inches) to cut out four circles for the ears and limbs. You can also cut out tiny circles for the snout and eyes using a straw or the end of a wooden spoon if you want to get fancy.
What I Messed Up: The first time I made these, I tried to reroll the scraps immediately. The dough was too warm and kept shrinking. Now I let the scraps rest in the fridge for 10 minutes before rerolling. Game changer.
Step 4: Arrange on Your Pan
Place your large circle (the head) on the prepared baking sheet. Position the four smaller circles around it to create ears on top and paws on the sides. Don’t worry if there are small gaps—the dough will puff up slightly and fill them in.
Step 5: Season the Crust
Brush the entire bear lightly with olive oil. Sprinkle with Italian seasoning, garlic powder, salt, and pepper. This is what makes the crust taste like restaurant pizza.
Step 6: Add Your Sauce
Spread about a tablespoon of pizza sauce onto each bear, concentrating it on the head portion. Don’t go all the way to the edges—you want some crust to stay crispy and visible.
Step 7: Cheese Time
Sprinkle mozzarella cheese over each bear, using about 2 to 3 tablespoons per pizza. Again, don’t overdo it. You want the cheese to melt into the sauce, not create a thick layer that won’t cook through.
Step 8: Add Your Toppings
If you’re using pepperoni, ham, or other proteins, add them now. Fresh veggies can go on now too. Just keep it light—these are mini pizzas, not loaded nachos.
Step 9: Bake
Pop your bears into the preheated oven for 12 to 15 minutes. You’re looking for the crust to be golden brown and the cheese to be melted and slightly bubbly. The exact time depends on your oven, so start checking around the 12-minute mark.
Step 10: Cool Slightly and Serve
Let them cool for about 2 minutes before serving. They’ll be hot, so warn anyone eating them, especially kids. If you’re adding fresh herbs like basil, do it right after they come out of the oven so the heat wilts them slightly.
Common Mistakes to Avoid
Overloading with toppings: I know it’s tempting to pile everything on, but restraint is key. Too many toppings = soggy crust and uneven cooking.
Using wet ingredients without draining: If you’re using fresh mushrooms or tomatoes, pat them dry first. Excess moisture will make your pizza soggy.
Not preheating the oven: This seems obvious, but I’ve definitely forgotten. A properly preheated oven is the difference between crispy and doughy.
Crowding the pan: Don’t try to fit too many bears on one sheet. They need a little breathing room to cook evenly.
Using cold dough straight from the fridge: Let it come to room temperature first, or at least 15 minutes on the counter. Cold dough is harder to shape and takes longer to cook.
My Tested Substitutions
No pizza sauce? Use marinara, pasta sauce, or even a thin spread of tomato paste mixed with a little water. All work beautifully.
Dairy-free: Use a good-quality dairy-free mozzarella. Honestly, some brands are better than others, so this might take a little trial and error. I’ve had great results with brands that specifically say they melt well.
Gluten-free: Use a gluten-free pizza dough. The cooking time might be slightly different, so keep an eye on them. They tend to brown a bit faster.
No cookie cutters? Use a glass or the rim of a jar. Or honestly, just make little free-form bear shapes with your hands. They won’t be perfect, but they’ll still taste amazing.
Whole wheat dough: This works great and adds a nice nutty flavor. Just know that it might need an extra minute or two in the oven.
How to Customize
One of my favorite things about this recipe is how adaptable it is. Here are some themed variations I’ve made:
The Pepperoni Classic: Just sauce, cheese, and pepperoni. Sometimes simple is best.
The Veggie Lover: Layer on sautéed mushrooms, bell peppers, spinach, and olives. Add a little fresh basil after baking.
The Meat Lovers: Pepperoni, sausage, and bacon. It’s indulgent and absolutely delicious.
The White Pizza: Skip the red sauce and use a thin layer of ricotta mixed with garlic and herbs. Top with mozzarella and fresh spinach.
The BBQ Chicken: Use BBQ sauce instead of pizza sauce, add shredded cooked chicken, and a little red onion. Top with cheddar if you like.
Serving Ideas
These bears are cute on their own, but here’s how I like to serve them:
- With a simple green salad: The freshness balances the richness of the cheese and sauce perfectly.
- With garlic bread or breadsticks: If you’re feeling indulgent, cut some of your leftover dough into strips, brush with garlic oil, and bake alongside the bears.
- With marinara for dipping: Even though they have sauce on them, having extra for dipping is fun.
- As a party appetizer: Make them slightly smaller and serve them on a platter. They disappear fast.
- With roasted veggies: Roast some broccoli or zucchini on the side for a more balanced meal.
Meal Prep and Storage
This is where these pizzas really shine for me. Here’s my system:
Freezing unbaked bears: After you’ve topped them but before baking, freeze them on the baking sheet for about 2 hours. Then transfer them to a freezer bag and store for up to a month. When you want them, bake directly from frozen, adding about 5 extra minutes to the cooking time.
Storing leftovers: Let them cool completely, then store in an airtight container in the fridge for up to 3 days. Reheat in a 350°F oven for about 5 minutes, or in the toaster oven until warmed through.
Can you freeze baked bears? Yes, but I find they’re best eaten fresh or reheated from the fridge. If you do freeze baked ones, let them thaw in the fridge first, then reheat gently.
Nutritional Breakdown
Keep in mind that nutrition varies based on your specific toppings and the exact size of your bears. Here’s a rough estimate per pizza (made with basic cheese and sauce, no additional toppings):
- Calories: 280 to 320
- Protein: 12g
- Carbs: 28g
- Fat: 13g
- Fiber: 1g
If you add pepperoni or other proteins, you’ll add roughly 50 to 100 calories per pizza. Veggies add minimal calories but lots of nutrients and fiber.
Final Thoughts
Making cute bear-shaped mini pizzas has genuinely become one of my favorite ways to cook. There’s something about taking something as ordinary as pizza and making it playful that just changes the whole vibe of dinner. It’s not harder than making regular pizza—it’s just more fun.
I love that this recipe works whether you’re cooking for picky kids, hosting friends, or just wanting to make a regular Tuesday feel a little special. And the fact that they freeze beautifully means you can make a big batch and have homemade pizza ready whenever you need it.
If you make these, I’d genuinely love to hear how they turn out. Did your kids help decorate them? Did you come up with a fun topping combination? These little moments of joy in the kitchen are what cooking is really about for me.
Happy cooking, friend. I hope these bears bring as much joy to your table as they’ve brought to mine.
—
Recipe Card
Cute Bear-Shaped Mini Pizzas
Ingredients
Method
- Preheat oven to 425°F and line a baking sheet with parchment paper brushed with olive oil.
- Roll out pizza dough to 1/4 inch thickness on a floured surface.
- Using a 3-inch round cookie cutter, cut circles for bear heads. Using a 1.5-inch cutter, cut four circles per bear for ears and paws.
- Arrange on baking sheet with smaller circles positioned around each large circle to form bear shape.
- Brush entire bears with olive oil and sprinkle with Italian seasoning, garlic powder, salt, and pepper.
- Spread about 1 tablespoon pizza sauce on each bear head, leaving edges clear.
- Sprinkle 2 to 3 tablespoons mozzarella cheese over each pizza.
- Add desired toppings, keeping them light to avoid sogginess.
- Bake for 12 to 15 minutes until crust is golden brown and cheese is melted and bubbly.
- Cool for 2 minutes before serving. Add fresh herbs if desired.