No-Bake S’mores Pudding Cups
No-Bake S'mores Pudding Cups
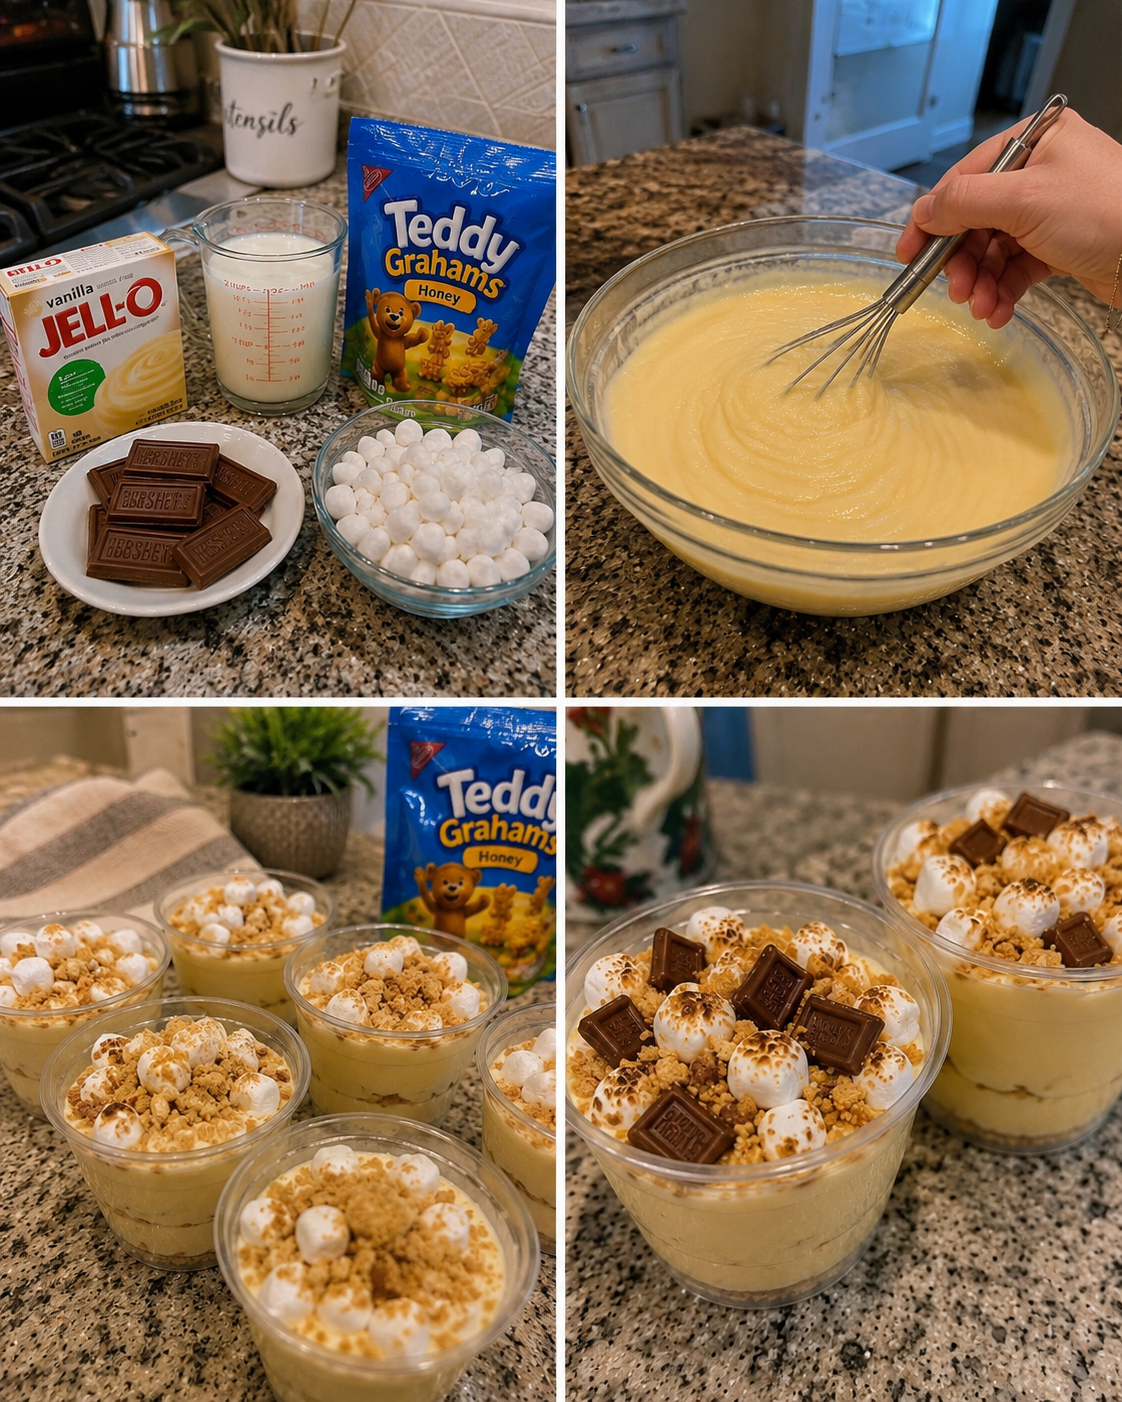
No-Bake S’mores Pudding Cups: A Cozy Dessert That Actually Works
Let me tell you how this recipe came to life. It was one of those random Tuesday nights where I was standing in my kitchen at 9 PM, absolutely craving s’mores but with zero motivation to haul out my camping gear or even turn on the oven. My kids were already in their pajamas, my partner was settled on the couch with a book, and I had maybe fifteen minutes before everyone collectively lost their minds asking for a snack.
I started pulling things from my pantry—chocolate pudding mix, graham crackers, marshmallows—and honestly, I was just throwing together whatever felt right. But then something magical happened. Those layers of creamy chocolate, buttery graham cracker crumbs, and fluffy marshmallow topping came together into something that genuinely tasted like s’mores without any of the fuss. My daughter took one spoonful and said, “Mom, this is better than the real thing,” which, let’s be honest, is the highest compliment a home cook can get.
That’s when I knew I had to develop this into a proper recipe. No-Bake S’mores Pudding Cups are exactly what they sound like: individual dessert cups layered with chocolate pudding, crushed graham crackers, and toasted marshmallow, all ready to eat in about ten minutes with basically zero cooking skills required. They’re perfect for busy weeknights, potlucks, or those moments when you want something indulgent but don’t want to spend your entire evening in the kitchen. Whether you’re feeding a family, impressing friends, or just treating yourself after a long day, these cups deliver that cozy, nostalgic s’mores flavor every single time.
If you love easy, no-stress desserts that actually taste amazing, keep reading. And if you want more recipes like this one, follow me on HaileeRecipes on Pinterest for all my latest ideas.
Why You’ll Love This Recipe
First, let’s be real: this recipe is ridiculously simple. There’s no baking, no tempering, no fancy equipment. You literally just need a spoon, a bowl, and maybe ten minutes. That alone makes it a winner in my book.
But beyond the ease factor, these pudding cups actually taste incredible. You get that creamy, rich chocolate from the pudding, the buttery, slightly sweet crunch of graham crackers, and that marshmallow fluffiness that makes s’mores so addictive. It’s all the nostalgia and comfort of campfire s’mores, but in a format you can eat while wearing clean clothes on your couch.
I also love how customizable these are. Want to add a little sea salt on top? Go for it. Prefer dark chocolate pudding over milk chocolate? Absolutely. Have some leftover cookies you want to crush up instead of graham crackers? That works too. This recipe is flexible enough to work with what you have on hand, but structured enough that it comes out delicious every time.
Plus, they’re impressive without being pretentious. When you serve these to guests, people always assume you spent way more time on them than you actually did. It’s the best kind of food blogger magic.
Ingredients
- 2 cups whole milk (or use unsweetened almond milk if you prefer—I’ve tested both)
- 2 boxes instant chocolate pudding mix (3.9 oz each—the regular kind, not sugar-free unless that’s your preference)
- 1 cup heavy whipping cream (or whipped topping if you want to skip a step)
- 2 tablespoons powdered sugar (only if using heavy cream; skip if using whipped topping)
- 1 teaspoon vanilla extract (pure vanilla is worth it here)
- 1.5 cups graham cracker crumbs (about 10-12 full crackers, crushed into bite-sized pieces)
- 4 tablespoons unsalted butter, melted
- 2 tablespoons brown sugar (this makes the crumbs taste more like actual s’mores)
- 2 cups mini marshmallows (or regular marshmallows, cut into chunks)
- Pinch of sea salt (for topping, optional but highly recommended)
Hailee’s Tip: Don’t skip the brown sugar mixed into the graham cracker layer. It sounds like a small thing, but it’s what transforms basic crumbs into something that actually tastes like s’mores filling instead of just… crumbs.
Hailee’s Tip: If you’re making these ahead or storing them, use regular whipped topping instead of homemade whipped cream. It holds up better in the fridge and won’t start separating after a day or two.
Hailee’s Tip: Buy pre-crushed graham cracker crumbs if you can find them. I know it sounds lazy, but honestly, it saves time and your hands don’t get all sticky from crushing them yourself. (Though if you want to crush them by hand, just put them in a zip-top bag and go to town with a rolling pin—very therapeutic.)
Optional Add-Ins and Variations
This is where you get to have fun and make the recipe your own. Here are some of my favorite tweaks:
- Chocolate chips: Sprinkle some mini chocolate chips into the pudding layer or between the pudding and graham cracker crumbs. Adds extra richness.
- Salted caramel drizzle: A thin drizzle of salted caramel on top takes these from good to absolutely unforgettable.
- Crushed Oreos: Replace half the graham crackers with crushed Oreos for a cookies-and-cream-s’mores hybrid.
- Peanut butter swirl: Mix a couple tablespoons of peanut butter into the pudding before layering. Trust me on this one.
- Espresso powder: A quarter teaspoon mixed into the pudding deepens the chocolate flavor in a way that’s subtle but noticeable.
- Toasted marshmallows: If you want to get fancy, you can actually torch the marshmallow tops right before serving for that authentic s’mores char.
Step-by-Step Method
Step 1: Make the pudding
Pour the milk into a medium bowl and add both boxes of instant pudding mix. Whisk it together for about two minutes until it thickens up. It should look like actual pudding, not runny, but not so thick that you can’t scoop it. Set it aside while you work on the other layers.
Hailee’s Moment of Truth: The first time I made this, I forgot to whisk the pudding long enough and it came out kind of lumpy. Lesson learned: give it a full two minutes of whisking. Your future self will thank you.
Step 2: Prepare the graham cracker layer
In a small bowl, combine your crushed graham crackers, melted butter, and brown sugar. Mix it until everything is evenly coated and it looks kind of like wet sand. This is your base layer, and it’s going to give you that buttery, slightly sweet crunch that makes s’mores so good.
Step 3: Whip the cream (if using)
If you’re using heavy whipping cream, pour it into a bowl and whip it with an electric mixer until soft peaks form. Add the powdered sugar and vanilla extract, then whip a bit more until you get stiff peaks. If you’re using whipped topping, just let it thaw and you’re ready to go.
Step 4: Layer your cups
Now for the fun part. Grab four to six individual serving cups or mason jars (I usually make six because that’s what fits nicely in my container). Start with a layer of the graham cracker mixture at the bottom—about two tablespoons per cup. Press it down gently so it stays put.
Next, add a layer of chocolate pudding—about three tablespoons per cup. Then add a layer of whipped cream or whipped topping—about two tablespoons per cup. Top everything with a generous handful of mini marshmallows.
Step 5: Chill and serve
Pop these in the fridge for at least thirty minutes before serving. This gives everything time to set and the flavors to meld together. When you’re ready to eat, top with a tiny pinch of sea salt if you’re feeling fancy, and dig in.
Common Mistakes to Avoid
Not whisking the pudding long enough: I mentioned this earlier, but it’s worth repeating. Lumpy pudding is not the vibe. Whisk for the full two minutes.
Skipping the brown sugar in the crumb layer: I know I already said this, but I’m saying it again because it really does make a difference. That brown sugar is what makes it taste like actual s’mores and not just chocolate pudding with random crackers on top.
Using too much whipped cream: It’s tempting to pile it high, but too much whipped cream makes the whole thing feel heavy and overly sweet. Stick to about two tablespoons per cup and you’ll hit that perfect balance.
Not chilling them long enough: I get it—you’re excited to eat them. But thirty minutes in the fridge really does help everything set properly. If you try to eat them right away, the layers get a little mushy and everything kind of blends together.
Forgetting about the sea salt: This isn’t a mistake exactly, but it’s something I see people skip. A tiny pinch of sea salt on top actually makes the chocolate taste more chocolatey and the marshmallow taste more marshmallow-y. Don’t skip it.
My Tested Substitutions
Milk options: I’ve made these with whole milk, two percent milk, and unsweetened almond milk. They all work, though whole milk gives you the creamiest pudding. Almond milk works fine if you’re dairy-free, but the pudding will be slightly less rich.
Whipped topping versus heavy cream: Heavy cream tastes better and feels more homemade, but whipped topping is more stable and holds up better in the fridge. For a weeknight dessert, whipped topping is totally fine. For impressing people, go with heavy cream.
Graham crackers: You can absolutely use honey graham crackers, chocolate graham crackers, or even cinnamon ones. Each brings a slightly different flavor, which is kind of fun. I’ve also used digestive biscuits in a pinch and they worked great.
Pudding mix: Obviously you can use any flavor pudding you want, but chocolate is the classic for s’mores. That said, I’ve had fun with butterscotch pudding mixed with chocolate pudding, and it was delicious.
Marshmallows: Mini marshmallows are easier to layer, but regular marshmallows work too—just cut them into smaller pieces. You can also use marshmallow fluff if that’s what you have on hand, though it’s messier to work with.
How to Customize
The beauty of this recipe is that it’s basically a framework for you to build on. Here are some ways I like to make it my own:
For chocolate lovers: Use dark chocolate pudding instead of milk chocolate, add a layer of chocolate chips, and maybe drizzle some chocolate syrup on top before serving.
For people who like things sweeter: Add an extra layer of marshmallow fluff or caramel sauce. No judgment here.
For people who like things less sweet: Reduce the marshmallows, skip the brown sugar in the crumb layer, or use a less-sweet pudding mix. You could also add a pinch of sea salt to balance out the sweetness.
For people with dietary restrictions: Use sugar-free pudding mix, dairy-free whipped topping, and check your graham crackers for gluten if that matters to you. The recipe is surprisingly adaptable.
Serving Ideas
These pudding cups are pretty versatile in terms of how you serve them:
- As an individual dessert: Just grab a spoon and eat straight from the cup. This is my go-to on a Tuesday night.
- At a potluck: Make them in individual mason jars and stack them in a box. They’re easy to transport and look cute on a dessert table.
- For a dinner party: Serve them in fancy glasses or bowls with a small spoon on the side. Suddenly they feel elegant.
- As a kids’ snack: My children lose their minds for these. They feel special eating something in their own little cup, and honestly, it’s a way healthier dessert than most of the stuff they ask for.
- For a camping trip: Make them at home and transport them in a cooler. It’s like bringing the campfire s’mores experience with you, but without the actual campfire.
Meal Prep and Storage
One of my favorite things about this recipe is how well it stores. You can make these up to three days in advance, which makes them perfect for meal prep or for having on hand when you need a quick dessert.
In the fridge: Store them covered (I use plastic wrap or a lid if your cups have one) for up to three days. The graham cracker layer will soften slightly as it sits, which honestly I kind of like because it becomes more cake-like.
Freezing: I don’t recommend freezing the whipped cream version because it gets weird and separates. But if you make them with whipped topping, you can freeze them for up to two weeks. Just let them thaw in the fridge for a couple hours before eating.
Make-ahead tip: You can prep all the components separately and assemble them the day you want to eat them. Make the pudding the night before, crush and butter your graham crackers ahead of time, and whip your cream that morning. Then just layer them when you’re ready.
Nutritional Breakdown
Here’s what you’re looking at per serving (based on six servings):
- Calories: approximately 320
- Protein: about 3 grams
- Carbohydrates: about 45 grams
- Fat: about 14 grams
- Fiber: less than 1 gram
Look, these are a dessert, so they’re not exactly health food. But they’re not egregiously heavy either, and the portion size is pretty reasonable. The pudding mix does contain some artificial ingredients, so if that matters to you, look for a more natural pudding option at your grocery store.
Final Thoughts
Making these No-Bake S’mores Pudding Cups has become one of my favorite ways to feel like I’m doing something special without actually spending my entire evening in the kitchen. They hit that sweet spot between impressive and easy, between indulgent and not-totally-ridiculous, and between nostalgic and modern.
I think what I love most about this recipe is that it works every single time. There’s no guessing, no failed batches, no cleanup nightmare. Just ten minutes of assembly and you have something that tastes like comfort and makes people happy.
If you make these, I’d genuinely love to hear what you think. Did you add anything fun? Did your family lose their minds like mine did? Drop me a comment or send me a message—I read everything, and I love hearing how my recipes work in your kitchen.
Now go make yourself some pudding cups and enjoy the fact that you just made a legit dessert without breaking a sweat.
Recipe Card
No-Bake S'mores Pudding Cups
Ingredients
Method
- Whisk together milk and pudding mix in a medium bowl for two minutes until thickened. Set aside.
- In a small bowl, combine graham cracker crumbs, melted butter, and brown sugar. Mix until