No-Bake Oreo Dessert Cups – Creamy & Delicious
No-Bake Oreo Dessert Cups – Creamy & Delicious
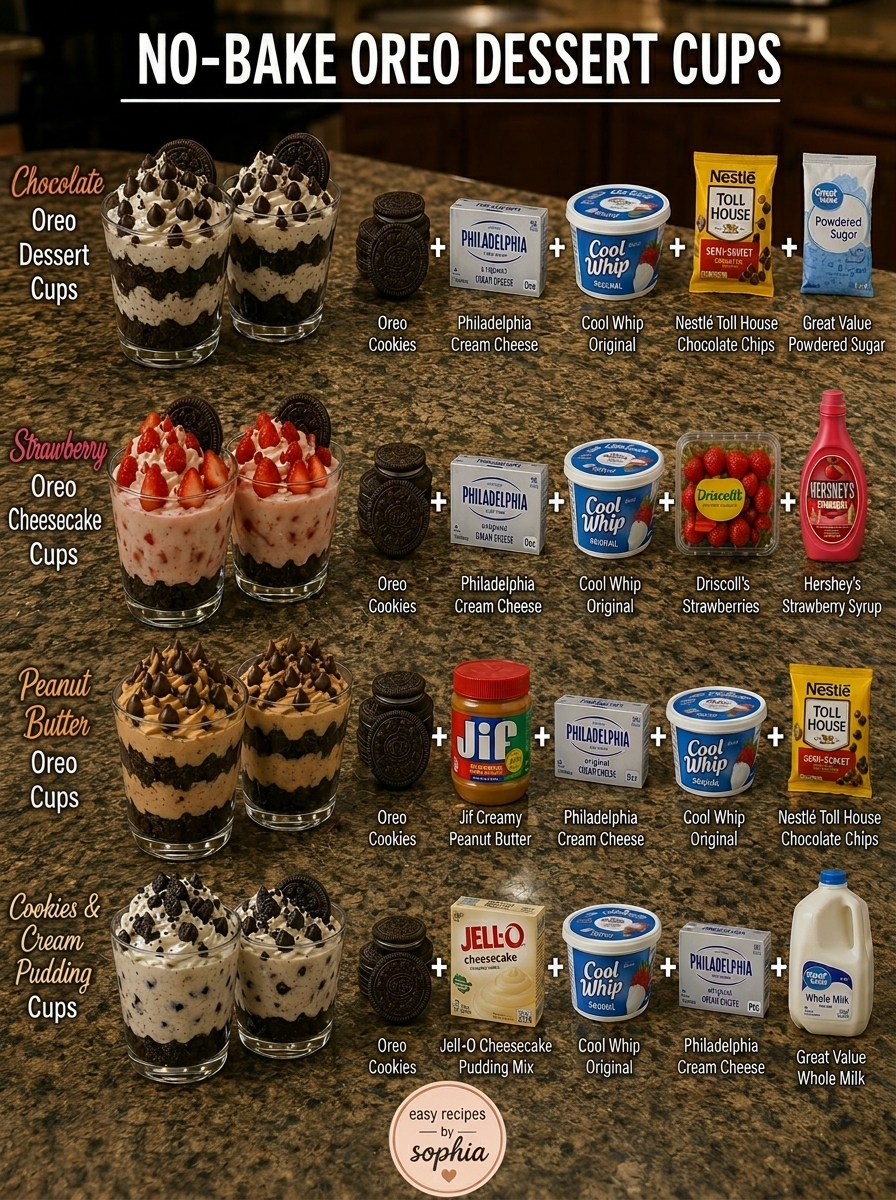
I’m so excited to share these no-bake Oreo dessert cups with you because, honestly, they’ve been a total game-changer in my kitchen. When you’re craving something sweet but don’t want to turn on the oven, these little cups are absolute lifesavers. They come together in minutes, look fancy enough to impress anyone, and taste like you spent way more time on them than you actually did. I’ve rounded up four of my favorite variations so you can pick your favorite or make them all.
What I love most about this collection is that each recipe brings something different to the table. Whether you’re Team Classic Chocolate, obsessed with strawberry cheesecake, a peanut butter devotee, or you just want something creamy and indulgent, there’s a cup here for you. They’re perfect for meal prep, last-minute desserts, or when you just need a little treat that doesn’t require baking. These are definitely worth saving because they’re so versatile and reliable.
If you find yourself making these over and over, I’d love for you to Follow me on HaileeRecipes on Pinterest so you never miss a new recipe. I’m constantly sharing quick desserts and no-bake treats that fit perfectly into busy lives. Now let’s get into these delicious cups!
1. Chocolate Oreo Dessert Cups
These no-bake Chocolate Oreo Dessert Cups deliver an indulgent treat with minimal effort. Layers of crushed Oreos mixed with creamy filling create a rich, cookie-forward flavor with satisfying texture contrasts. The chocolate ganache topping adds elegance and depth. Perfect for potlucks, dinner parties, or whenever you need an impressive dessert without turning on the oven. These cups come together in minutes and taste like you spent hours in the kitchen.
Why You’ll Love It
- Completely no-bake, requiring no oven time or special equipment.
- Impressive presentation in individual cups that feels restaurant-quality.
- Make-ahead friendly, allowing you to prepare them days in advance.
Ingredients
- 20 Oreo cookies, crushed into crumbs
- 4 tablespoons unsalted butter, melted
- 8 ounces cream cheese, softened
- 1 cup heavy whipping cream
- 1/2 cup powdered sugar
- 1 teaspoon vanilla extract
- 6 ounces semi-sweet chocolate, chopped
- 1/2 cup heavy cream for ganache
- Crushed Oreos for topping
How To Make It
- Combine crushed Oreos with melted butter and press the mixture firmly into the bottom of six to eight clear dessert cups or small jars to create the crust layer.
- Beat softened cream cheese with powdered sugar and vanilla extract until smooth and fluffy, about 2 minutes.
- In a separate bowl, whip heavy whipping cream to stiff peaks, then gently fold it into the cream cheese mixture until no streaks remain.
- Divide the cream mixture evenly among the cups, spreading it over the Oreo crust and smoothing the tops.
- Heat the heavy cream until steaming, then pour it over the chopped chocolate and let sit for one minute before stirring until glossy and smooth.
- Allow the ganache to cool for 5 minutes, then spoon it evenly over each cup.
- Refrigerate the cups for at least 30 minutes until the ganache sets completely.
- Top with additional crushed Oreos just before serving for fresh texture and visual appeal.
Variations And Substitutions
Swap semi-sweet chocolate for dark chocolate or milk chocolate depending on your preference. Replace the cream cheese layer with whipped mascarpone for a lighter Italian twist. Use crushed vanilla wafers or graham crackers instead of Oreos for a different flavor profile. Add a tablespoon of espresso powder to the ganache for a mocha variation, or stir in a splash of peppermint extract for holiday flair.
Make-Ahead, Storage, And Serving Tips
Prepare these cups up to three days ahead, storing them covered in the refrigerator. The flavors actually improve as they meld together overnight. Transport them carefully in a sturdy container to prevent shifting. Serve chilled directly from the refrigerator for the best texture. If the ganache cracks when serving, let the cups sit at room temperature for five minutes. These cups can be frozen for up to two weeks; thaw in the refrigerator before enjoying.
2. Strawberry Oreo Cheesecake Cups
These elegant Strawberry Oreo Cheesecake Cups combine creamy cheesecake filling with crunchy Oreo cookie crusts and fresh strawberry toppings for a dessert that tastes indulgent but requires zero baking. The contrast between the buttery cookie base, smooth cheesecake layer, and bright berries creates a sophisticated flavor profile that feels restaurant-quality. Perfect for dinner parties, potlucks, or when you want an impressive dessert without turning on the oven, these cups come together in minutes and chill while you prepare the rest of your meal.
Why You’ll Love It
- No oven required—everything is assembled and chilled, making it perfect for hot summer days.
- Can be made up to two days ahead, reducing last-minute stress when entertaining.
- Looks fancy enough to impress guests but simple enough for a weeknight treat.
Ingredients
- 16 Oreo cookies, divided
- 3 tablespoons melted butter
- 8 ounces cream cheese, softened
- 1/2 cup heavy whipping cream
- 1/4 cup powdered sugar
- 1/2 teaspoon vanilla extract
- 1 cup fresh strawberries, sliced
- 2 tablespoons strawberry jam
How To Make It
- Crush 12 Oreos into fine crumbs using a food processor or by placing them in a sealed bag and crushing with a rolling pin. Mix the crumbs with melted butter until the texture resembles wet sand.
- Divide the Oreo mixture evenly among four clear cups or small jars, pressing firmly into the bottom of each to create a compact crust.
- Beat the softened cream cheese in a bowl until smooth and creamy, about 1 minute. Add powdered sugar and vanilla extract, mixing until combined.
- In a separate bowl, whip the heavy cream to stiff peaks using an electric mixer. Gently fold the whipped cream into the cream cheese mixture until no white streaks remain.
- Divide the cheesecake mixture evenly among the four cups, spooning it over the Oreo crust and smoothing the tops.
- Chop the remaining 4 Oreos into bite-sized pieces and sprinkle over the cheesecake layer for decoration and texture.
- Warm the strawberry jam slightly and toss with the sliced strawberries. Top each cup with the strawberry mixture just before serving.
Variations And Substitutions
Replace strawberries with raspberries, blueberries, or blackberries for different fruit flavors. Swap the strawberry jam for chocolate sauce or caramel for a different topping. Use crushed vanilla wafers or graham crackers instead of Oreos for a lighter cookie base. Add a tablespoon of lemon zest to the cheesecake filling for a citrusy twist, or stir in a tablespoon of coffee liqueur for an adult version.
Make-Ahead, Storage, And Serving Tips
Assemble these cups up to two days ahead, keeping them covered in the refrigerator. Add the fresh strawberry topping no more than 2 hours before serving to prevent the berries from releasing too much liquid. Store in airtight containers for up to three days. For best results, serve chilled directly from the refrigerator. If the cheesecake filling becomes too soft, place the cups in the freezer for 15 minutes before serving. These cups can also be frozen for up to one month; thaw in the refrigerator for 4 hours before serving.
3. Peanut Butter Oreo Cups
These Peanut Butter Oreo Cups combine two beloved flavors in one creamy, crunchy no-bake treat. A smooth peanut butter filling is sandwiched between a chocolate-Oreo crust and topped with melted chocolate, creating a dessert with incredible texture contrast. The peanut butter layer is rich and satisfying while the Oreo pieces add delightful crunch throughout. Perfect for potlucks, holiday gatherings, or whenever you need an impressive dessert that requires zero baking skills. These cups come together in under 30 minutes of hands-on time and are sure to disappear quickly.
Why You’ll Love It
- Combines two classic flavors that taste amazing together without any baking required.
- Makes 12 individual servings that look fancy but come together effortlessly.
- Creamy, crunchy, and chocolatey all at once with balanced sweetness.
Ingredients
- 20 Oreo cookies, divided
- 4 tablespoons butter, melted
- 1 cup creamy peanut butter
- 1/2 cup powdered sugar
- 1 cup semi-sweet chocolate chips
- 2 tablespoons coconut oil
- 1/4 teaspoon sea salt
- 2 tablespoons roasted peanuts, finely chopped (optional)
How To Make It
- Line a muffin tin with 12 paper liners. Crush 15 Oreos into fine crumbs and mix with melted butter until resembles wet sand.
- Press about 2 tablespoons of the Oreo mixture firmly into the bottom of each liner to create a crust.
- In a bowl, mix peanut butter, powdered sugar, and sea salt until smooth and well combined.
- Chop the remaining 5 Oreos and fold them into the peanut butter mixture.
- Divide the peanut butter filling evenly among the cups, pressing gently to compact.
- Melt chocolate chips and coconut oil together in a microwave-safe bowl in 30-second intervals, stirring between each, until smooth.
- Spoon chocolate over each peanut butter layer, spreading to edges and covering completely.
- Top with chopped peanuts if desired, then refrigerate for at least 2 hours until set.
Variations And Substitutions
Use dark chocolate instead of semi-sweet for a less sweet version. Substitute natural peanut butter if preferred, though it may be slightly oilier. Add a drizzle of white chocolate on top for visual appeal. For a nuttier twist, use almond butter instead of peanut butter. You can also swap the Oreos in the filling for crushed candy pieces like Reese’s cups or chocolate-covered pretzels for different flavor combinations.
Make-Ahead, Storage, And Serving Tips
These cups can be made up to 5 days ahead and stored in an airtight container in the refrigerator. They also freeze beautifully for up to 3 weeks. Remove from the freezer 10-15 minutes before serving if you prefer them slightly softer. Keep them chilled until serving, as warm peanut butter filling can become messy. If the chocolate layer cracks during unmolding, simply warm a knife under hot water and smooth it out gently. These are best enjoyed cold straight from the refrigerator.
4. Cookies & Cream Pudding Cups
These elegant Cookies & Cream Pudding Cups deliver creamy, dreamy indulgence with minimal effort. Layers of rich chocolate pudding, whipped cream, and crushed Oreos create a sophisticated dessert that tastes like you spent hours in the kitchen. The combination of smooth pudding, airy whipped topping, and crunchy cookie pieces provides wonderful textural contrast in every spoonful. Perfect for dinner parties, potlucks, or when you need an impressive dessert that requires no baking, these cups come together in about 15 minutes and can be prepared hours ahead.
Why You’ll Love It
- Completely no-bake and requires just basic ingredients you likely have on hand
- Individual servings look restaurant-quality and feel special without complicated techniques
- Naturally gluten-free when using certified Oreos, and easily customizable for dietary needs
Ingredients
- 2 cups whole milk
- 1 package instant chocolate pudding mix
- 1 cup heavy whipping cream
- 2 tablespoons powdered sugar
- 1 teaspoon vanilla extract
- 20 Oreo cookies, divided
- 4 clear glass cups or dessert bowls
How To Make It
- Prepare the chocolate pudding according to package directions using the 2 cups of milk, then divide evenly among your four cups, filling each about one-third of the way.
- Place the heavy whipping cream, powdered sugar, and vanilla extract in a chilled bowl and whip until stiff peaks form, about 2 to 3 minutes with an electric mixer.
- Crush 12 Oreo cookies into various sized pieces, ranging from fine crumbs to larger chunks, and fold three-quarters of these crushed cookies into the whipped cream.
- Spoon the cookies and cream mixture evenly over the pudding layer in each cup, filling to about two-thirds full.
- Crush the remaining 8 cookies into fine crumbs and sprinkle generously over the whipped cream layer as a topping.
- Separate the remaining whole or half Oreos and place one on top of each cup for an elegant garnish.
- Refrigerate for at least 30 minutes before serving to allow flavors to meld and texture to set.
Variations And Substitutions
Swap the chocolate pudding for vanilla, butterscotch, or cookies and cream flavored pudding for different taste profiles. Use crushed Mint Oreos for a minty twist, or layer in a small amount of chocolate sauce between the pudding and cream layers. For a lighter version, substitute half the heavy cream with Greek yogurt. You can also add a tablespoon of coffee liqueur or instant espresso powder to the whipped cream for enhanced chocolate flavor.
Make-Ahead, Storage, And Serving Tips
These pudding cups are ideal for make-ahead entertaining and can be assembled up to 24 hours in advance, though the cookie topping stays crispest if added within 4 hours of serving. Store covered in the refrigerator and add the final cookie garnish just before serving to prevent softening. If your pudding seems too thick, whisk in a splash of milk to reach the desired consistency. These cups are best served chilled directly from the refrigerator and should be consumed within two days for optimal texture and flavor.
Final Thoughts
No-bake Oreo dessert cups are the perfect solution when you want something sweet without heating up your kitchen. Whether you’re drawn to the classic simplicity of a chocolate-Oreo combo or eager to experiment with fun flavor twists, there’s a recipe here that will speak to your taste buds. These treats come together quickly, require minimal ingredients, and deliver maximum indulgence—making them ideal for busy weeknights, last-minute gatherings, or whenever a craving strikes.
We encourage you to start with whichever recipe sounds most appealing to you right now. If you’re a purist, go for the traditional version. If you love a little adventure, try the peanut butter or mint variation. Once you master the basic technique, you’ll find yourself making these cups again and again, each time discovering new ways to customize them to your liking.
Chocolate Oreo Dessert Cups
Ingredients
Method
- Melt semi-sweet chocolate chips with coconut oil in a microwave-safe bowl in 30-second intervals, stirring until smooth.
- Combine crushed Oreo cookies with melted butter and salt in a small bowl.
- Spoon 2 tablespoons of melted chocolate into the bottom of each serving cup or ramekin, then add 2 tablespoons of the Oreo mixture on top, pressing gently.
- Beat softened cream cheese and powdered sugar together until fluffy, then fold in heavy whipping cream and vanilla extract until well combined.
- Pipe or spoon the cream cheese mixture evenly over the Oreo layer in each cup.
- Top each dessert cup with remaining melted chocolate and garnish with a whole Oreo cookie.
- Refrigerate for at least 2 hours before serving.