Strawberry Cheesecake Slice
Strawberry Cheesecake Slice
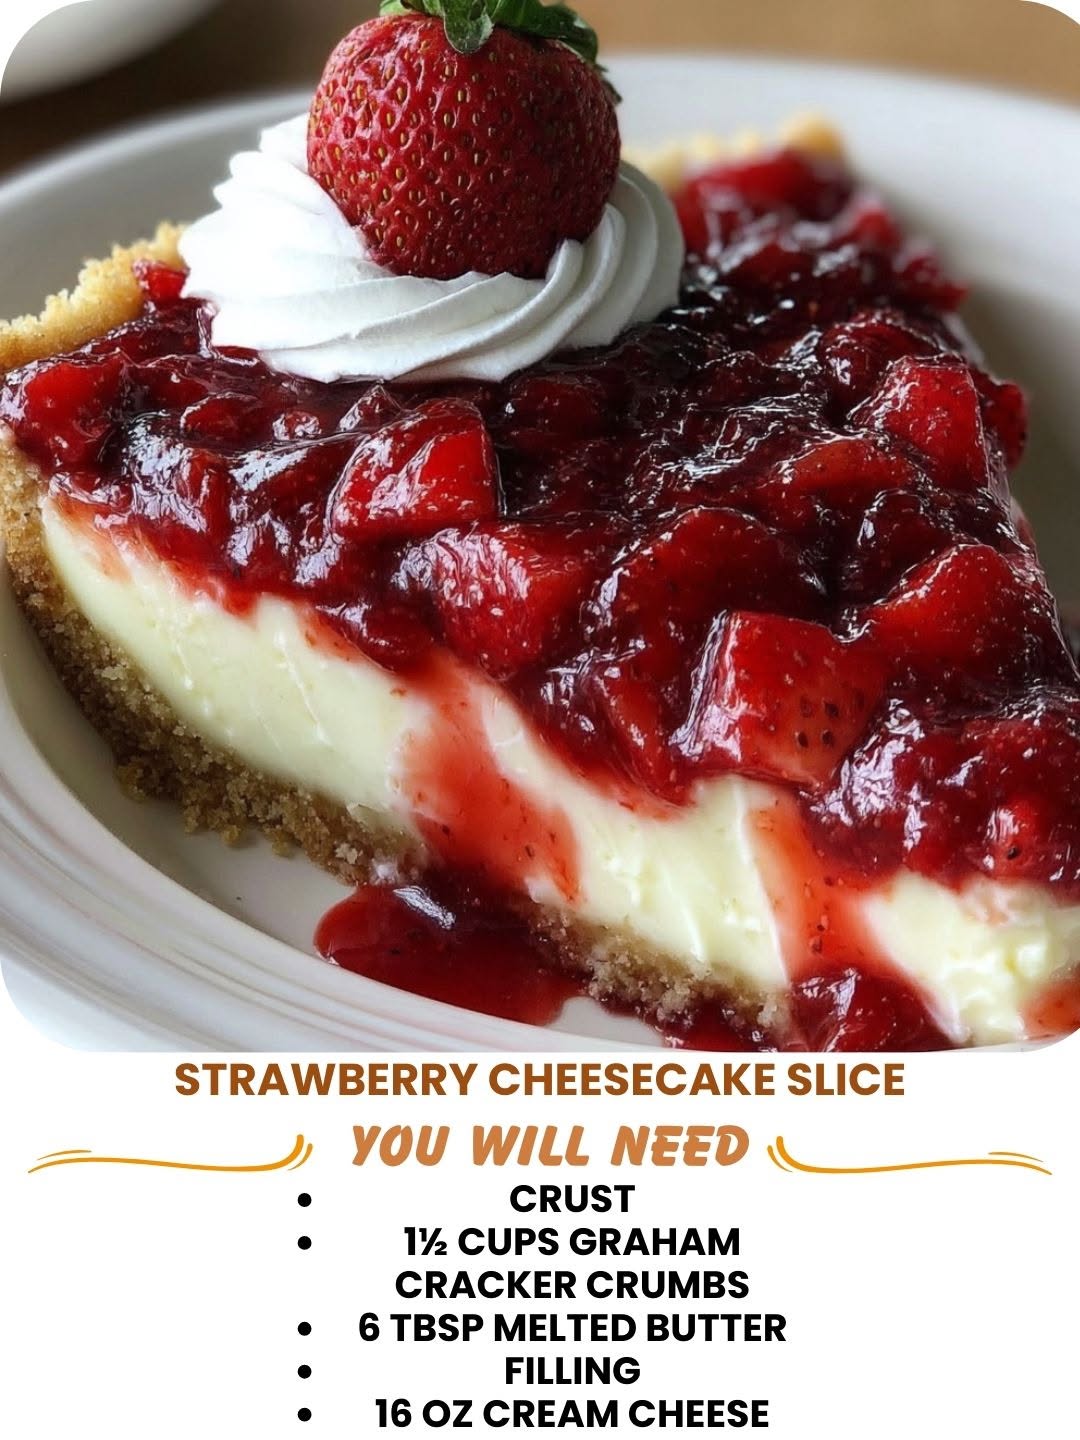
Strawberry Cheesecake Slice: The Dessert That Feels Like a Hug
I’m going to be honest with you—I created this Strawberry Cheesecake Slice on a Tuesday night when I was craving something that tasted like summer but didn’t require me to spend three hours in the kitchen. I’d just finished a long day of testing recipes, my kitchen was a disaster, and I wanted something that would make me feel cozy without adding to the mess. So I grabbed what I had on hand: cream cheese, a few strawberries that were getting a little too ripe, some graham crackers, and a moment of inspiration.
What came out of that kitchen that night was pure magic. This isn’t your grandmother’s cheesecake—though I love those too. This is something simpler, more forgiving, and honestly more fun. It’s a no-fuss dessert that looks like you spent way more effort than you actually did. The kind of thing you can make on a random Tuesday and feel proud of yourself for the rest of the week.
Here’s what makes it special: you get a buttery, crispy graham cracker crust, a silky-smooth cheesecake layer that’s rich but not heavy, and a bright, fresh strawberry topping that keeps everything from feeling too decadent. It’s elegant enough to serve at a dinner party, but casual enough to eat straight from the pan with a fork while binge-watching your favorite show. And yes, I do that. No judgment here.
This recipe is for anyone who loves cheesecake but wants something a little less intimidating than a full-sized cake. It’s for the person who wants to impress their friends without losing their mind. It’s for late-night cravings, weekend gatherings, and those moments when you need a little sweetness in your life. If you love strawberries and cream cheese, this is your recipe. And if you’d like more ideas like this, follow me on HaileeRecipes on Pinterest where I share all my favorite cozy kitchen moments.
Why You’ll Love This Recipe
Let me break down exactly why this dessert has become one of my most-requested recipes.
- It’s genuinely easy. No water bath, no fancy equipment, no temperamental oven tricks. Just mix, press, bake, chill, and enjoy.
- It looks impressive. Seriously, people will think you went to culinary school. The presentation is naturally beautiful, and that matters.
- It’s flexible. You can make it ahead, customize the toppings, swap ingredients, and adapt it to whatever you have in your kitchen.
- The texture is perfect. Creamy, smooth, not too heavy, with a satisfying crunch from the crust.
- It feeds a crowd. One pan makes enough for 8 to 12 servings, depending on how generous you’re feeling.
- It tastes fresh and summery. The strawberries keep it bright, so it doesn’t feel like an overly heavy dessert.
Ingredients
For the Crust:
- 1 1/2 cups graham cracker crumbs (about 10-12 full crackers)
- 1/3 cup melted butter
- 2 tablespoons sugar
- Pinch of salt
For the Cheesecake Layer:
- 16 oz cream cheese, softened to room temperature
- 1/2 cup granulated sugar
- 1/4 cup sour cream
- 1 teaspoon vanilla extract
- 2 large eggs
- 2 tablespoons all-purpose flour
For the Topping:
- 1 1/2 pounds fresh strawberries, hulled and halved
- 3 tablespoons strawberry jam or preserves
- 1 tablespoon water
- 1 tablespoon lemon juice
Hailee’s Tip: Make sure your cream cheese is actually soft. I’m talking leave-it-on-the-counter-for-30-minutes soft. Cold cream cheese will give you lumps, and nobody wants that. Trust me, I learned this the hard way.
Hailee’s Tip: Use full-fat sour cream here. It makes a difference in the texture and flavor. I know it’s tempting to go light, but this is dessert—let yourself have the real thing.
Hailee’s Tip: Fresh strawberries are non-negotiable for the topping. Frozen ones will get watery and sad-looking. Save the frozen ones for smoothies.
Optional Add-Ins and Variations
This is where you get to play around and make this recipe your own. Here are my favorite tweaks:
- Lemon zest: Add 1 teaspoon of lemon zest to the cheesecake mixture. It brightens everything up beautifully.
- Almond extract: Use 1/2 teaspoon almond extract instead of vanilla. It pairs wonderfully with strawberries.
- Honey drizzle: Drizzle a little raw honey over the top before serving. Adds sweetness and a gorgeous shine.
- Candied ginger: Chop up a little candied ginger and sprinkle it on top. Sounds weird, tastes amazing.
- Chocolate crust: Replace half the graham crackers with crushed chocolate cookies. Yes, chocolate and strawberry together. Always.
- Whipped cream topping: Dollop some fresh whipped cream on each slice before serving.
Step-by-Step Method
Step 1: Prepare Your Pan
Preheat your oven to 325°F. Line an 8×8-inch square baking pan with parchment paper, letting it hang over the edges a bit. This makes it so much easier to lift the whole thing out later. Trust me on this.
Step 2: Make the Crust
In a small bowl, mix together your graham cracker crumbs, melted butter, sugar, and salt. Stir it until it looks like wet sand—you want everything evenly coated with butter. Press this mixture firmly into the bottom of your prepared pan. Use the bottom of a measuring cup to really pack it down. You want a solid, even layer. Bake this for about 8 minutes until it’s lightly golden and smells amazing.
Hailee’s What I Messed Up: The first time I made this, I didn’t press the crust down hard enough, and it ended up crumbly and falling apart when I cut into the finished dessert. Not the end of the world, but definitely annoying. Press it down like you mean it.
Step 3: Beat the Cream Cheese
While the crust is baking, grab your softened cream cheese and beat it with an electric mixer for about 2 minutes until it’s smooth and fluffy. This is important—you’re incorporating air, which helps the texture. Scrape down the sides of the bowl as you go.
Step 4: Add Sugar and Sour Cream
Add the sugar to your cream cheese and beat for another minute. Then add the sour cream and vanilla extract. Mix until everything is combined and smooth. The mixture should look creamy and light.
Step 5: Add Eggs and Flour
Add your eggs one at a time, beating on low speed after each addition. Once both eggs are in, add the flour and mix just until combined. Don’t overmix here—you don’t want to incorporate too much air or you’ll end up with cracks on top. Mix until you don’t see any streaks of flour, then stop.
Hailee’s What I Messed Up: I once beat this mixture way too much because I was worried about lumps, and the cheesecake came out with a bunch of cracks across the top. It still tasted great, but it looked a little rough. Gentle mixing is your friend here.
Step 6: Pour and Bake
Remove the crust from the oven and let it cool for just a minute. Then pour your cheesecake mixture over it and smooth the top. Bake for 20 to 25 minutes. You’re looking for the edges to be set but the center to still jiggle just slightly when you gently shake the pan. It should look almost done but not quite. This is the sweet spot for creamy texture.
Step 7: Cool Slowly
Turn off the oven and crack the door open about 2 inches. Let the cheesecake sit in the warm oven for 15 minutes. This gentle cooling prevents sudden temperature changes that cause cracks. Then remove it from the oven and let it cool completely on the counter.
Step 8: Chill
Once it’s cooled, cover it with plastic wrap and refrigerate for at least 4 hours, but ideally overnight. I know this is the hardest part, but it’s so worth it. The cheesecake needs time to set up properly.
Step 9: Make the Strawberry Topping
When you’re ready to serve, warm the strawberry jam with the water and lemon juice in a small saucepan over low heat. Stir until it’s smooth and pourable. Let it cool for a minute, then gently toss your fresh strawberries in this glaze. Arrange them on top of the cheesecake however you like.
Common Mistakes to Avoid
Using cold cream cheese: This is the number-one culprit for lumpy cheesecake. Take it out of the fridge 30 minutes before you start. Seriously.
Overmixing the batter: More mixing doesn’t equal better results. Mix until combined, then stop. Your future self will thank you when there are no cracks on top.
Overbaking: The center should still have a tiny bit of jiggle. If it looks completely set, you’ve gone too far. It’ll continue to cook as it cools.
Skipping the slow cooling: That crack-free top is worth those extra 15 minutes in the warm oven. Don’t rush it.
Not chilling long enough: I know you want to eat it right away, but give it at least 4 hours. The flavor actually improves as it sits.
Using thawed frozen strawberries: They release too much liquid and make everything soggy. Fresh is the way to go here.
My Tested Substitutions
Can I use a different pan size? Yes, but adjust your baking time. A 9×9-inch pan will need a few extra minutes. A smaller 6×6-inch pan will bake faster. Just keep an eye on it.
What if I don’t have sour cream? Greek yogurt works in a pinch, though it’ll be slightly tangier. Use the same amount.
Can I use store-bought graham cracker crust? Absolutely. Skip the crust-making step and just use a pre-made one. No shame in that game.
What about a gluten-free version? Use gluten-free graham crackers for the crust and swap the all-purpose flour for gluten-free all-purpose flour in the cheesecake layer. Everything else stays the same.
Can I make this dairy-free? You’d need to use dairy-free cream cheese and sour cream, which I haven’t personally tested extensively. The results might be slightly different, so proceed with caution.
How to Customize
The beauty of this recipe is how adaptable it is. Here are some of my favorite ways to make it your own:
Berry Medley: Mix strawberries with raspberries and blueberries for a more complex flavor.
Chocolate Drizzle: Melt some dark chocolate and drizzle it over the top. Fancy and delicious.
Biscoff Crust: Replace the graham crackers with crushed Biscoff cookies. Caramel and strawberry together? Yes, please.
Brown Butter Crust: Brown your butter before mixing it into the crust. It adds a nutty depth that’s incredible.
Mint Cheesecake: Add 1/2 teaspoon of peppermint extract to the filling. Fresh and summery.
Serving Ideas
This dessert is stunning on its own, but here’s how I like to serve it:
- Cut into squares and serve on small plates with a fork. Elegant and easy.
- Serve with a dollop of fresh whipped cream on the side.
- Pair with a glass of sparkling rosé or a light dessert wine.
- Add a scoop of vanilla ice cream on top for extra indulgence.
- Dust with a tiny bit of powdered sugar for a fancy touch.
- Serve at room temperature for the creamiest texture, or cold for a firmer bite.
Meal Prep & Storage
How long does it last? Covered in the fridge, this keeps for up to 5 days. The strawberry topping is best added within a day of serving, though the cheesecake itself keeps longer.
Can I freeze it? Yes, wrap individual slices tightly in plastic wrap and freeze for up to 2 months. Thaw in the fridge overnight before eating. The texture will be slightly different but still delicious.
Make-ahead tip: You can bake the cheesecake up to 2 days ahead and keep it covered in the fridge. Add the strawberry topping on the day you’re serving.
Transport tip: If you’re taking this somewhere, keep it in the pan and cover it tightly. Add the strawberry topping right before serving so it stays fresh and pretty.
Nutritional Breakdown
Per serving (based on 12 servings):
- Calories: 285
- Protein: 5g
- Carbohydrates: 28g
- Fat: 17g
- Fiber: 1g
- Sugar: 22g
Keep in mind that these are estimates and can vary based on your specific ingredients and portion sizes. If you’re tracking macros, adjust accordingly.
Final Thoughts
This Strawberry Cheesecake Slice has become such a staple in my kitchen, and I hope it becomes one in yours too. It’s the kind of recipe that feels special without being stressful, impressive without being complicated. It’s what I make when I want to feel a little fancy but still like myself.
There’s something really lovely about making dessert that brings people together. Whether you’re serving it at a dinner party, packing it for a picnic, or eating it alone at midnight because you’ve had a day, this recipe is there for you. It’s forgiving, it’s delicious, and it’s absolutely worth the wait while it chills.
I’d love to know how this turns out for you. Did you add any fun variations? What’s your favorite way to serve it? That’s the stuff that makes cooking real and fun—hearing about what works in your kitchen, what you changed, what made you smile.
Happy baking, friends. You’ve got this.
Warmly,
Hailee
—
Strawberry Cheesecake Slice
Ingredients
Method
- Step 1: Prepare Your Pan Preheat your oven to 325°F. Line an 8x8-inch square baking pan with parchment paper, letting it hang over the edges a bit. This makes it so much easier to lift the whole thing out later. Trust me on this. Step 2: Make the Crust In a small bowl, mix together your graham cracker crumbs, melted butter, sugar, and salt. Stir it until it looks like wet sand—you want everything evenly coated with butter. Press this mixture firmly into the bottom of your prepared pan. Use the bottom of a measuring cup to really pack it down. You want a solid, even layer. Bake this for about 8 minutes until it's lightly golden and smells amazing. Hailee's What I Messed Up: The first time I made this, I didn't press the crust down hard enough, and it ended up crumbly and falling apart when I cut into the finished dessert. Not the end of the world, but definitely annoying. Press it down like you mean it. Step 3: Beat the Cream Cheese While the crust is baking, grab your softened cream cheese and beat it with an electric mixer for about 2 minutes until it's smooth and fluffy. This is important—you're incorporating air, which helps the texture. Scrape down the sides of the bowl as you go. Step 4: Add Sugar and Sour Cream Add the sugar to your cream cheese and beat for another minute. Then add the sour cream and vanilla extract. Mix until everything is combined and smooth. The mixture should look creamy and light. Step 5: Add Eggs and Flour Add your eggs one at a time, beating on low speed after each addition. Once both eggs are in, add the flour and mix just until combined. Don't overmix here—you don't want to incorporate too much air or you'll end up with cracks on top. Mix until you don't see any streaks of flour, then stop. Hailee's What I Messed Up: I once beat this mixture way too much because I was worried about lumps, and the cheesecake came out with a bunch of cracks across the top. It still tasted great, but it looked a little rough. Gentle mixing is your friend here. Step 6: Pour and Bake Remove the crust from the oven and let it cool for just a minute. Then pour your cheesecake mixture over it and smooth the top. Bake for 20 to 25 minutes. You're looking for the edges to be set but the center to still jiggle just slightly when you gently shake the pan. It should look almost done but not quite. This is the sweet spot for creamy texture. Step 7: Cool Slowly Turn off the oven and crack the door open about 2 inches. Let the cheesecake sit in the warm oven for 15 minutes. This gentle cooling prevents sudden temperature changes that cause cracks. Then remove it from the oven and let it cool completely on the counter. Step 8: Chill Once it's cooled, cover it with plastic wrap and refrigerate for at least 4 hours, but ideally overnight. I know this is the hardest part, but it's so worth it. The cheesecake needs time to set up properly. Step 9: Make the Strawberry Topping When you're ready to serve, warm the strawberry jam with the water and lemon