Delicious Dessert Bars for a Crowd
Delicious Dessert Bars for a Crowd
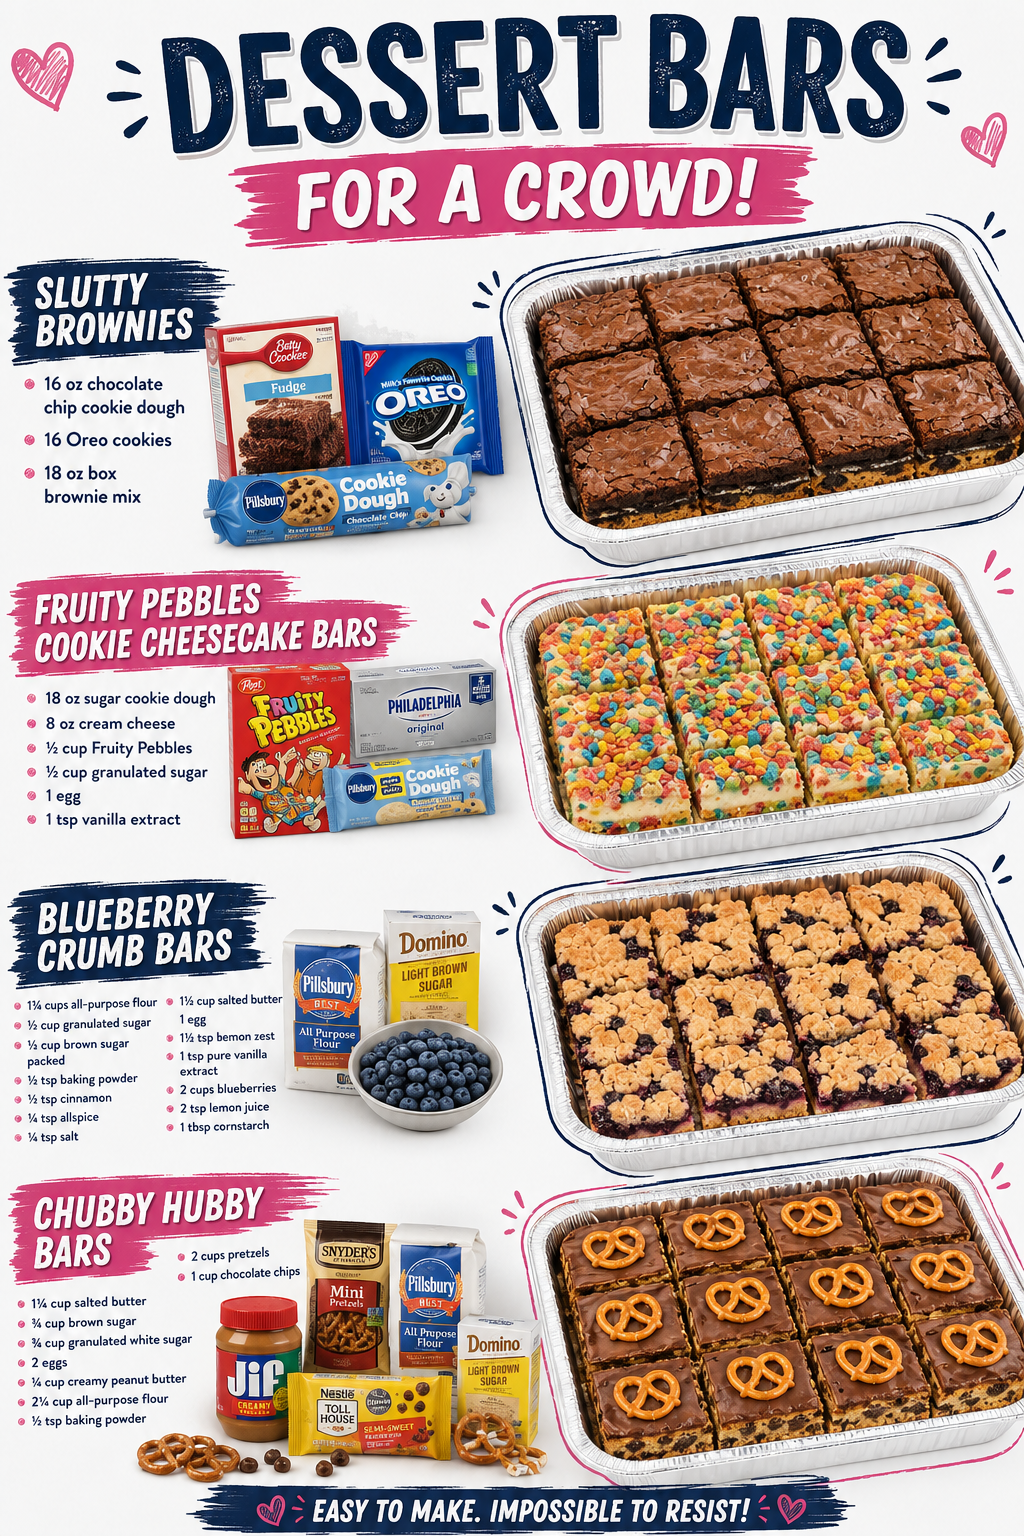
I’m always looking for dessert bars that can feed a crowd without keeping me in the kitchen all day, so I’ve rounded up my favorite recipes that do exactly that. These delicious dessert bars are the kind of treats that disappear fast at potlucks, parties, and family gatherings, and honestly, they’re so good that people will be asking for your recipe. Whether you’re planning a big celebration or just want to have something special on hand, these bars are total game-changers.
What I love most about these recipes is that they’re all make-ahead friendly, which means less stress on the day of your event. You can bake them the night before, store them in an airtight container, and you’re golden. Plus, each bar has its own personality, from fudgy and indulgent to fruity and fun, so there’s something for every dessert lover at your table. I’m talking about combinations like Slutty Brownies that stack layers of pure decadence, Fruity Pebbles Cookie Cheesecake Bars that bring back nostalgic vibes, Blueberry Crumb Bars with that perfect balance of fruit and buttery topping, and Chubby Hubby Bars that honestly live up to their name.
These are the kinds of recipes worth saving and coming back to again and again. If you want to keep discovering more crowd-pleasing treats like these, Follow me on HaileeRecipes on Pinterest where I share all my favorite baking inspiration. Now let’s get to these bars because I promise you, they’re about to become your new go-to dessert solution.
1. Slutty Brownies
Slutty Brownies are the ultimate indulgence for chocolate lovers—a decadent three-layer dessert combining fudgy brownies, creamy cookie dough, and melted chocolate chips. This show-stopping bar delivers intense chocolate flavor with rich, gooey textures that meld together beautifully. The combination of brownie base, sweet cookie dough middle, and chocolate topping creates a dessert that’s both visually impressive and irresistibly delicious. Perfect for potlucks, parties, or whenever you need to feed a crowd something guaranteed to impress.
Why You’ll Love It
- Three layers of chocolate heaven in every bite—brownie, cookie dough, and melted chocolate
- No baking required for the middle layer, making assembly quick and foolproof
- Cuts into neat squares that transport easily and look beautiful on a dessert table
Ingredients
- 1 box brownie mix plus ingredients listed on box
- 1 cup butter, softened
- 2 cups brown sugar
- 2 cups all-purpose flour
- 1 teaspoon vanilla extract
- 2 cups chocolate chips
- 1 tablespoon coconut oil or shortening
How To Make It
- Prepare and bake the brownie mix according to package directions in a greased 9×13 inch baking pan. Allow to cool completely.
- While brownies cool, beat softened butter and brown sugar together until light and fluffy, about 2-3 minutes.
- Mix in the flour and vanilla extract until the dough comes together and resembles thick cookie dough.
- Spread the cookie dough mixture evenly over the cooled brownie layer, pressing gently to create an even surface.
- Combine chocolate chips and coconut oil in a microwave-safe bowl, heating in 30-second intervals and stirring until completely melted and smooth.
- Pour the melted chocolate over the cookie dough layer and spread evenly to the edges with an offset spatula or knife.
- Allow the chocolate layer to set at room temperature for 30 minutes, or refrigerate for 15 minutes until firm.
- Cut into squares using a sharp knife, wiping the blade between cuts for clean edges.
Variations And Substitutions
For a salted version, sprinkle fleur de sel over the chocolate layer before it sets. Swap the chocolate chips for white chocolate chips or a combination of milk and dark chocolate. If you prefer homemade brownies, use your favorite recipe instead of the box mix. Add a teaspoon of espresso powder to the cookie dough layer for enhanced chocolate flavor.
Make-Ahead, Storage, And Serving Tips
These bars keep well in an airtight container at room temperature for up to 5 days, or refrigerated for up to a week. For best results, store with parchment paper between layers. They can be made 2 days ahead and stored covered until serving. If the chocolate layer cracks when cutting, try using a hot, wet knife and wiping it clean between cuts. These bars travel beautifully for potlucks and actually taste better the next day as flavors meld together.
2. Fruity Pebbles Cookie Cheesecake Bars
These Fruity Pebbles Cookie Cheesecake Bars combine the best of both worlds: a buttery cookie crust studded with colorful cereal, topped with creamy cheesecake and finished with a crunch of Fruity Pebbles. The result is a dessert that’s visually stunning with its vibrant colors and offers multiple satisfying textures in every bite. The sweet, fruity cereal flavor pairs beautifully with tangy cheesecake, making these bars perfect for potlucks, picnics, or any gathering where you want a show-stopping dessert that tastes as good as it looks.
Why You’ll Love It
- Visually impressive with bright, eye-catching colors that appeal to both kids and adults.
- Combines familiar flavors of cereal and cheesecake for nostalgic comfort with elevated sophistication.
- Easier to serve than traditional cheesecake since bars are pre-portioned and no slicing required.
Ingredients
- 1 1/2 cups all-purpose flour
- 1/2 cup butter, softened
- 1/4 cup granulated sugar
- 1 cup Fruity Pebbles cereal, crushed
- 16 ounces cream cheese, softened
- 1/2 cup powdered sugar
- 1 teaspoon vanilla extract
- 1 cup heavy whipping cream
- 1/2 cup Fruity Pebbles cereal, whole pieces for topping
How To Make It
- Preheat your oven to 350 degrees Fahrenheit and line a 9×13-inch baking pan with parchment paper.
- Mix the flour, softened butter, granulated sugar, and crushed Fruity Pebbles together in a bowl until the mixture resembles coarse crumbs, then press firmly into the bottom of the prepared pan.
- Bake the crust for 10 to 12 minutes until lightly golden, then remove and let cool while you prepare the filling.
- Beat the softened cream cheese, powdered sugar, and vanilla extract together until smooth and fluffy, about 2 minutes.
- In a separate bowl, whip the heavy cream to stiff peaks, then gently fold it into the cream cheese mixture until no streaks remain.
- Spread the cheesecake filling evenly over the cooled crust and smooth the top with a spatula.
- Sprinkle the whole Fruity Pebbles pieces generously over the top of the filling.
- Refrigerate for at least 4 hours or until the filling is set and firm to the touch.
Variations And Substitutions
Swap Fruity Pebbles for other colorful cereals like Trix or Froot Loops for a different flavor profile. You can substitute the heavy cream with whipped topping if you prefer a lighter texture, or use a traditional baked cheesecake filling for a denser result. For a no-bake option, use a graham cracker crust instead of the cookie base and skip the baking step entirely.
Make-Ahead, Storage, And Serving Tips
These bars can be prepared up to two days in advance and stored covered in the refrigerator, making them ideal for party planning. Keep them chilled until serving to maintain the creamy texture and prevent the cereal from becoming soggy. If the cereal topping softens before serving, add a fresh sprinkle just before presenting. Cut with a hot, wet knife and wipe between cuts for clean edges. Store leftovers in an airtight container in the refrigerator for up to four days.
3. Blueberry Crumb Bars
Blueberry crumb bars combine a tender buttery shortbread base with a thick layer of juicy blueberries and a crunchy oat topping that adds wonderful texture contrast. These bars deliver bright, fruity flavor with a satisfying crumb that makes them perfect for picnics, potlucks, or casual gatherings. The beauty of this recipe is that it works equally well with fresh or frozen blueberries, making it convenient year-round. The bars are sturdy enough to transport and serve at room temperature, yet still taste delicious warm with a scoop of vanilla ice cream.
Why You’ll Love It
- Uses simple pantry ingredients and requires no special skills or equipment.
- Naturally portable and easy to cut into uniform squares for serving large groups.
- Works beautifully with frozen blueberries, so you can make it any season.
Ingredients
- 2 cups all-purpose flour
- 1 cup old-fashioned rolled oats
- 1 cup brown sugar, packed
- 1 cup unsalted butter, softened
- 1 teaspoon vanilla extract
- 3 cups fresh or frozen blueberries
- 1/4 cup granulated sugar
- 2 tablespoons cornstarch
- 1 tablespoon lemon juice
- 1/2 teaspoon salt
How To Make It
- Preheat your oven to 350 degrees Fahrenheit and line a 9 by 13-inch baking pan with parchment paper.
- In a large bowl, combine flour, oats, brown sugar, and salt. Add softened butter and vanilla extract, then mix with your hands or a pastry cutter until the mixture resembles coarse crumbs.
- Press two-thirds of the crumb mixture firmly into the bottom of your prepared pan to create an even base layer.
- In a separate bowl, toss blueberries with granulated sugar, cornstarch, and lemon juice until evenly coated. Spread this mixture over the base layer.
- Sprinkle the remaining crumb mixture evenly over the blueberry layer, pressing gently so it adheres.
- Bake for 35 to 40 minutes until the topping is golden brown and the blueberry filling is bubbling slightly at the edges.
- Allow the bars to cool completely in the pan on a wire rack before cutting into squares.
Variations And Substitutions
Swap blueberries for blackberries, raspberries, or a mixed berry combination for different flavor profiles. You can replace half the oats with chopped nuts like almonds or pecans for added crunch. For a spiced version, add one-half teaspoon of cinnamon or nutmeg to the crumb mixture. If you prefer less sugar, reduce the granulated sugar to three tablespoons without affecting the texture significantly.
Make-Ahead, Storage, And Serving Tips
These bars keep well in an airtight container at room temperature for up to four days, making them ideal for advance preparation. You can assemble the unbaked bars up to eight hours ahead and refrigerate before baking. For longer storage, freeze baked bars in a freezer-safe container for up to three months and thaw at room temperature before serving. If the topping browns too quickly, tent the pan loosely with foil during the final ten minutes of baking.
4. Chubby Hubby Bars
Chubby Hubby Bars bring together the beloved ice cream flavor combination of peanut butter, chocolate, and pretzels into a decadent dessert bar that’s perfect for feeding a crowd. These no-bake treats feature a buttery pretzel crust, creamy peanut butter filling, and a chocolate topping that creates layers of sweet and salty satisfaction. The combination of crunchy, smooth, and rich textures makes every bite irresistible. These bars are ideal for potlucks, parties, or whenever you need an impressive dessert that doesn’t require baking skills or complicated techniques.
Why You’ll Love It
- No-bake recipe means no oven time and minimal cleanup required
- The sweet and salty flavor combination appeals to almost everyone
- Makes a large batch that easily feeds 12-16 people from one pan
Ingredients
- 2 cups crushed pretzels
- 6 tablespoons butter, melted
- 1 cup creamy peanut butter
- 2 cups powdered sugar
- 1 cup chocolate chips
- 2 tablespoons coconut oil or shortening
- 1/4 teaspoon sea salt
- 1/2 cup chopped roasted peanuts (optional)
How To Make It
- Line a 9×13-inch baking pan with parchment paper, leaving overhang on the sides for easy removal.
- Mix crushed pretzels with melted butter until evenly coated, then press firmly into the bottom of the prepared pan to form a compact crust.
- In a bowl, beat together peanut butter and powdered sugar until smooth and creamy, then spread this mixture evenly over the pretzel crust.
- Melt chocolate chips and coconut oil together in a microwave-safe bowl in 30-second intervals, stirring between each interval until completely smooth.
- Pour the melted chocolate over the peanut butter layer and spread evenly to the edges, then sprinkle with sea salt and chopped peanuts if desired.
- Refrigerate for at least 2 hours until the chocolate is completely set and firm to the touch.
- Using the parchment paper overhang, lift the entire bar out of the pan and cut into squares with a sharp knife dipped in hot water between cuts.
Variations And Substitutions
Swap creamy peanut butter for almond butter or sunflower seed butter for a different nut flavor. Use milk chocolate instead of semi-sweet for a sweeter topping, or try white chocolate for a completely different taste. Replace regular pretzels with honey roasted pretzels for added sweetness, or crush them more finely for a tighter crust. Add a drizzle of caramel sauce over the chocolate layer before it sets, or sprinkle crushed candy bars like Snickers or Reese’s cups on top.
Make-Ahead, Storage, And Serving Tips
These bars can be made up to 5 days in advance and stored in an airtight container in the refrigerator, making them perfect for advance party planning. Keep them chilled until just before serving, as they soften at room temperature. For longer storage, freeze the bars in a single layer on a baking sheet before transferring to a freezer bag for up to 2 months. If the chocolate cracks when cutting, let the bars sit at room temperature for 5-10 minutes to soften slightly. These bars are best served cold and pair wonderfully with milk, coffee, or as an after-dinner treat.
Final Thoughts
Dessert bars are the perfect solution when you need to feed a crowd without spending all day in the kitchen. Whether you’re drawn to the fudgy richness of brownies, the bright citrus notes of lemon bars, or the comforting crunch of shortbread, there’s a recipe here that will become your new go-to. The best part is that most of these treats can be made ahead, allowing you to focus on enjoying time with your guests rather than last-minute baking stress.
Pick whichever recipe calls to you first, and don’t hesitate to make it your own with your favorite mix-ins or toppings. Your crowd will be impressed by how effortless these bars seem, and you’ll love having a reliable recipe in your back pocket for any gathering. Happy baking!
Delicious Dessert Bars for a Crowd
Ingredients
Method
- Slutty Brownies: Prepare brownie batter and layer with crushed Oreos and cookie dough in a 9x13 pan, then top with chocolate chips.
- Slutty Brownies: Bake at 350°F for 35-40 minutes until a toothpick comes out with fudgy crumbs.
- Fruity Pebbles Cookie Cheesecake Bars: Press sugar cookie dough mixed with Fruity Pebbles into a baking pan as the base layer.
- Fruity Pebbles Cookie Cheesecake Bars: Spread cheesecake filling over base and bake at 325°F for 25-30 minutes until set.
- Blueberry Crumb Bars: Mix flour, oats, brown sugar, and butter to create crumb mixture, then layer half in pan with blueberries on top.
- Blueberry Crumb Bars: Cover berries with remaining crumb mixture and bake at 350°F for 30-35 minutes until golden.
- Chubby Hubby Bars: Melt peanut butter and butter together, stir in pretzels and caramel bits, press into prepared pan.
- Chubby Hubby Bars: Top with melted chocolate chips and refrigerate for 2 hours until firm, then cut into bars.
Notes
Fruity Pebbles Cookie Cheesecake Bars Tips: Let cool to room temperature before refrigerating for 4 hours. These are best served chilled and can be made 1 day ahead.
Blueberry Crumb Bars Tips: Use frozen blueberries if fresh are unavailable. Store covered at room temperature for 2 days or refrigerate up to 5 days.
Chubby Hubby Bars Tips: Keep refrigerated as they soften at room temperature. These freeze beautifully for up to 2 months and are perfect for make-ahead entertaining.